> For the complete documentation index, see [llms.txt](https://docs.cloudeka.ai/llms.txt). Markdown versions of documentation pages are available by appending `.md` to page URLs; this page is available as [Markdown](https://docs.cloudeka.ai/deka-gpu-documentations/panduan-untuk-enterprise/deka-flexi/deka-flexi-instance/create-vm-instance.md).

# Membuat Instance VM

{% hint style="danger" %}
Sebelum membuat instance atau VM, Anda harus membuat jaringan Virtual Private Cloud (VPC) di [Create VPC Network](/deka-gpu-documentations/panduan-untuk-enterprise/deka-flexi/deka-flexi-network/vpc-network/create-vpc-network.md), dan membuat Server Group terlebih dahulu di Create Server Group.
{% endhint %}

Bagian ini menjelaskan cara membuat Virtual Machine. Virtual Machine (VM) adalah versi virtual dari komputer fisik. Perangkat lunak mesin virtual dapat menjalankan program dan sistem operasi, menyimpan data, terhubung ke jaringan, serta melakukan fungsi komputasi lainnya.

### Membuat Instance dengan Sistem Operasi

Public Image disediakan oleh Cloudeka secara default. Semua pelanggan memiliki akses ke image ini dan dapat menggunakannya untuk membuat instance.

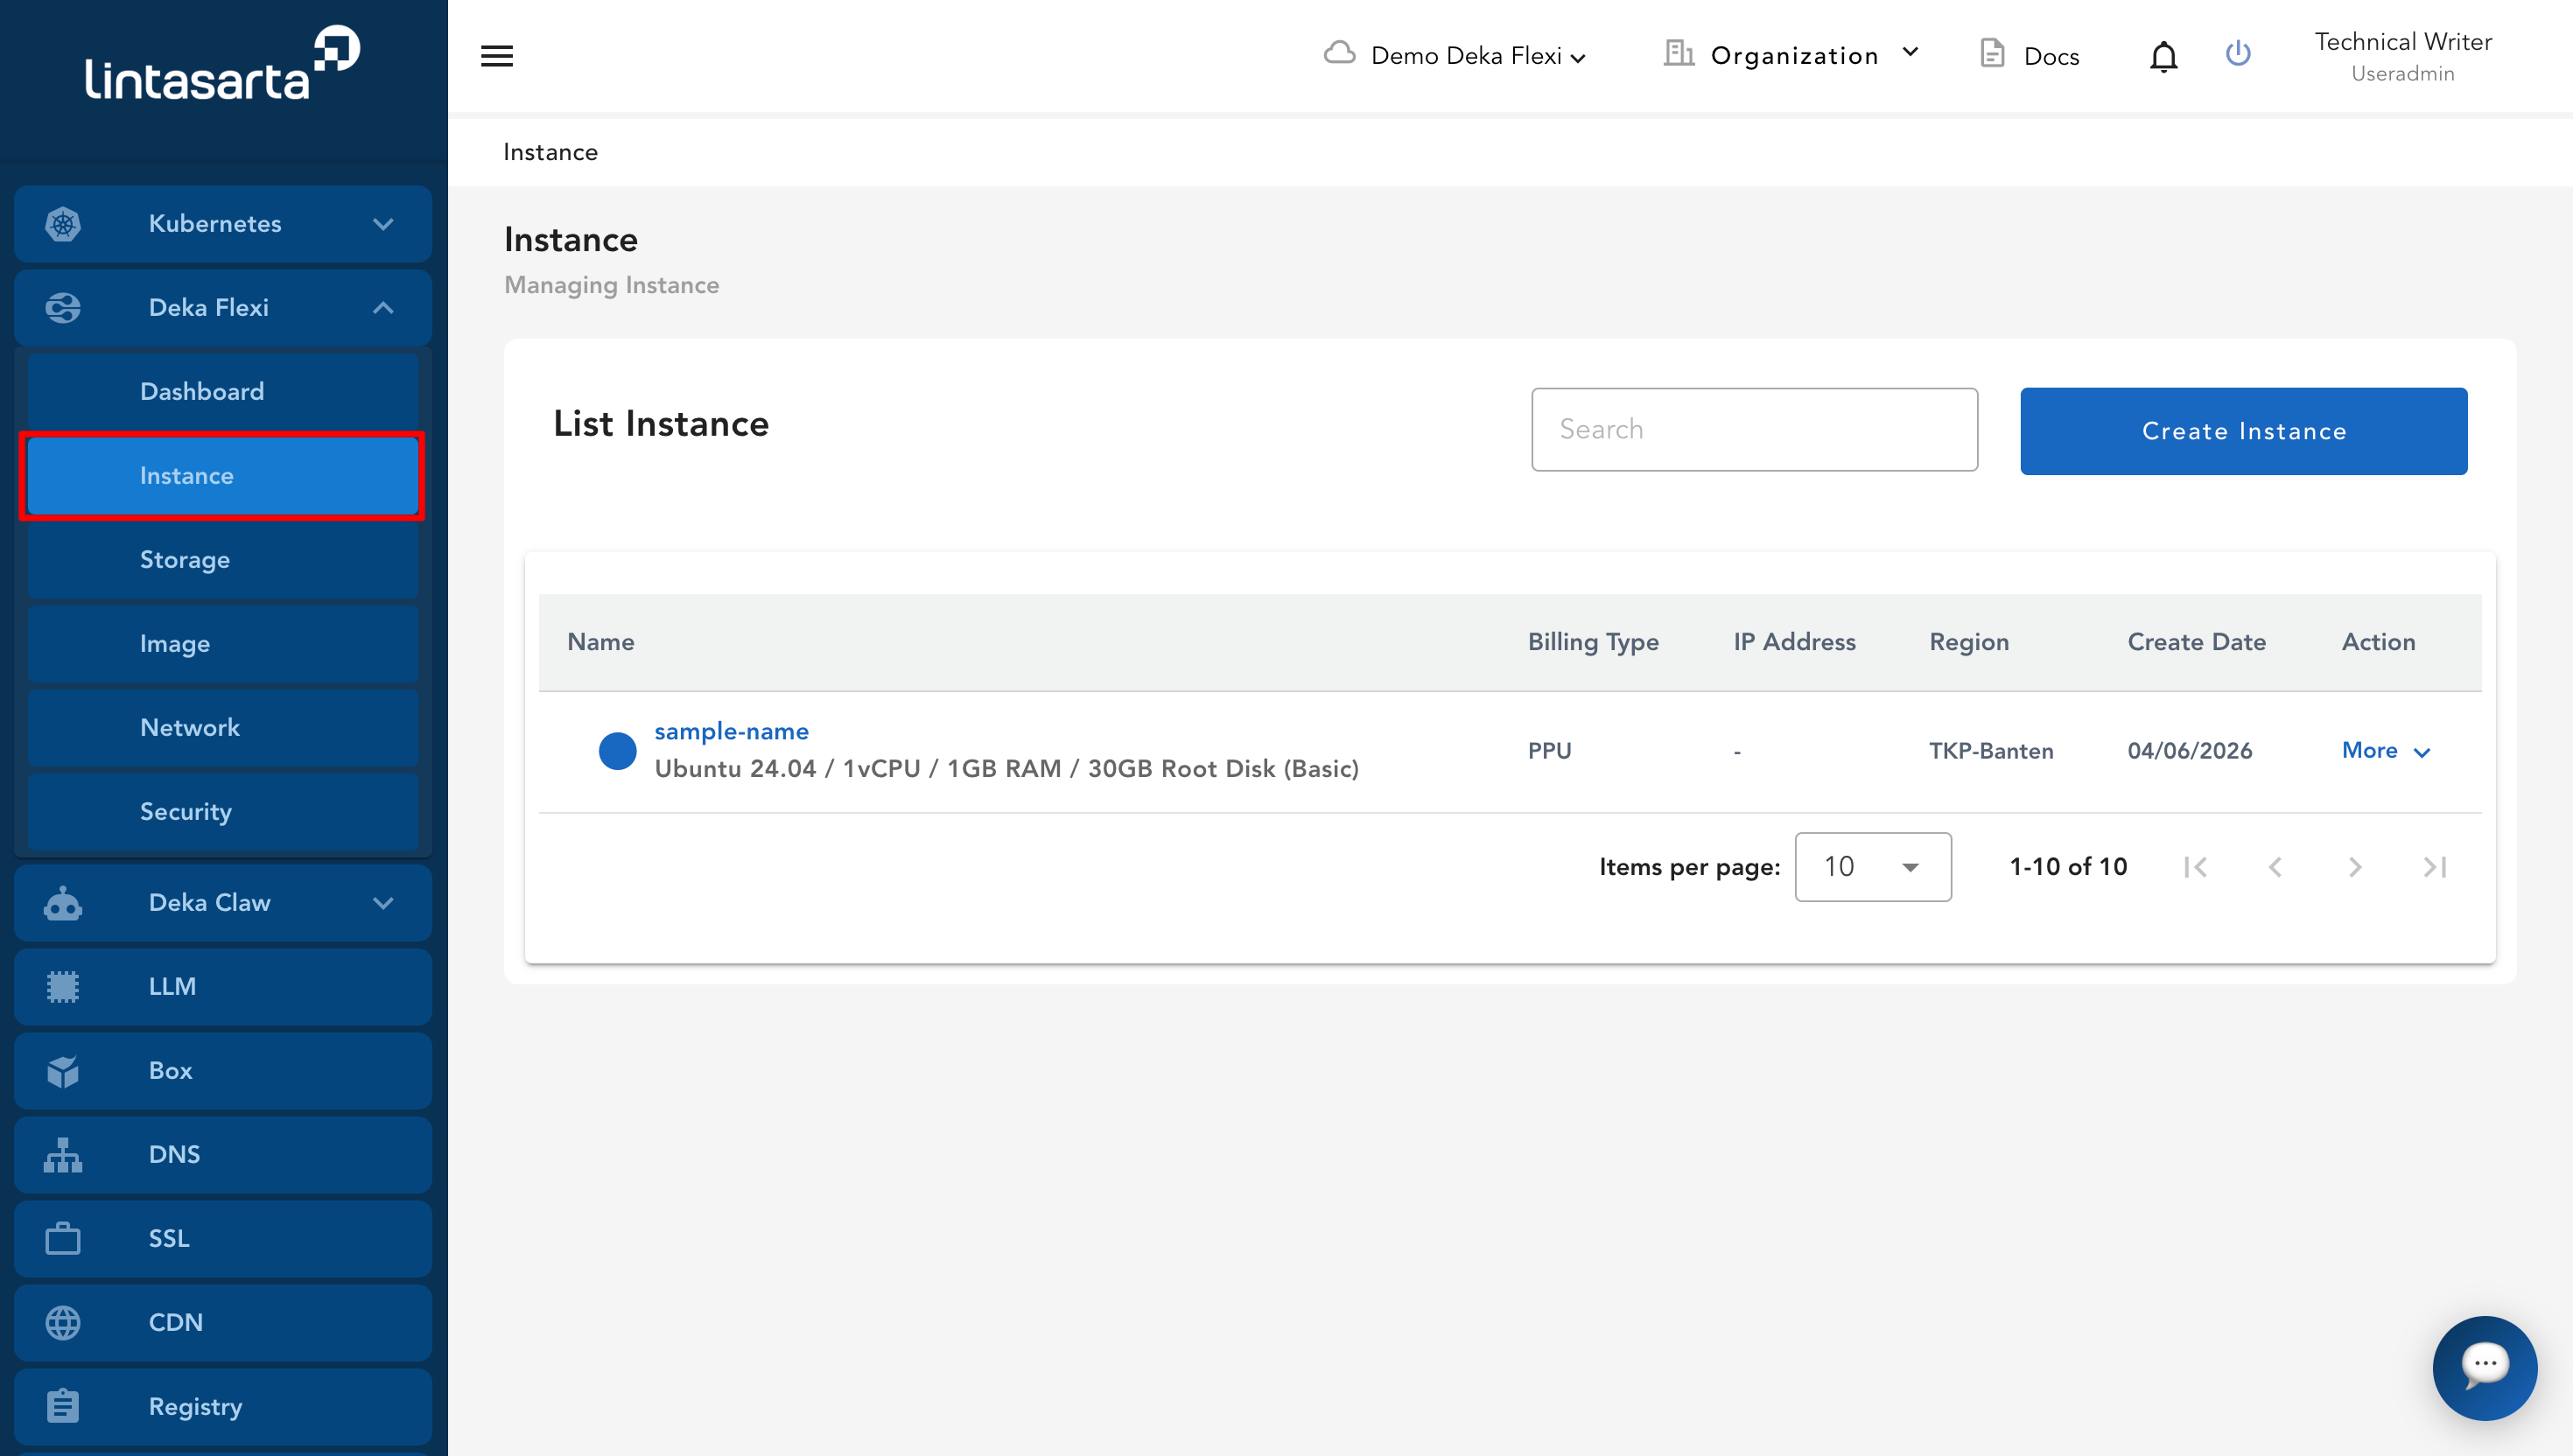
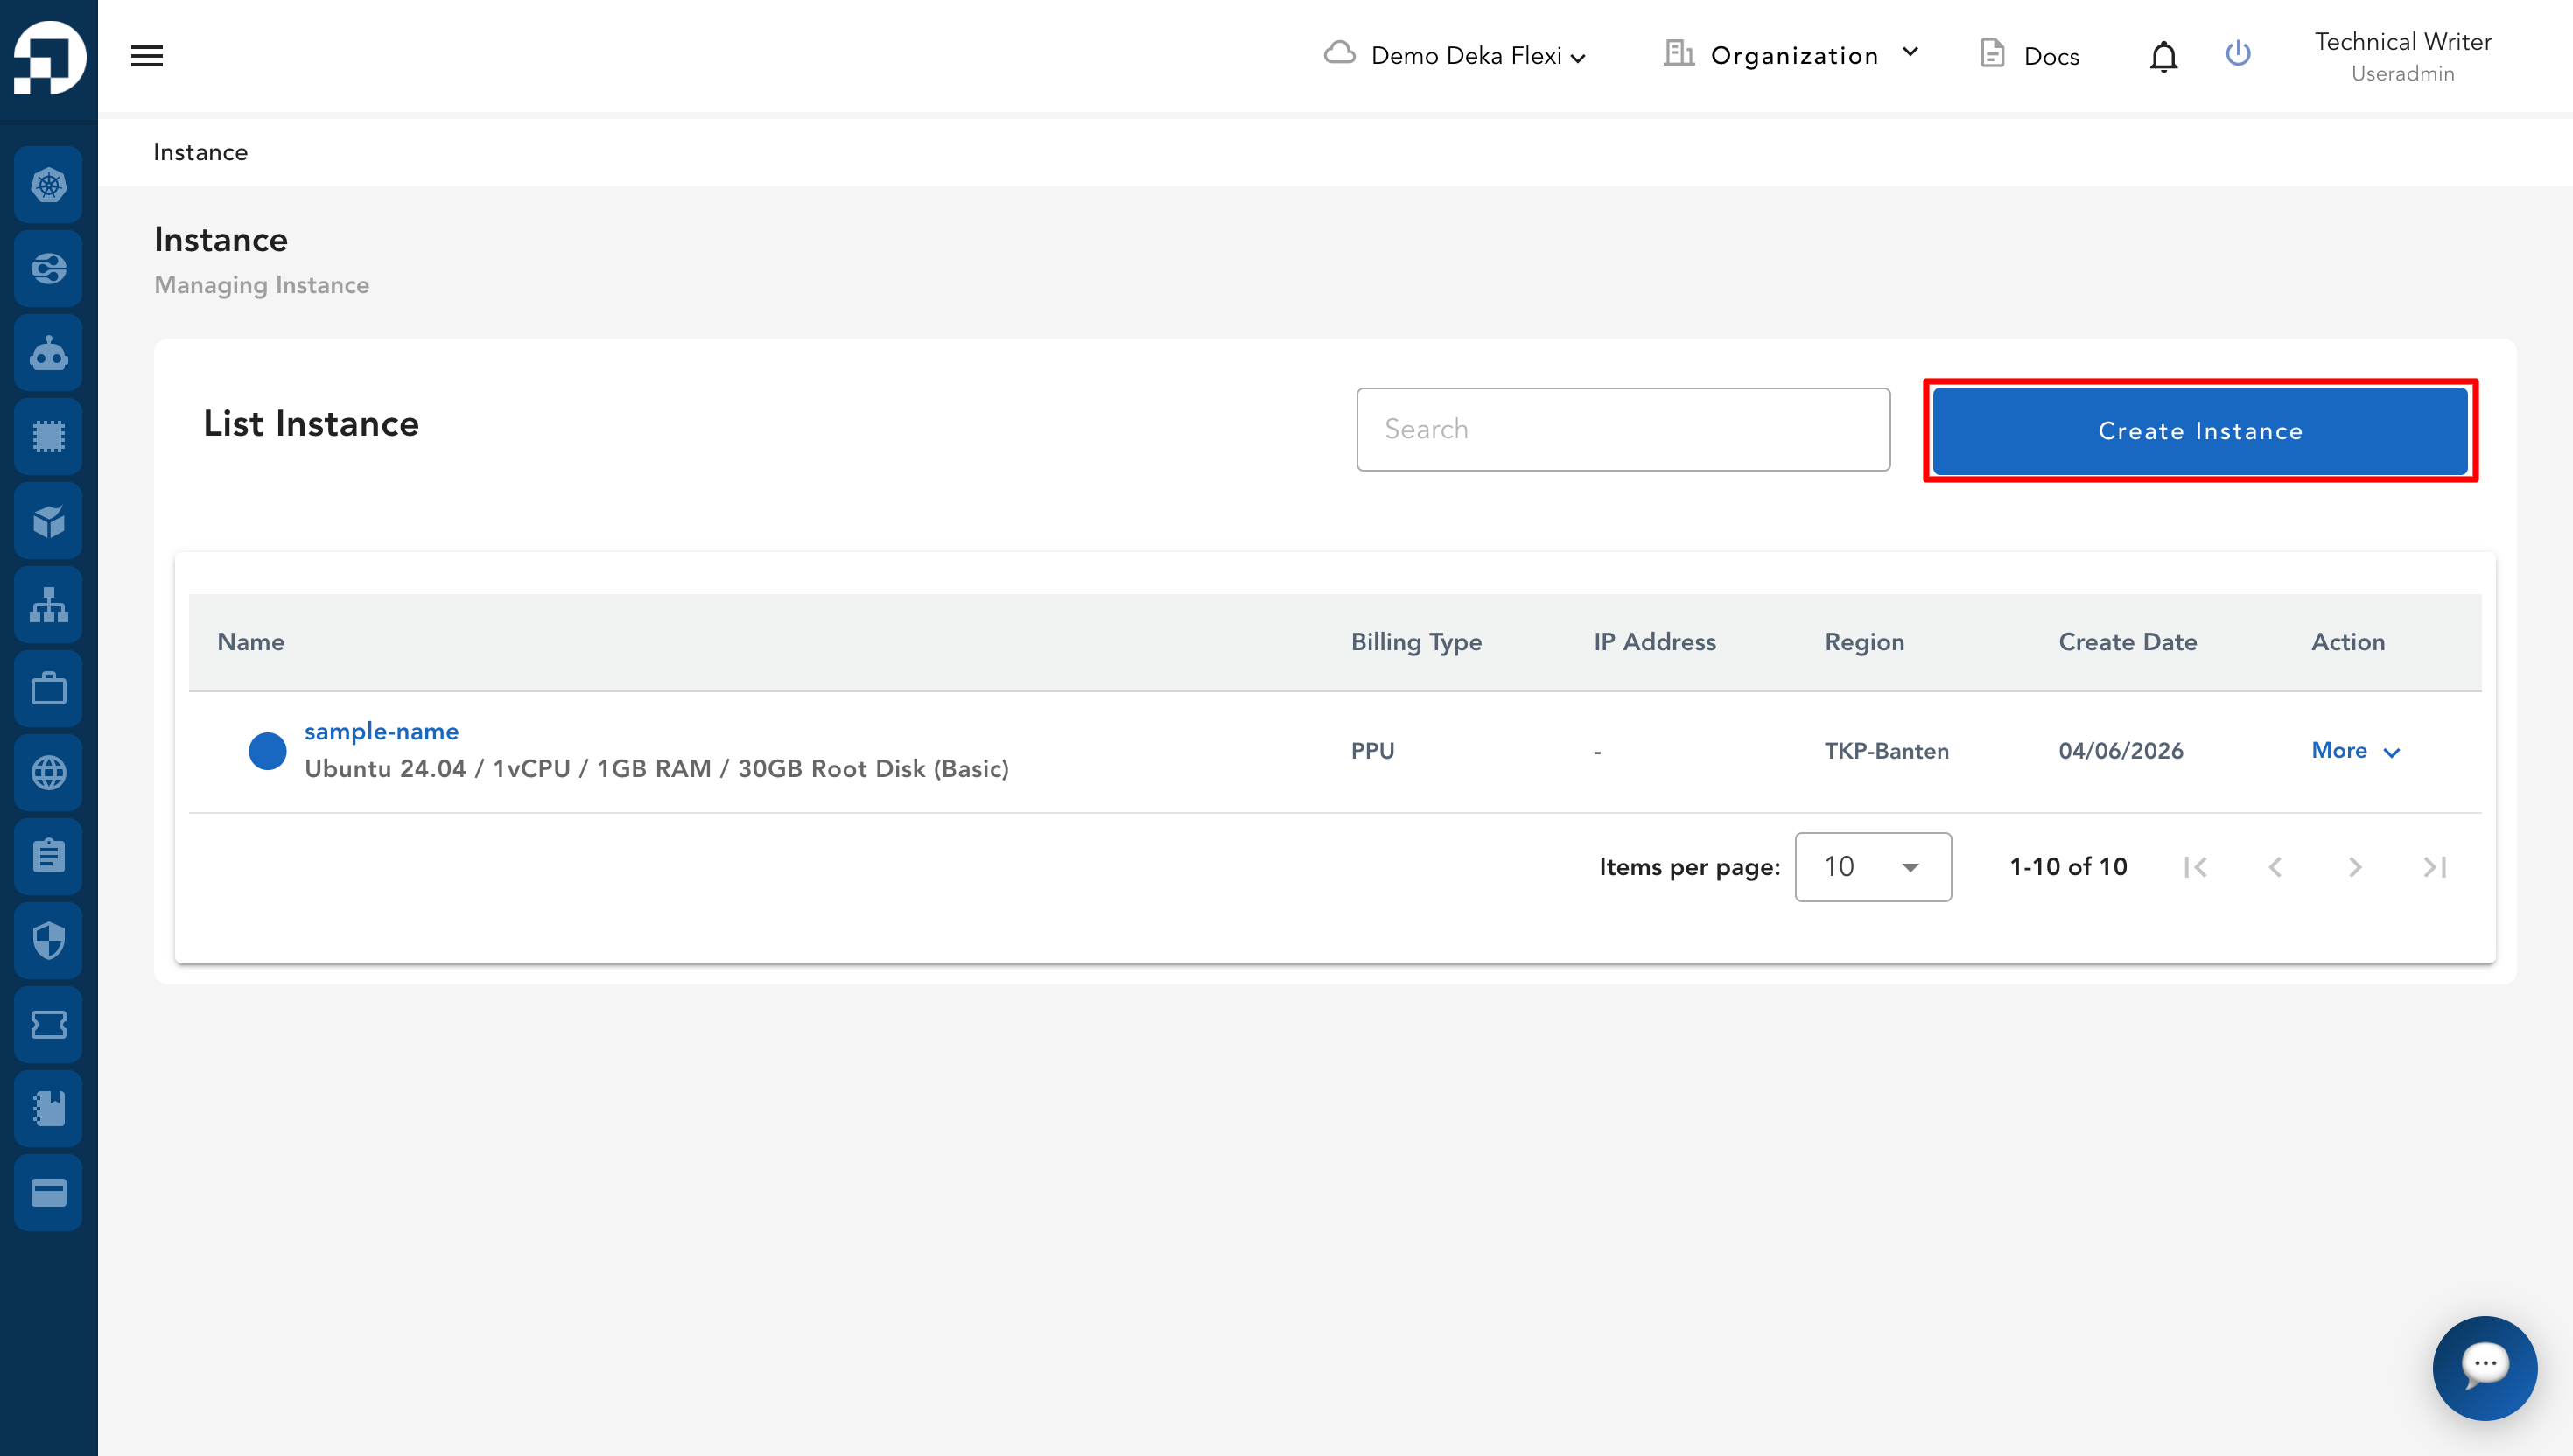
* Langkah pertama untuk membuat instance VM adalah mengklik menu Instance.

<figure><img src="https://putri.box.cloudeka.id/cloudeka-assets/docs.cloudeka.ai/6dekaflexi/createvmisntance_01.png" alt=""><figcaption></figcaption></figure>

* Untuk membuat instance, klik tombol **Create Instance**.

<figure><img src="https://putri.box.cloudeka.id/cloudeka-assets/docs.cloudeka.ai/6dekaflexi/createvmisntance_02.png" alt=""><figcaption></figcaption></figure>

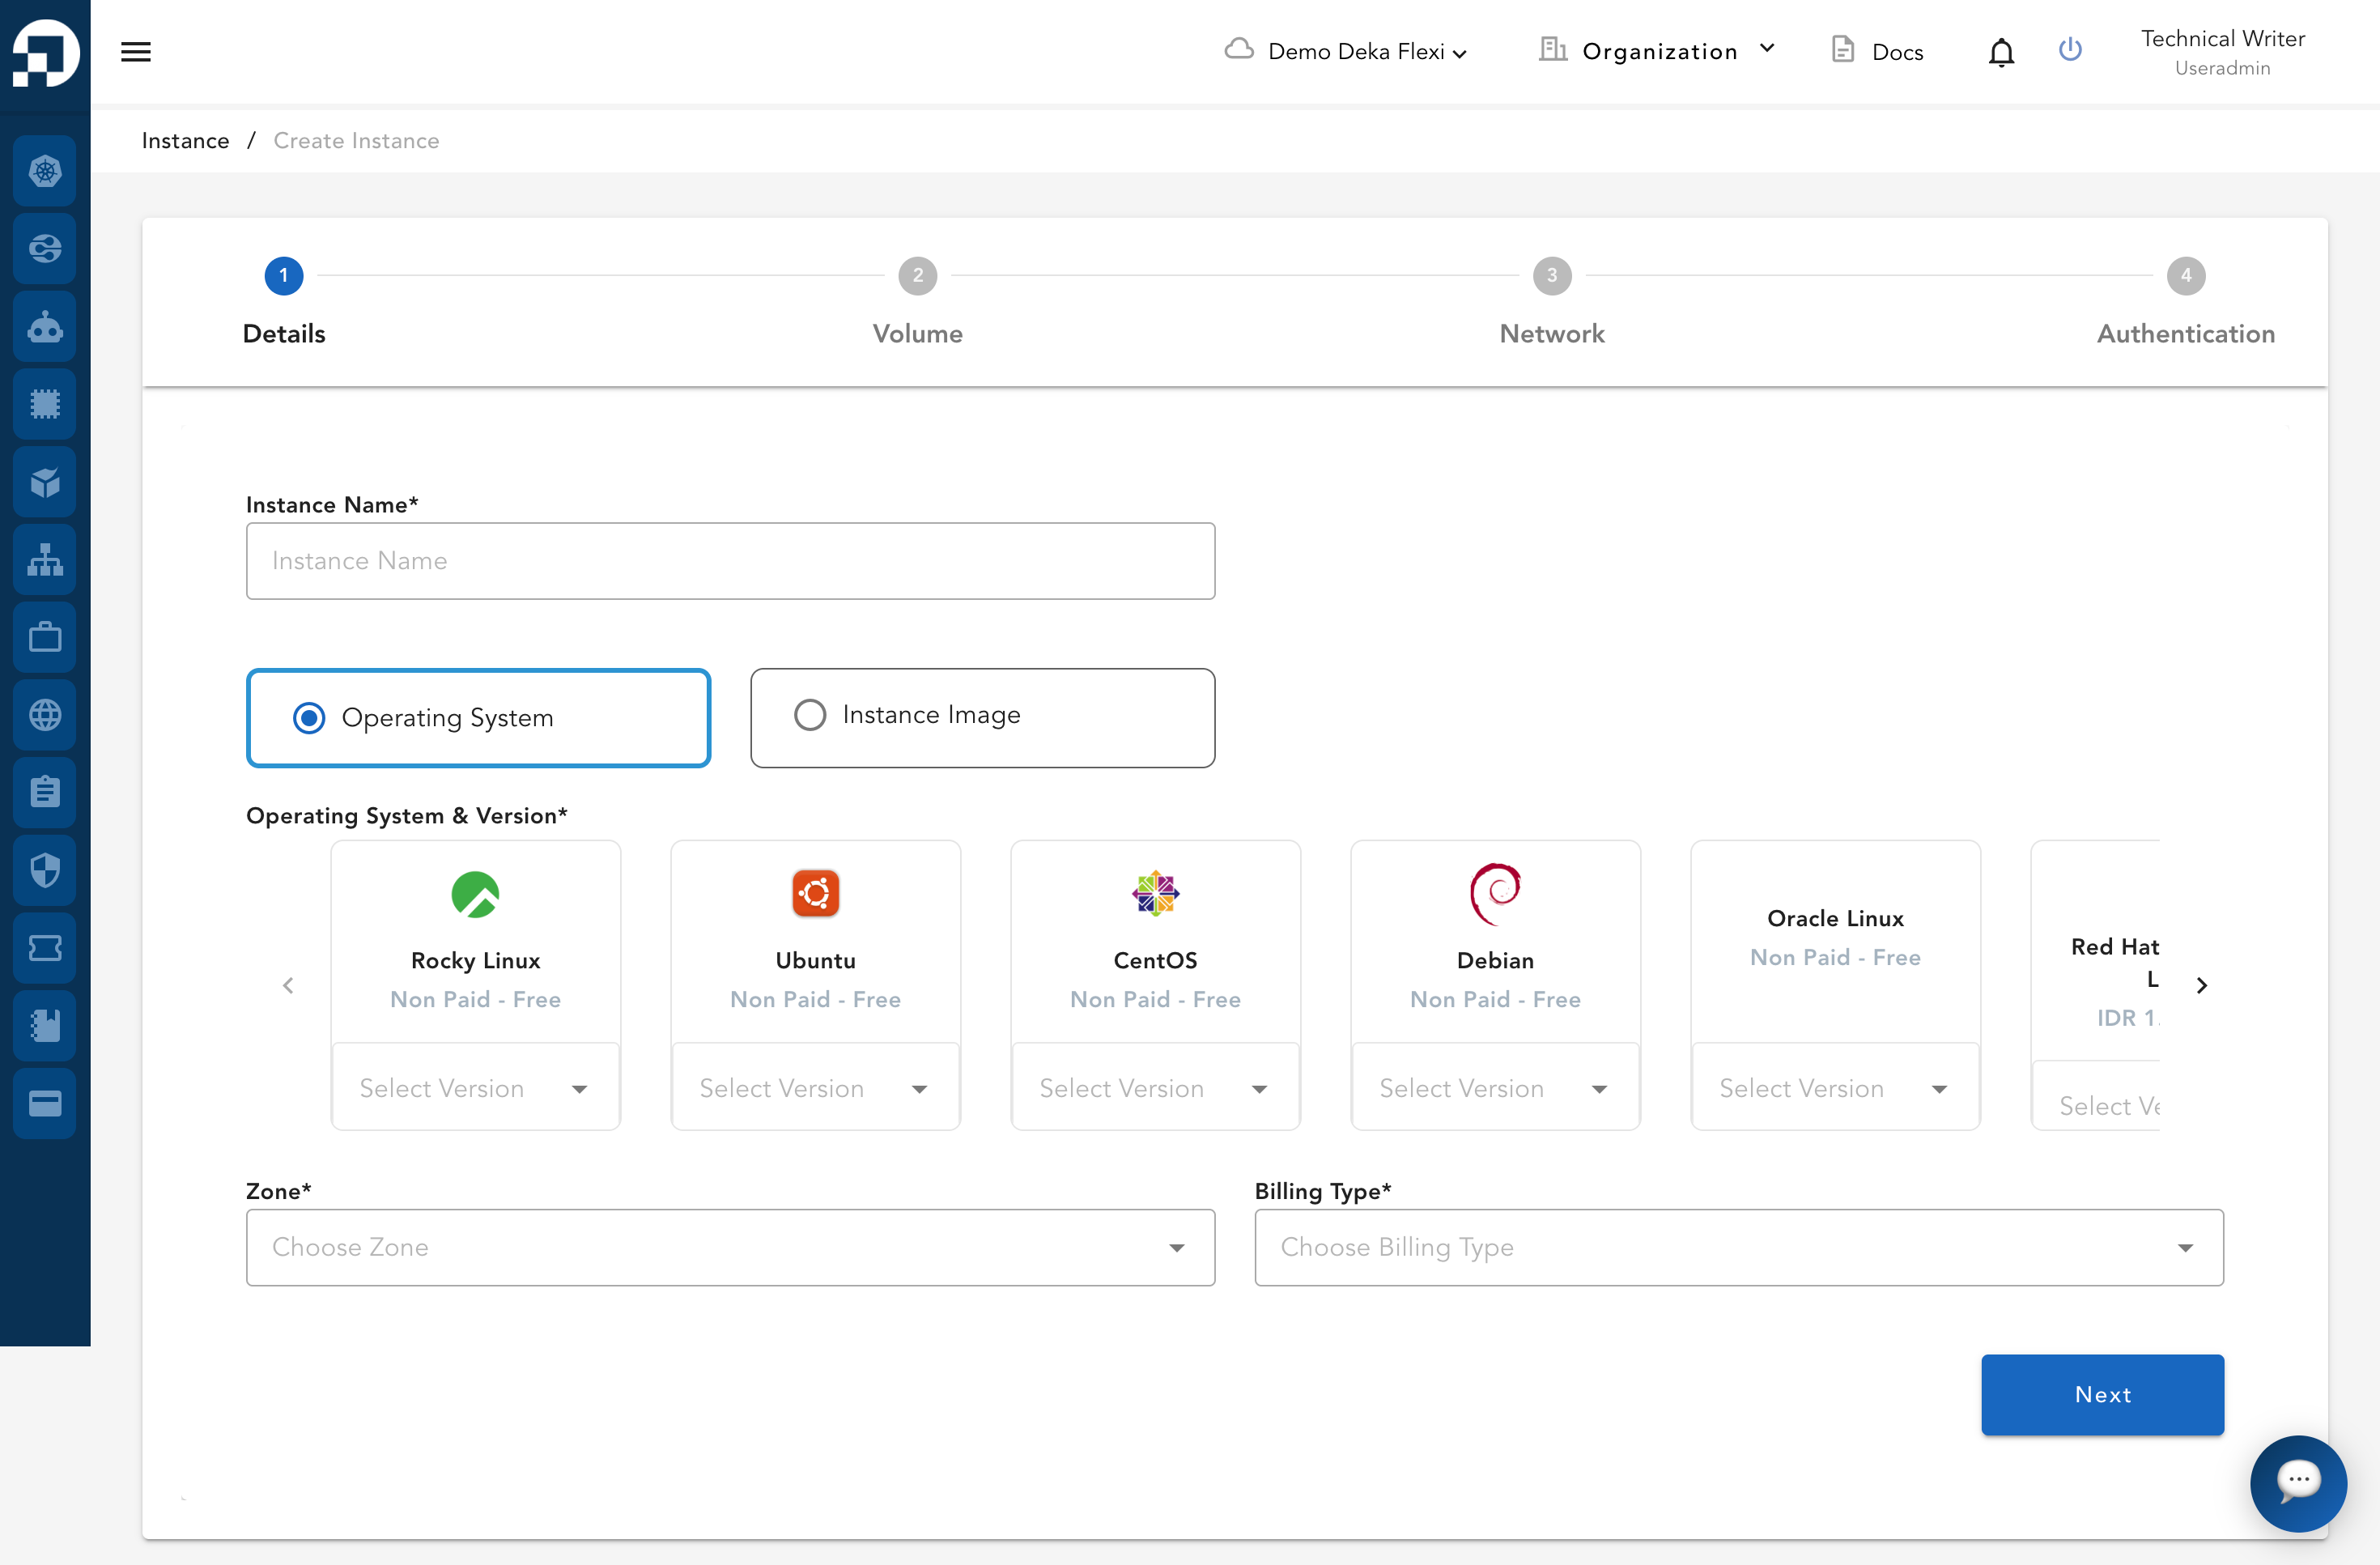
* Pada halaman Create Instance, terdapat empat tahap untuk menyelesaikan pembuatan instance. Pada tahap pertama, yaitu Details, tersedia Instance Name, Type Operating System atau Instance Image, Zone, dan Instance Billing Type.

<figure><img src="https://putri.box.cloudeka.id/cloudeka-assets/docs.cloudeka.ai/6dekaflexi/createvmisntance_03.png" alt=""><figcaption></figcaption></figure>

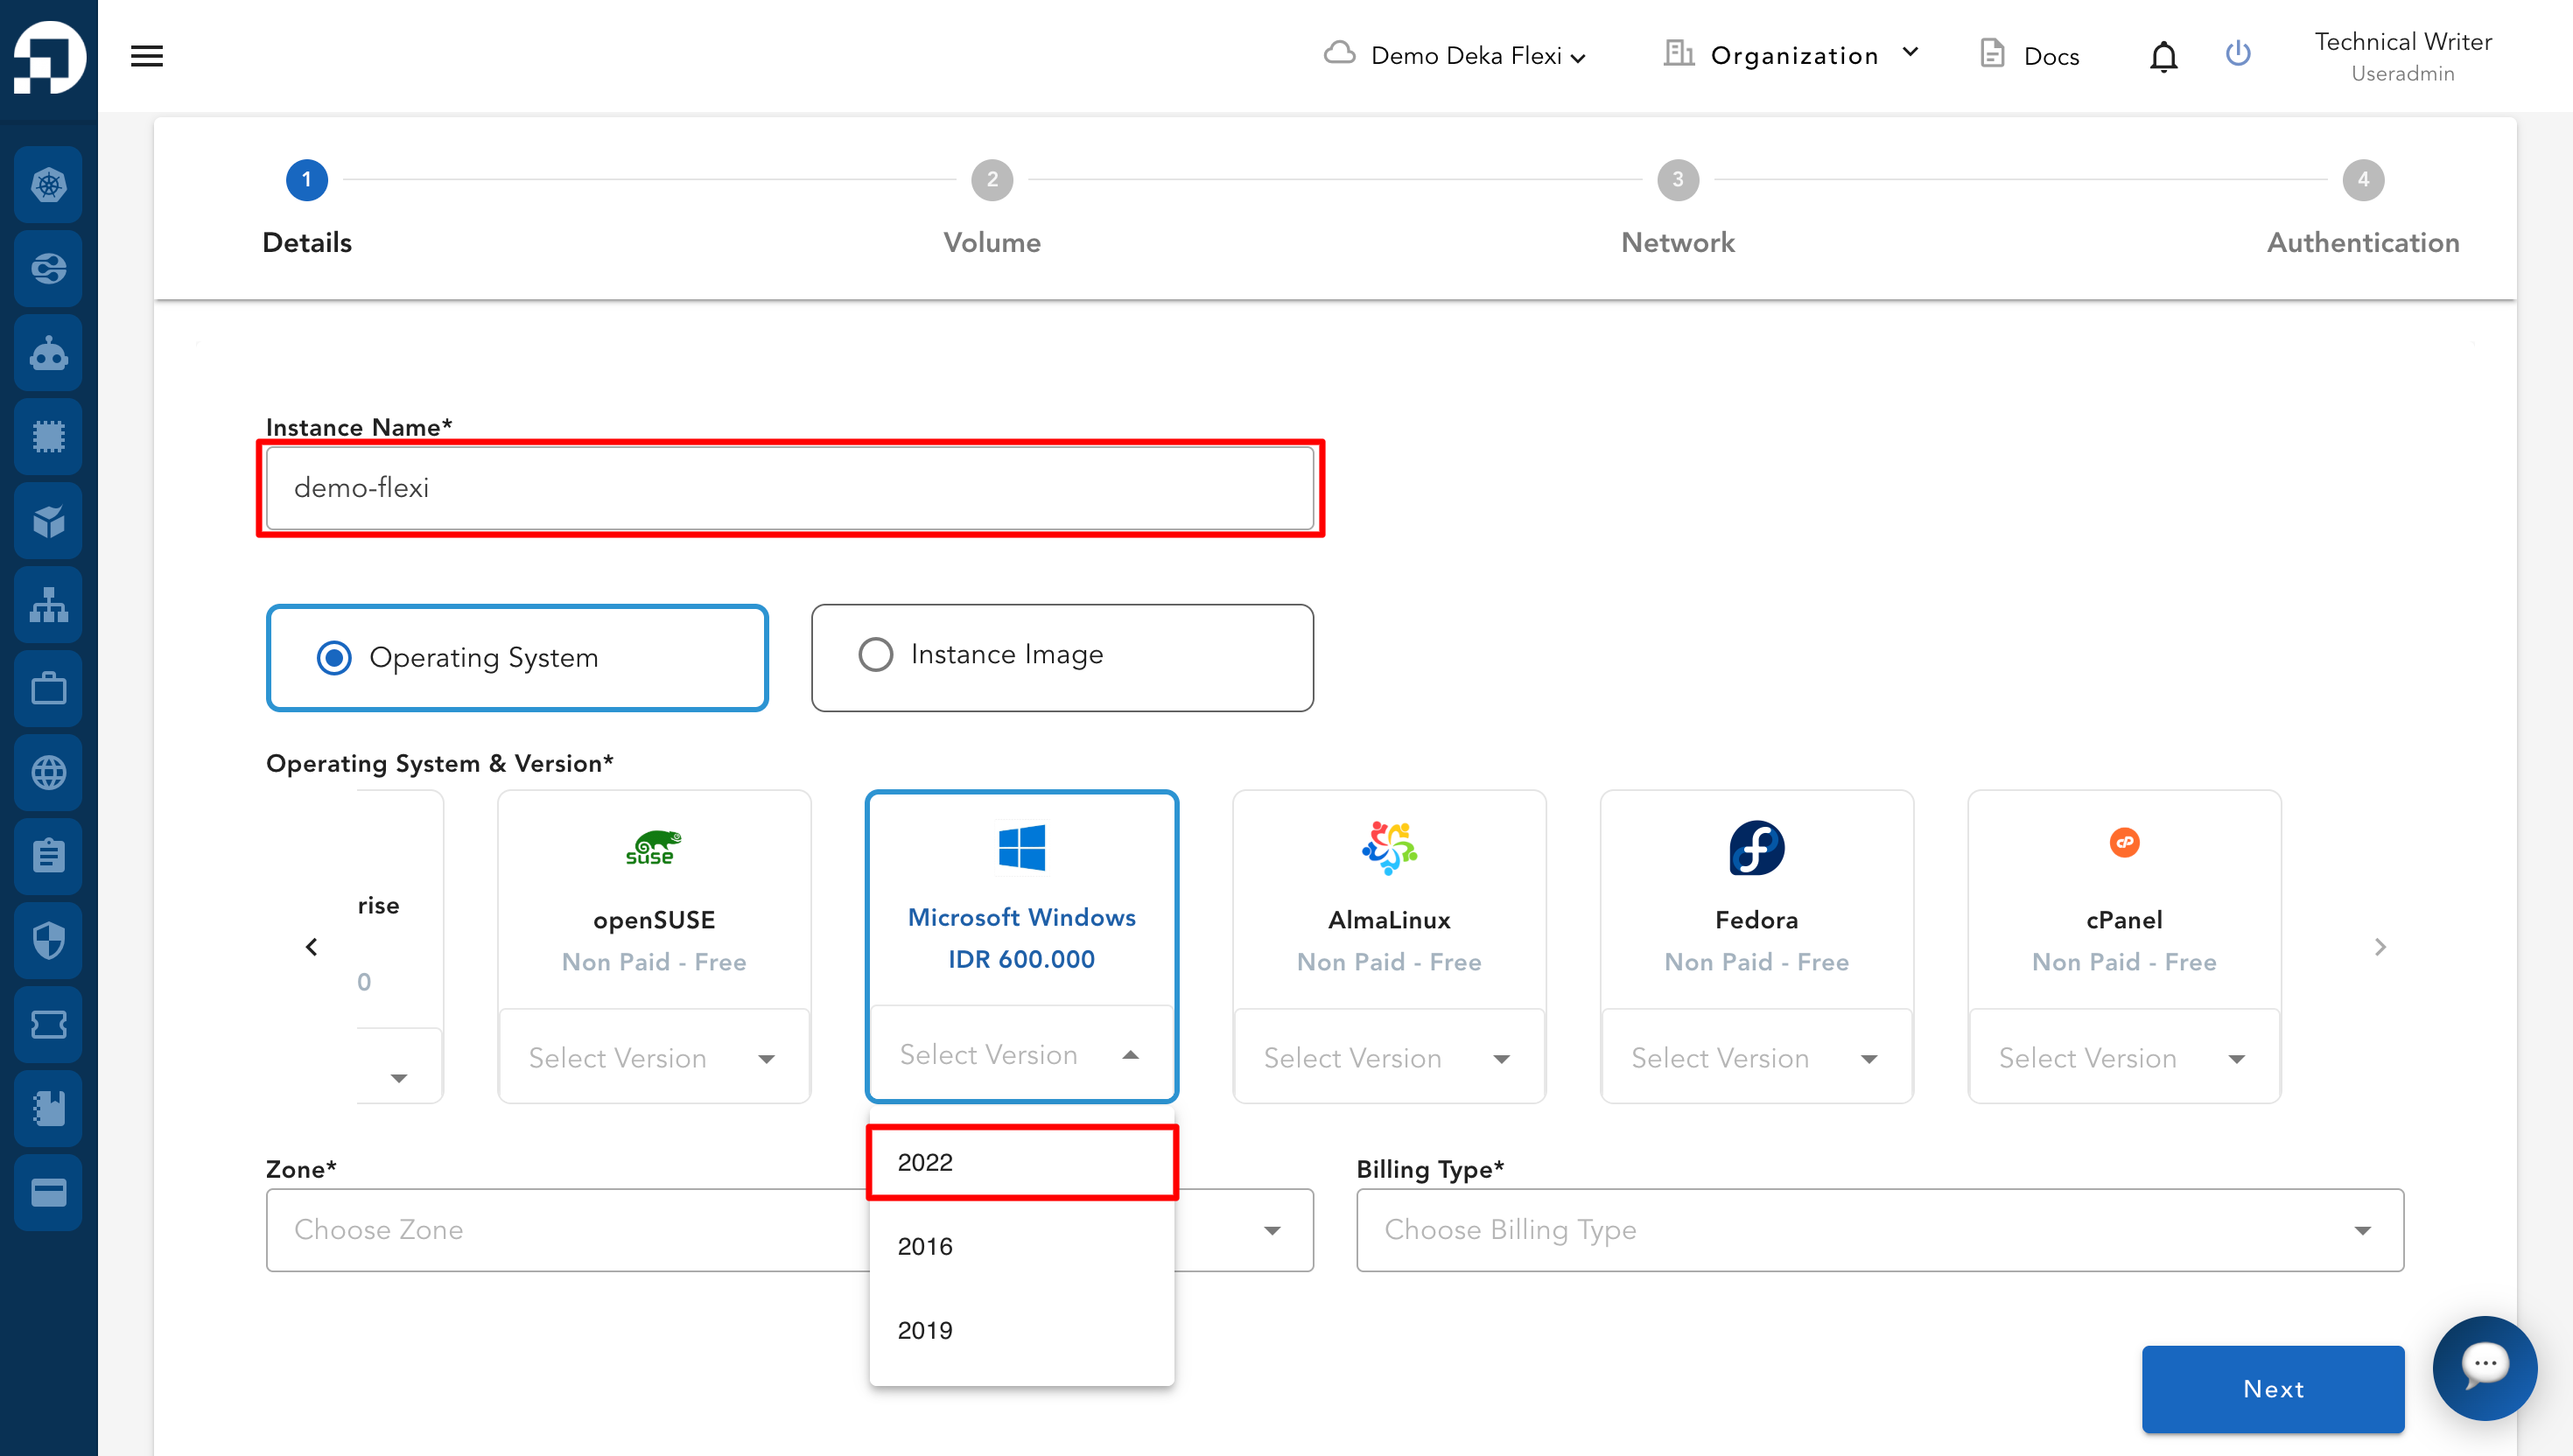
* Tentukan nama unik untuk VM pada kolom Instance Name, lalu pilih Type Operating System. Kemudian, isi kolom Select Operating System & Version dengan mengklik kolom Select Operating System, version, bit version.

<figure><img src="https://putri.box.cloudeka.id/cloudeka-assets/docs.cloudeka.ai/6dekaflexi/createvmisntance_04.png" alt=""><figcaption></figcaption></figure>

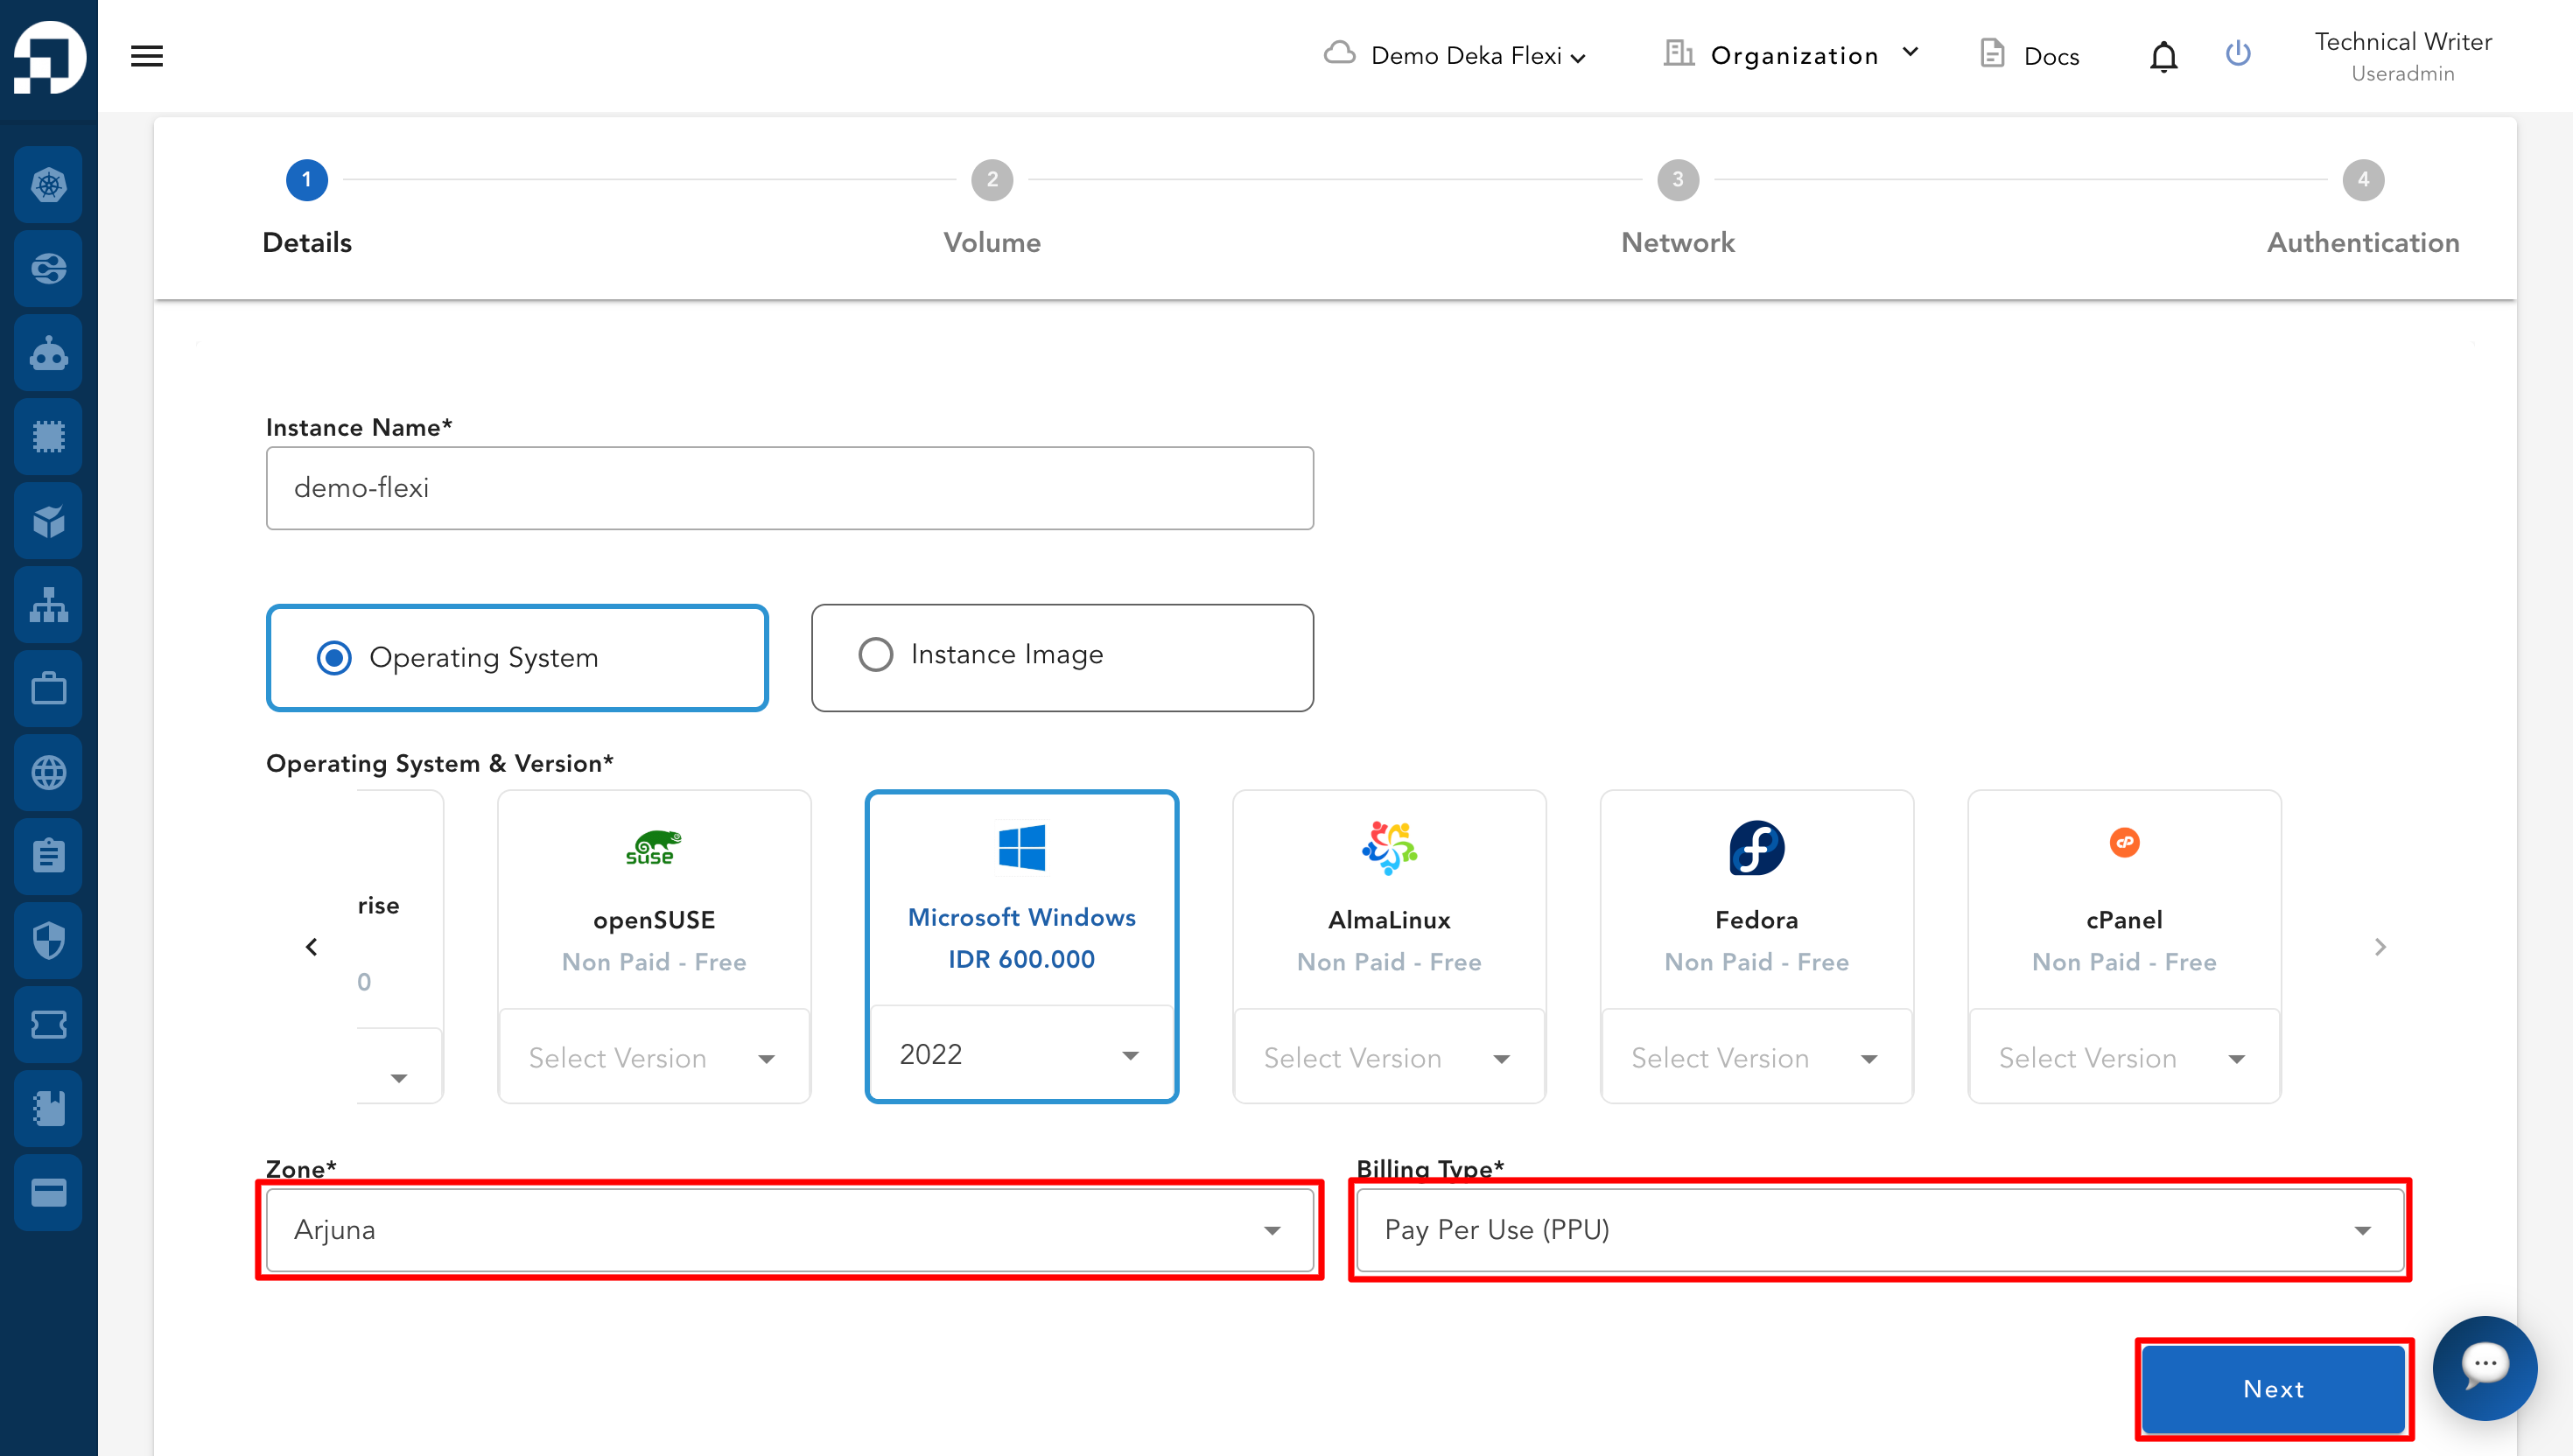
* Tentukan Zone untuk memilih lokasi data center yang digunakan VM. Pilih Instance Billing Type yang akan digunakan. Untuk penjelasan lebih lanjut tentang billing, lihat halaman Billing. Klik tombol **Next** untuk melanjutkan ke tahap berikutnya.

<figure><img src="https://putri.box.cloudeka.id/cloudeka-assets/docs.cloudeka.ai/6dekaflexi/createvmisntance_05.png" alt=""><figcaption></figcaption></figure>

<figure><img src="https://putri.box.cloudeka.id/cloudeka-assets/docs.cloudeka.ai/6dekaflexi/createvmisntance_06.png" alt=""><figcaption></figcaption></figure>

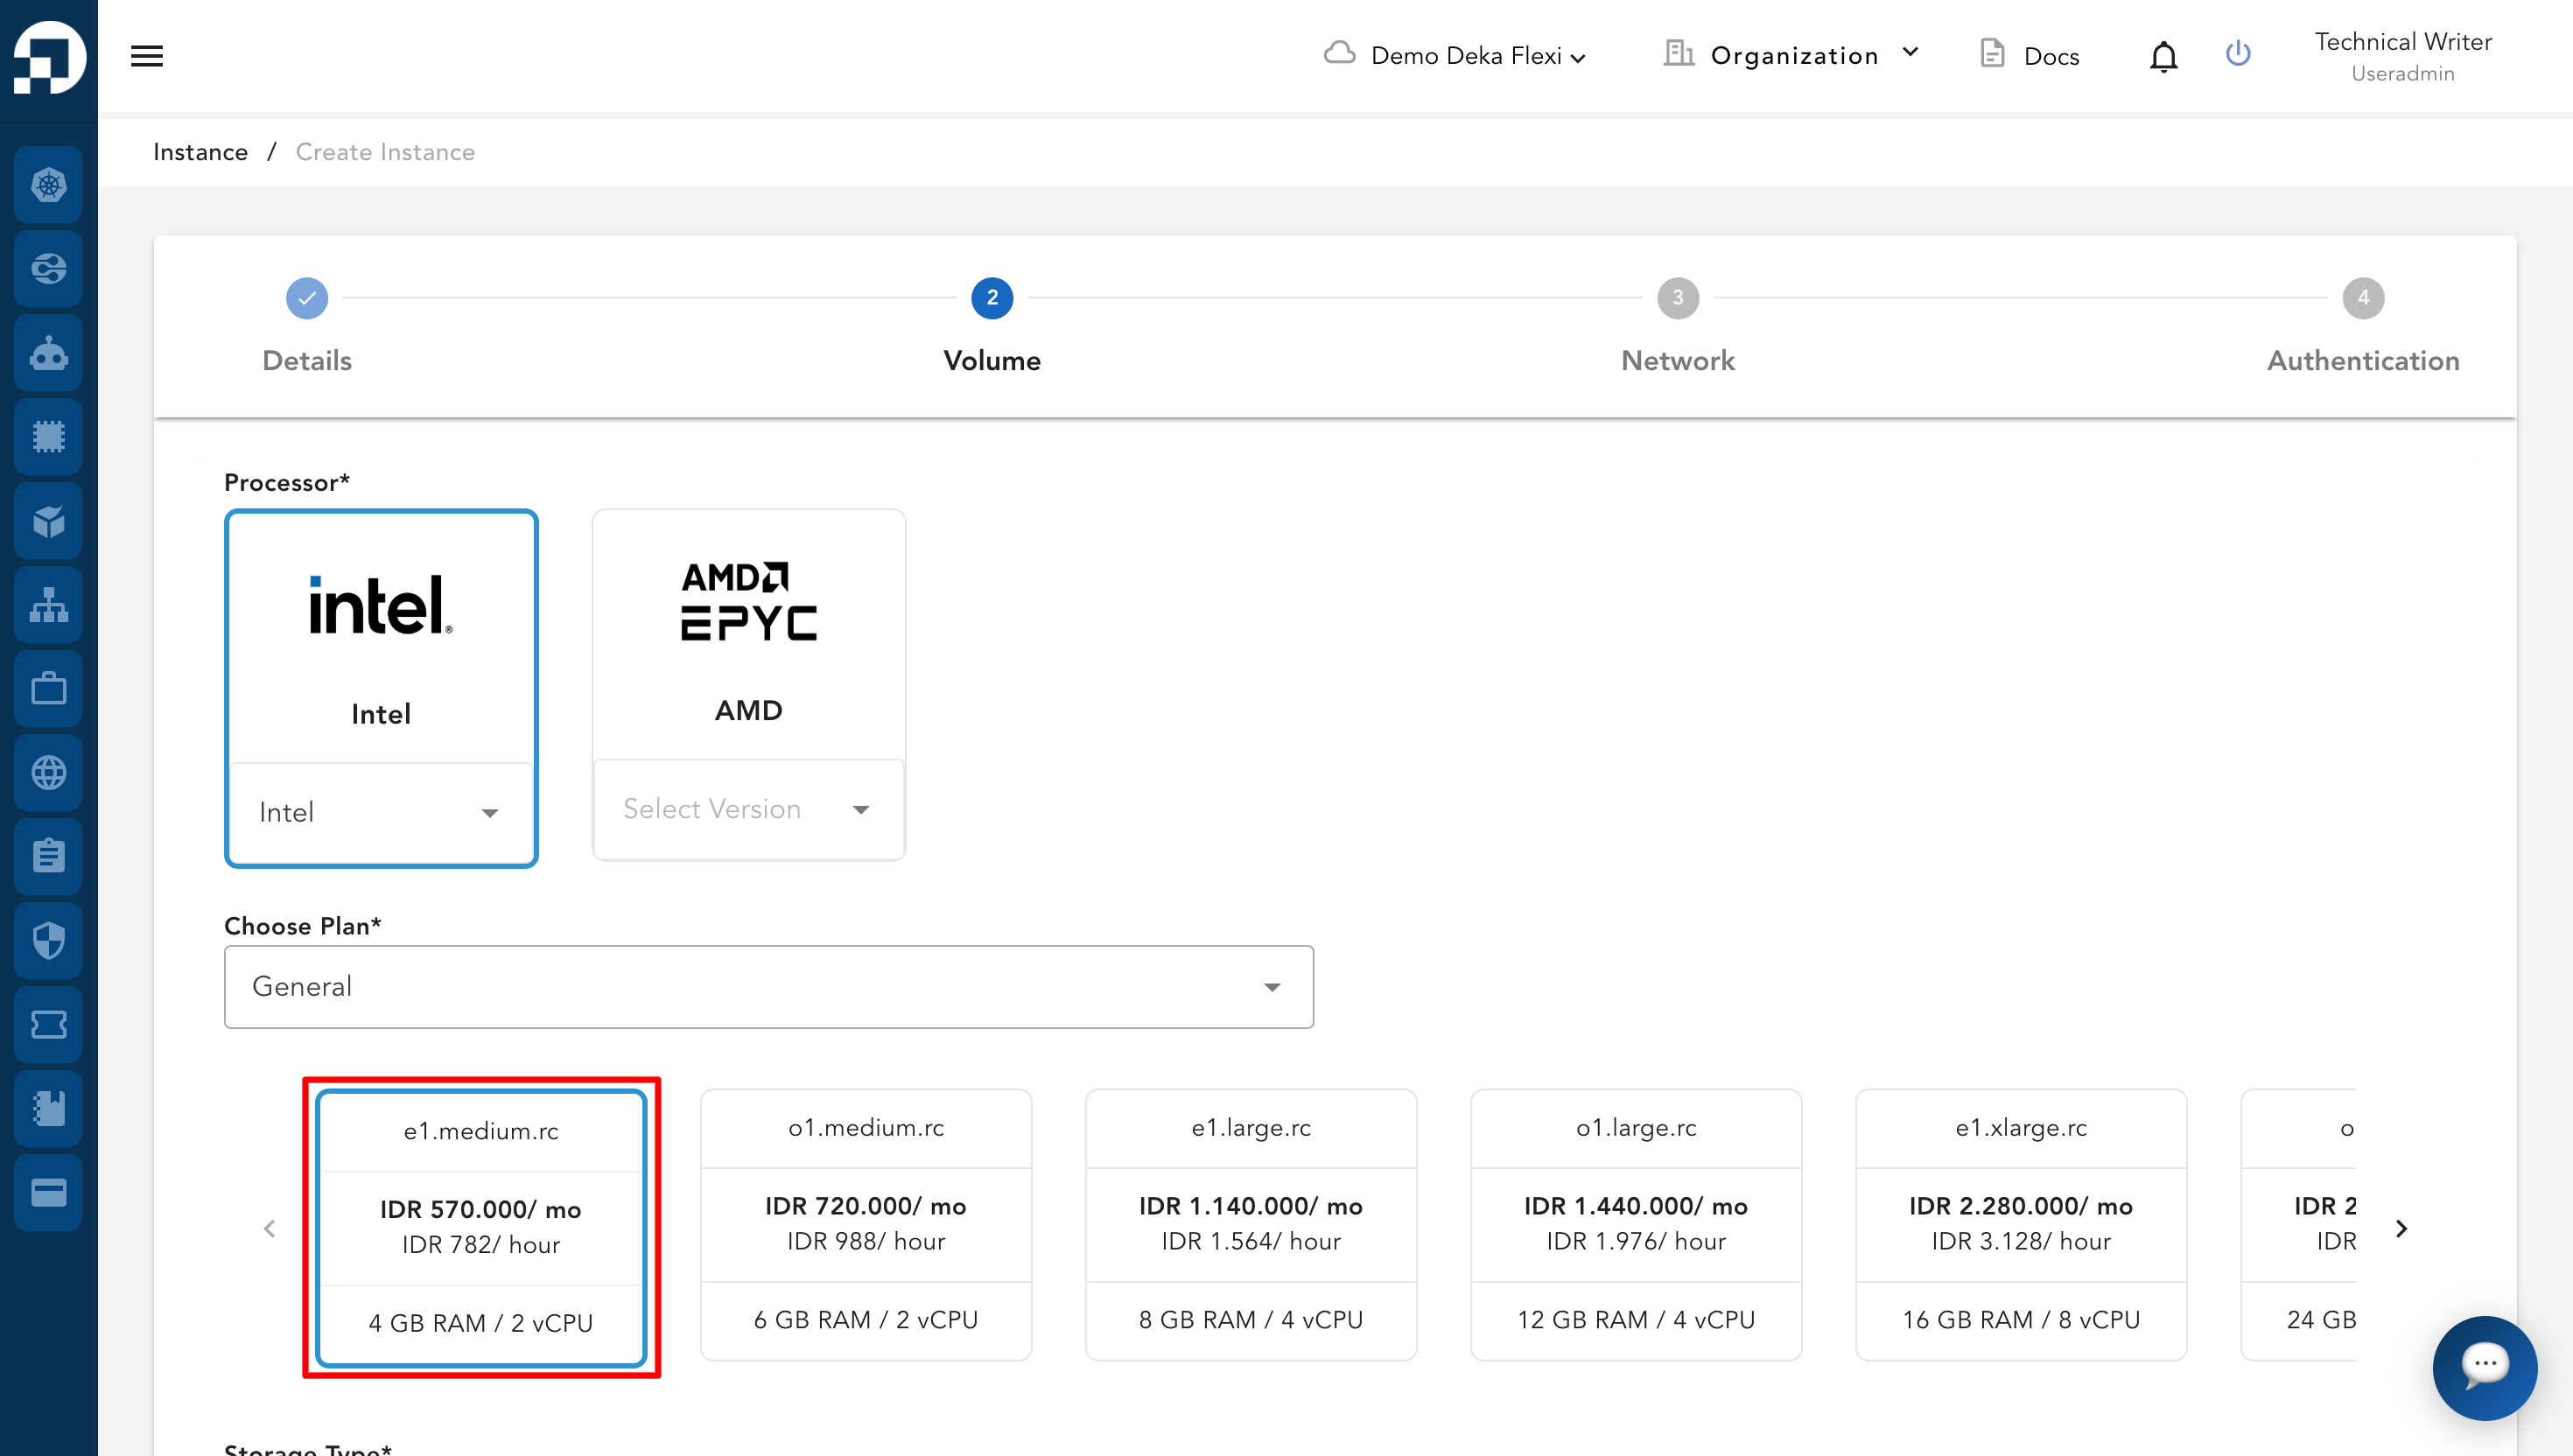
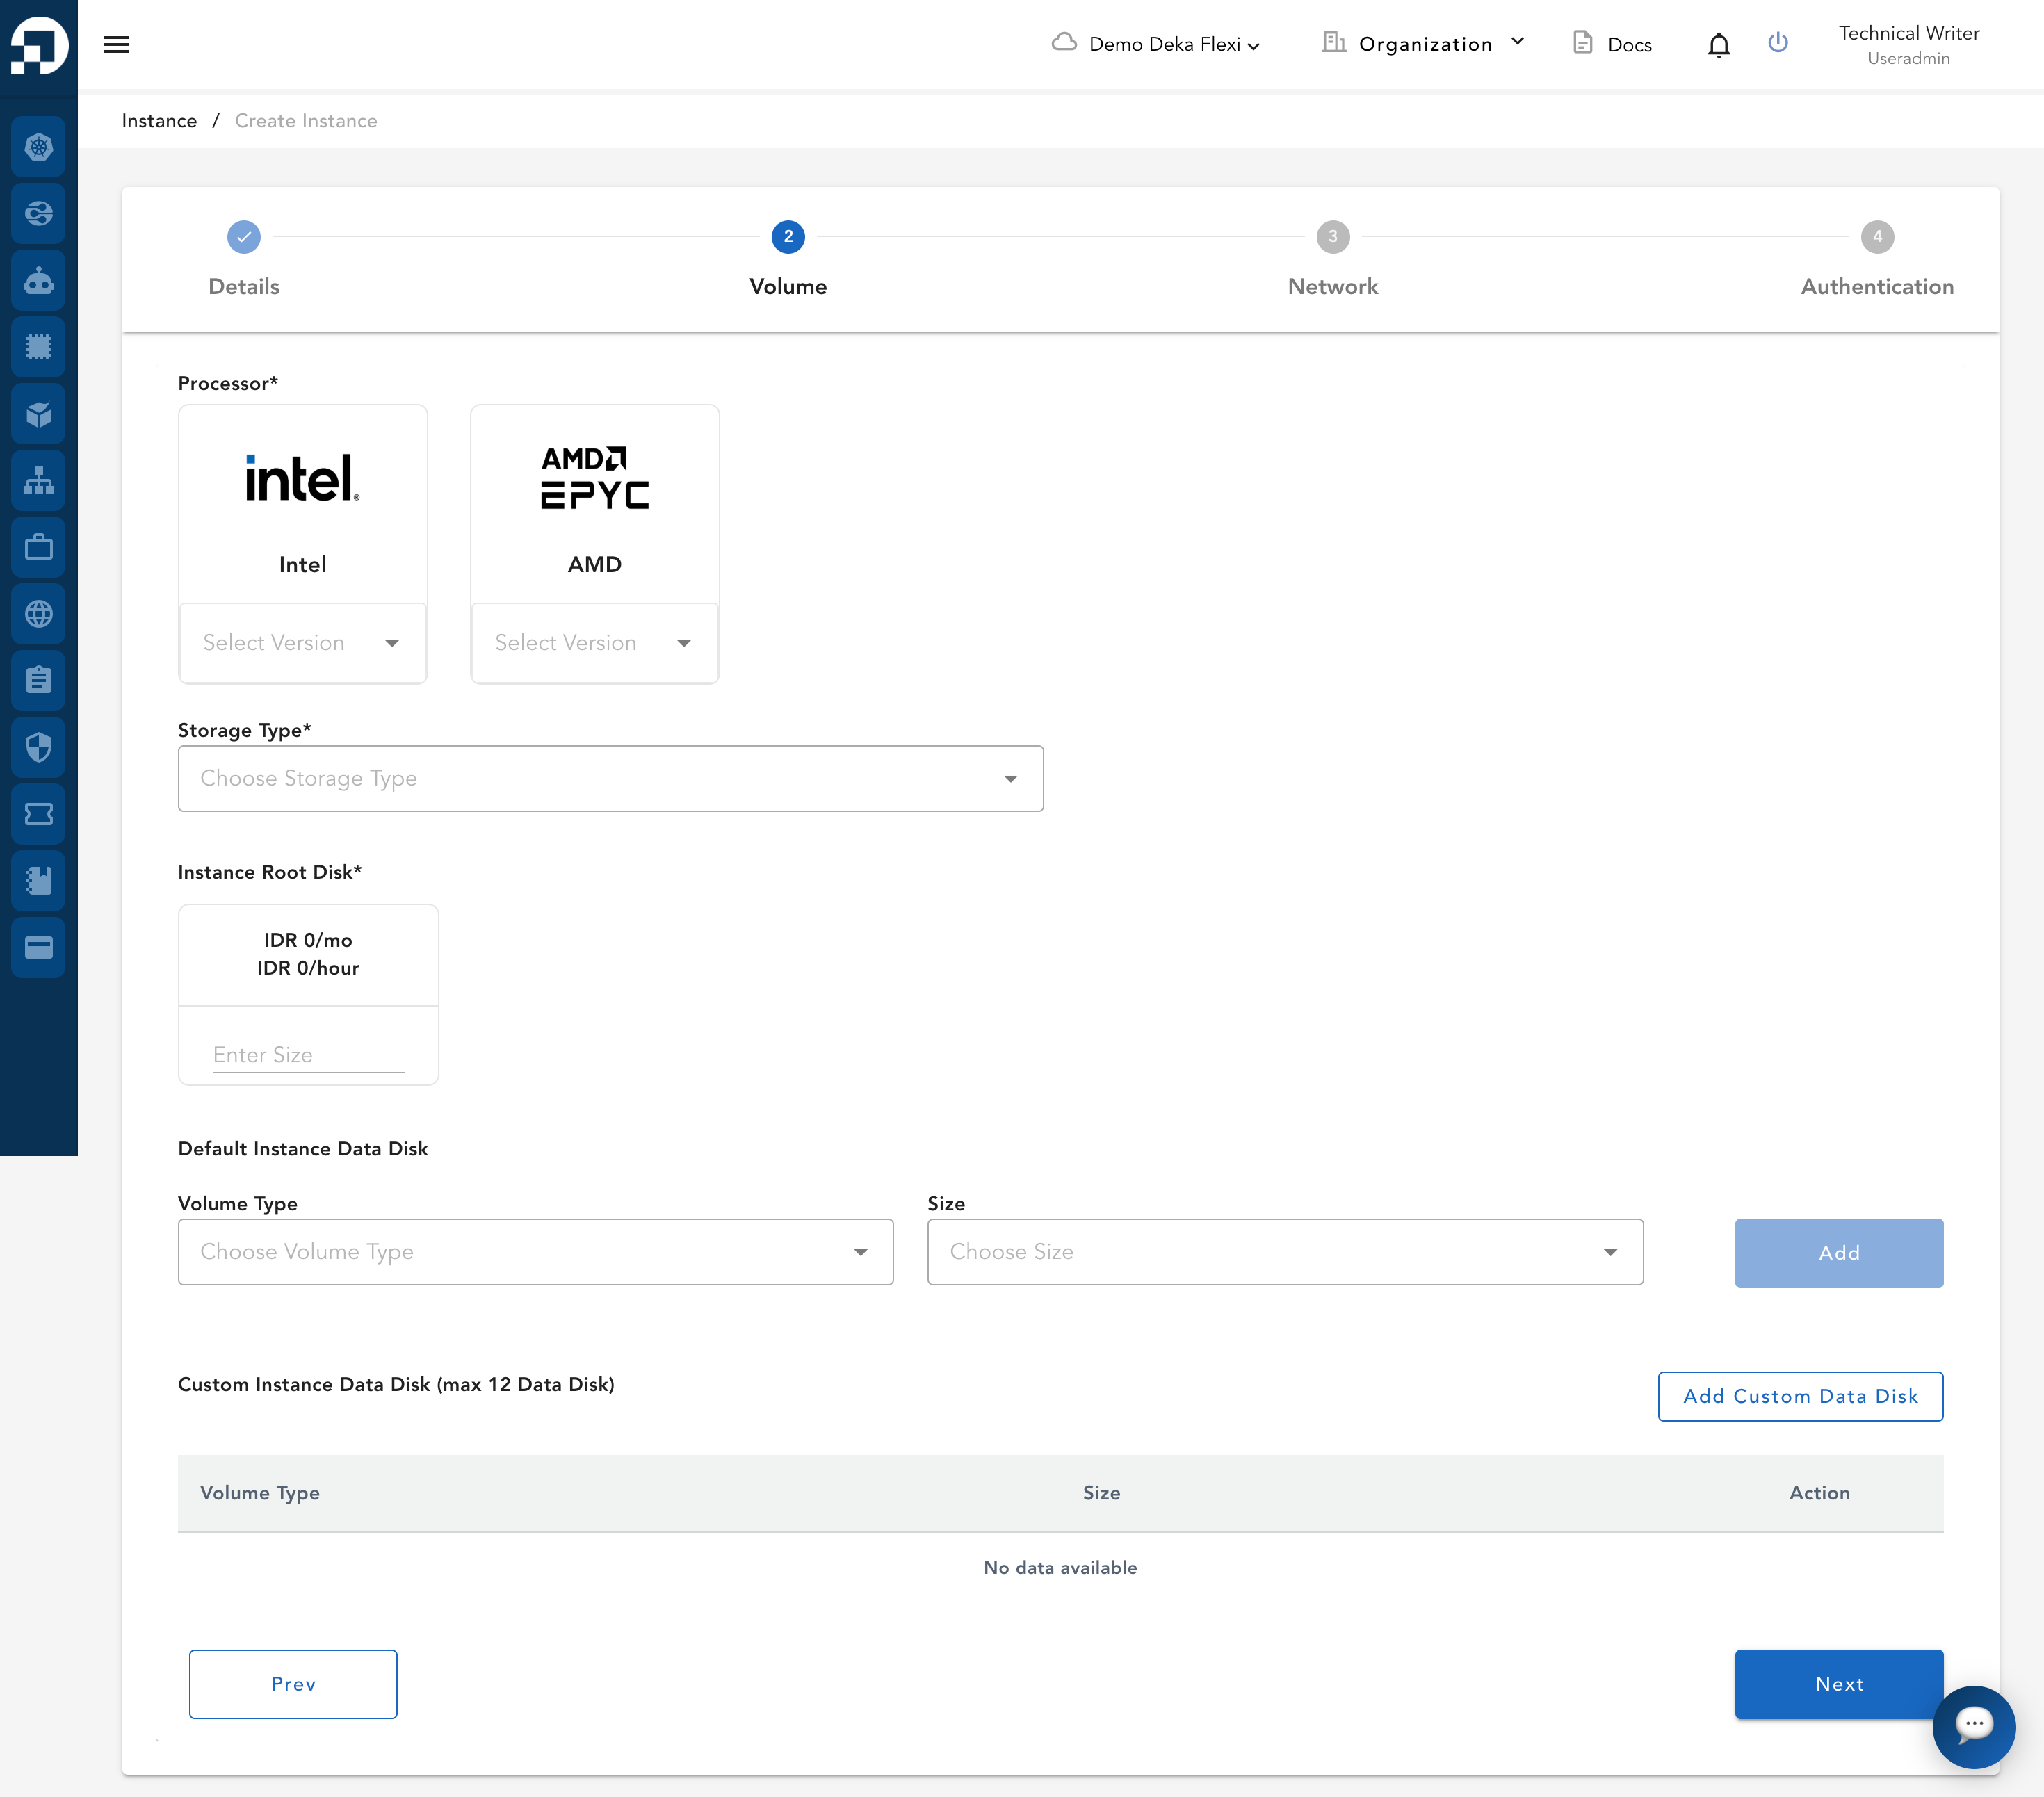
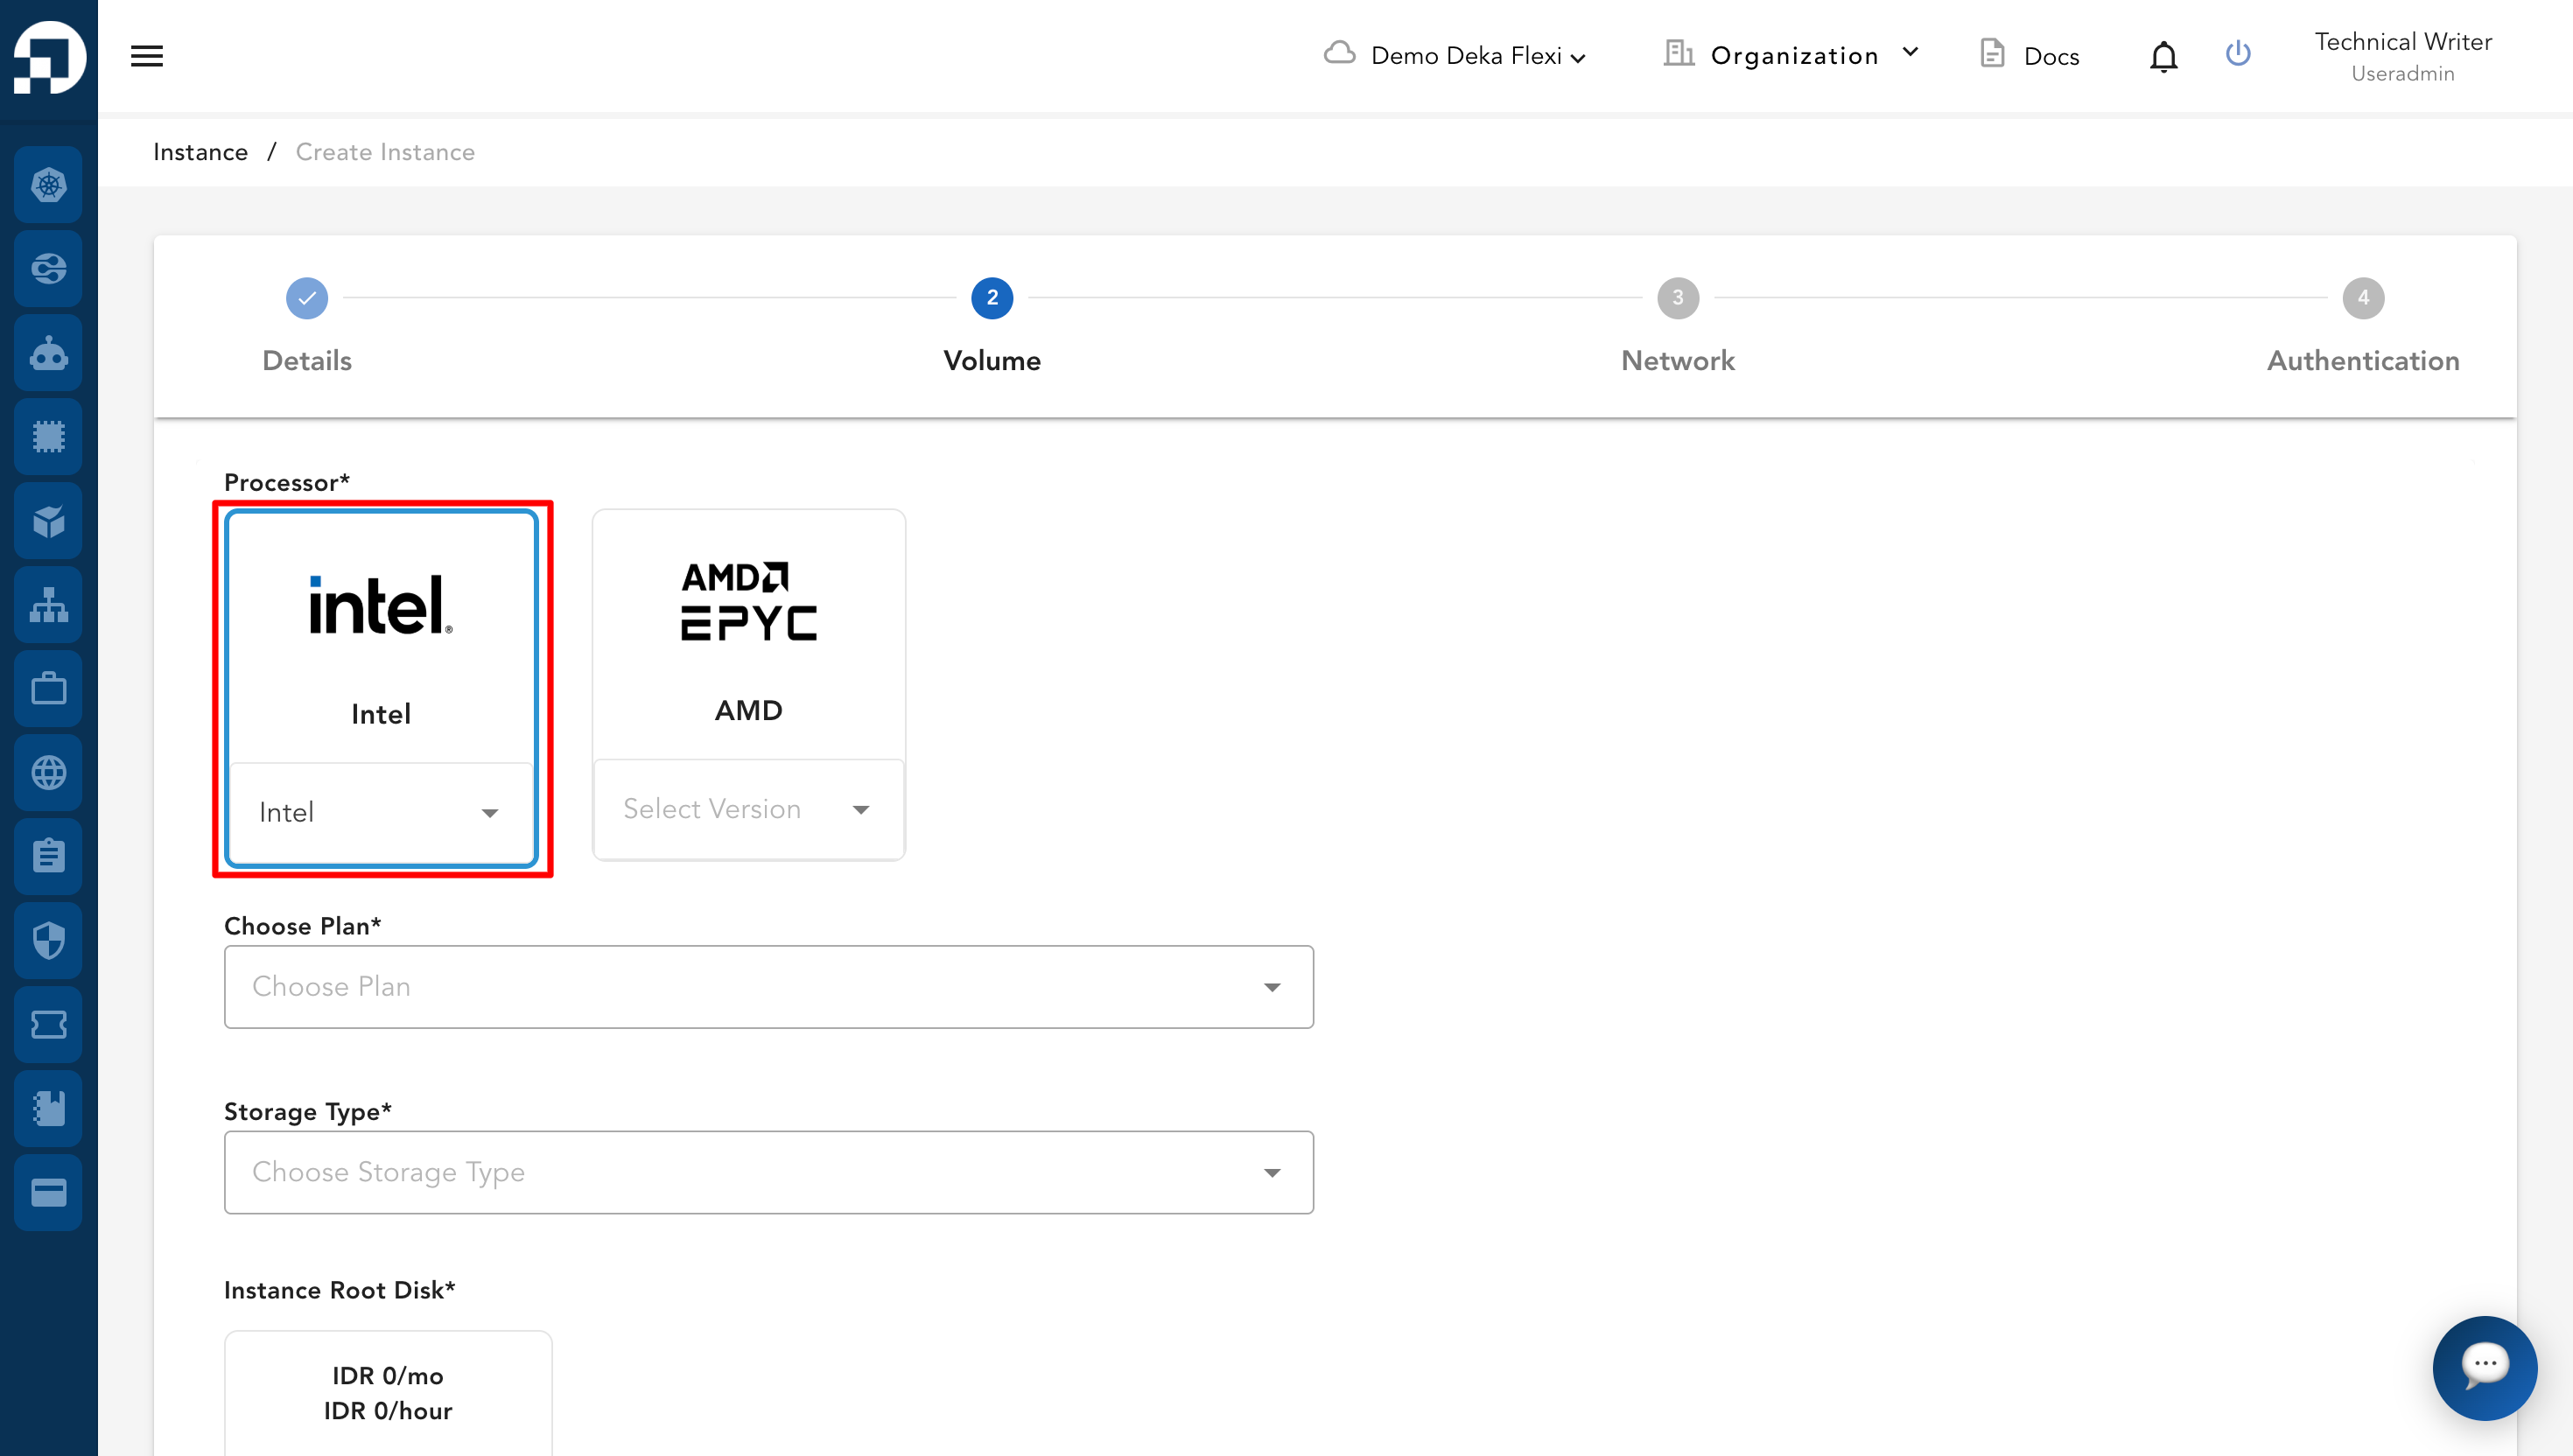
* In the **Processor** section, select a processor type (**Intel** or **AMD**), then choose the processor version. This guide uses **Intel** as an example.

<figure><img src="https://putri.box.cloudeka.id/cloudeka-assets/docs.cloudeka.ai/6dekaflexi/createvmisntance_07.png" alt=""><figcaption></figcaption></figure>

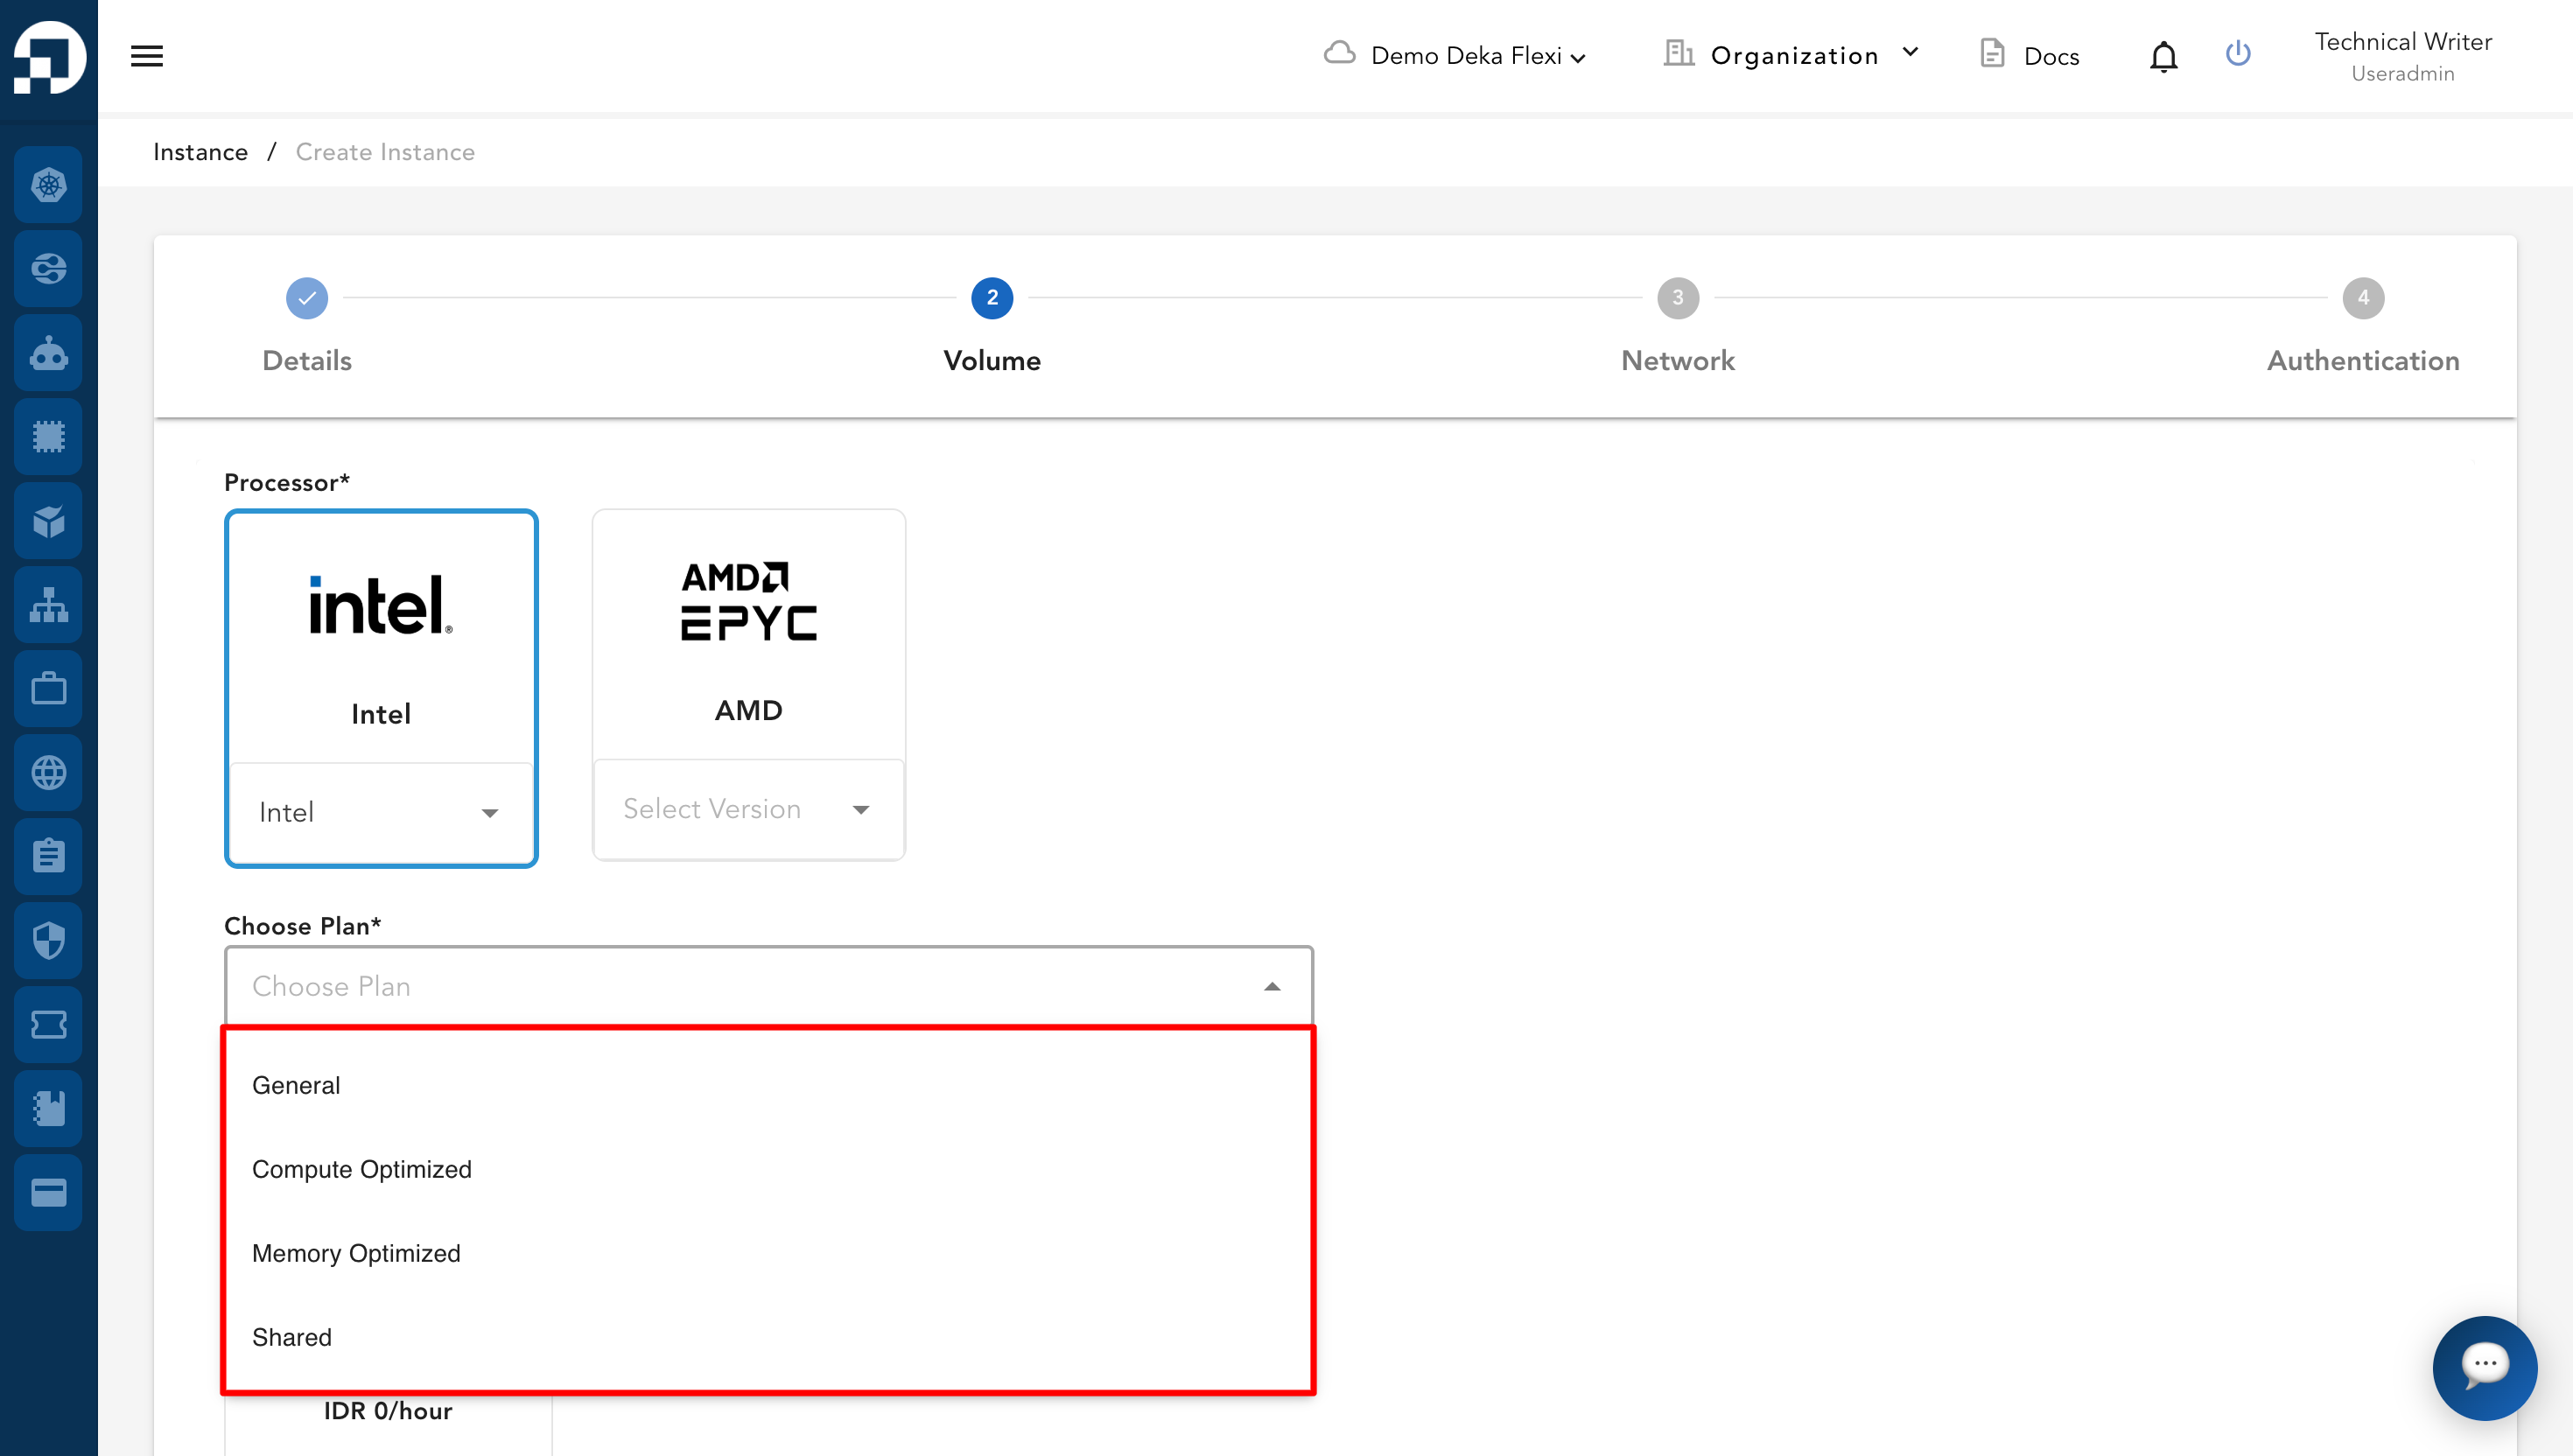
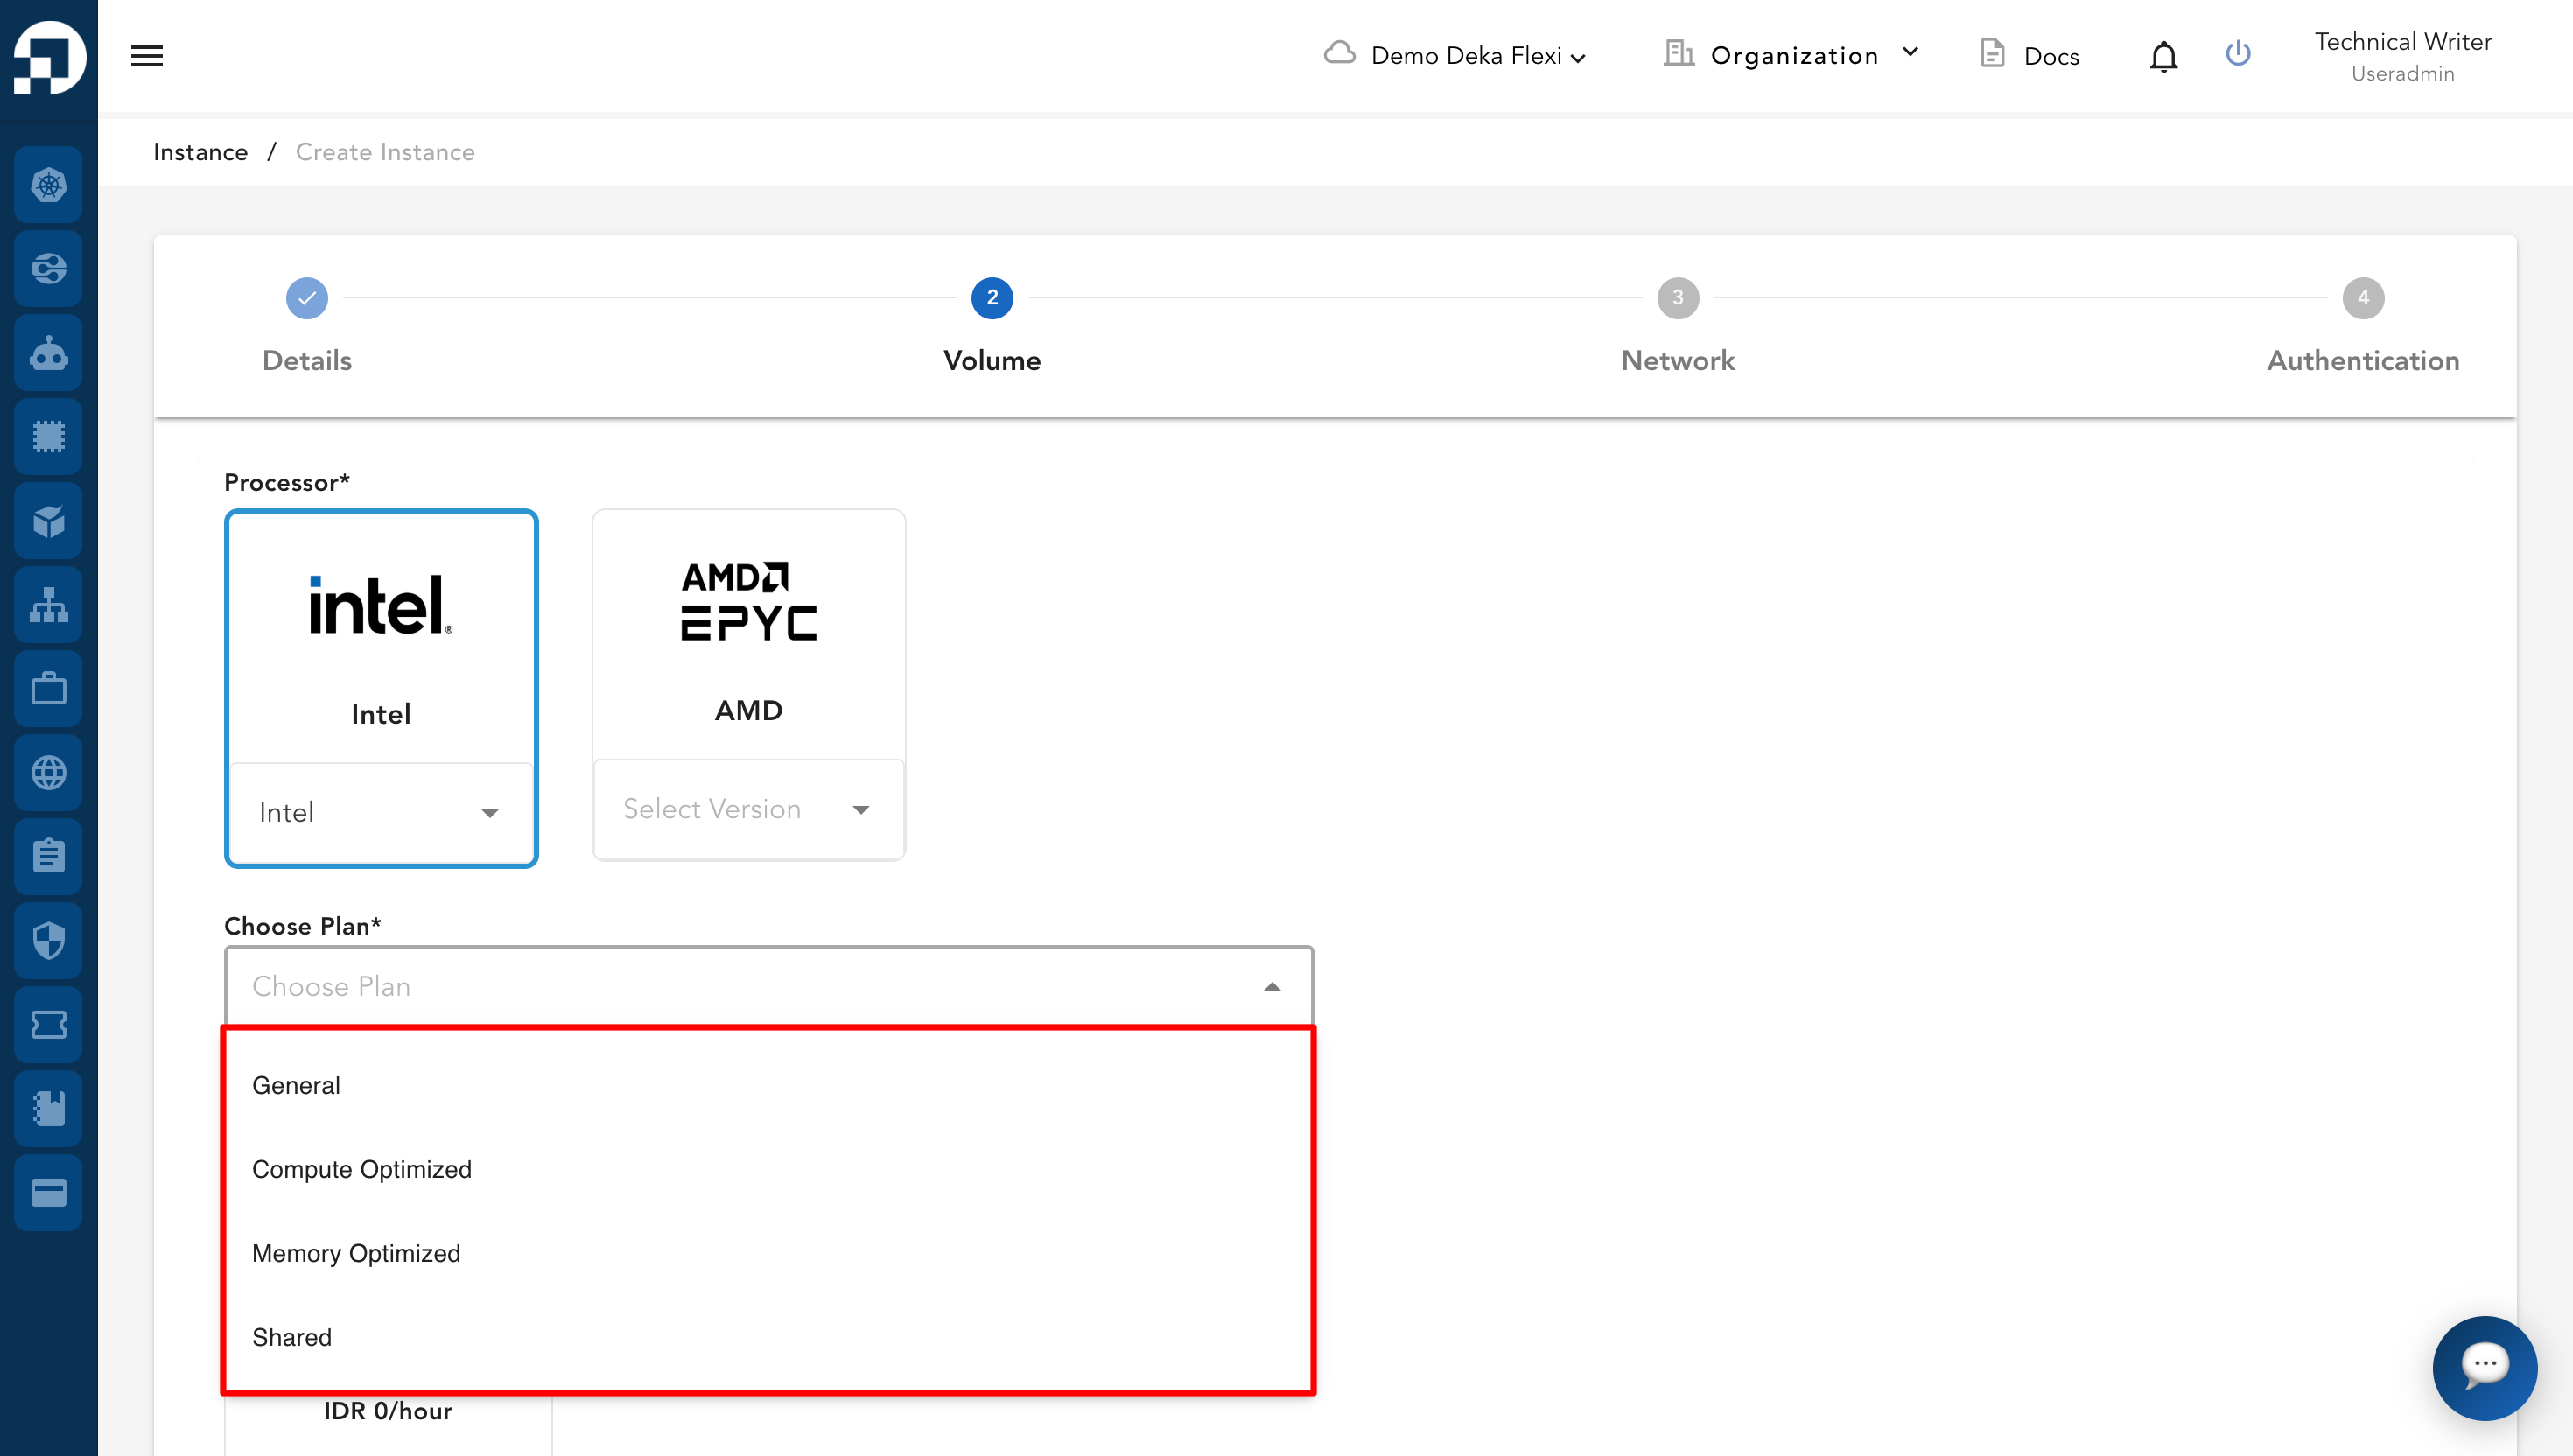
* Pilih Choose a plan untuk menentukan tipe mesin VM yang akan digunakan.

<figure><img src="https://putri.box.cloudeka.id/cloudeka-assets/docs.cloudeka.ai/6dekaflexi/createvmisntance_08.png" alt=""><figcaption></figcaption></figure>

<table><thead><tr><th width="206">Column</th><th>Description</th></tr></thead><tbody><tr><td><strong>General</strong></td><td>The VM size provides a balanced CPU to memory ratio.</td></tr><tr><td><strong>Compute Optimized</strong></td><td>Delivers the highest performance CPU in Compute Engine and is optimized for compute-intensive workloads.</td></tr><tr><td><strong>Shared</strong></td><td>It provides a cost-effective method for running small applications that is not resource intensive.</td></tr><tr><td><strong>Memory Optimized</strong></td><td>Provides high memory to CPU ratio, optimized for memory-intensive workloads.</td></tr></tbody></table>

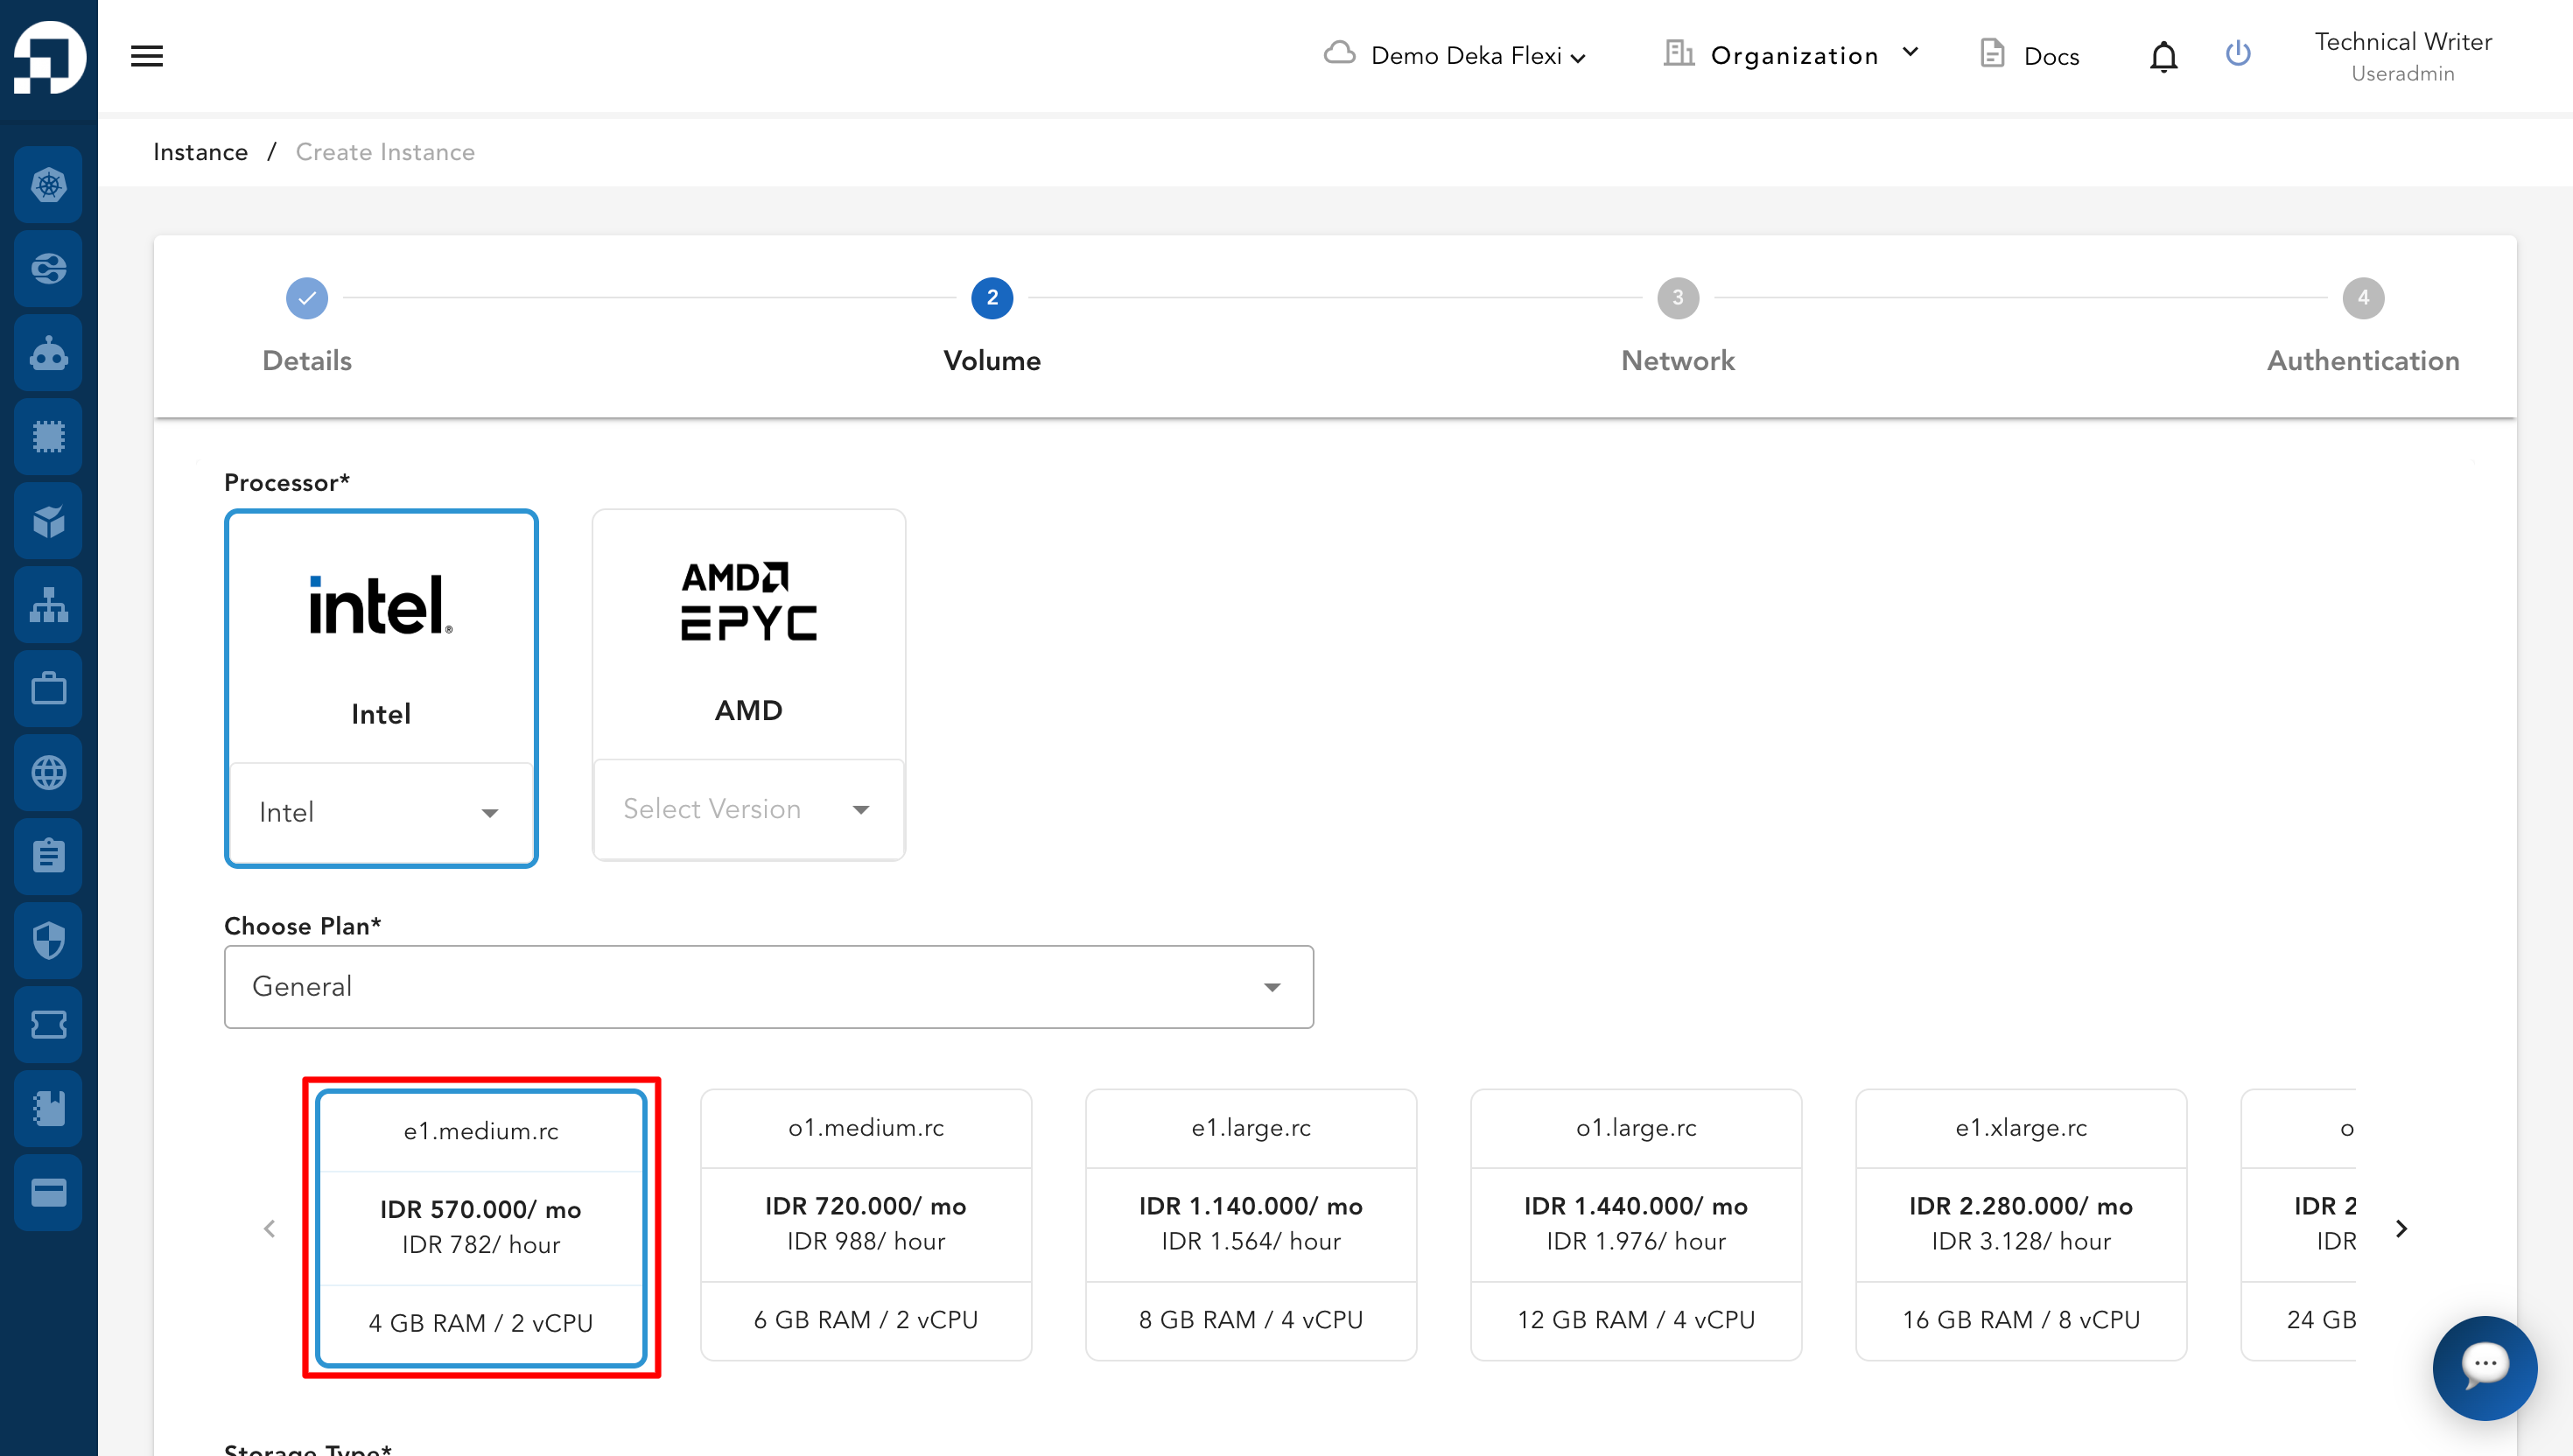
* Pilih Instance size untuk menentukan sumber daya CPU dan RAM pada VM yang akan dibuat.

<figure><img src="https://putri.box.cloudeka.id/cloudeka-assets/docs.cloudeka.ai/6dekaflexi/createvmisntance_09.png" alt=""><figcaption></figcaption></figure>

<table><thead><tr><th width="218">Type</th><th width="124">Description</th><th>vCPU/RAM</th></tr></thead><tbody><tr><td><strong>General</strong></td><td>CPU:RAM eq 1:2,1:3</td><td><p>In General there are several Instance size options including:</p><ol><li>o1.medium.rc with the size 2vCPU and memory 6 GB,</li><li>e1.medium.rc with the size 2vCPU and memory 4 GB,</li><li>o1.large.rc with the size 4vCPU and memory 12 GB,</li><li>e1.large.rc with the size 4vCPU and memory 8 GB,</li><li>o1.xlarge.rc with the size 8vCPU and memory 24 GB,</li><li>e1.xlarge.rc with the size 8vCPU and memory 16 GB,</li><li>o1.cclarge.rc with the size 16vCPU and memory 48 GB,</li><li>e1.xxlarge.rc dengan 16vCPU and memory 32 G,</li><li>o1.qlarge.rc with the size 32vCPU and memory 96 GB,</li><li>e1.qlarge.rc with the size 32vCPU and memory 64 GB.</li></ol></td></tr><tr><td><strong>Compute Optimized</strong></td><td>CPU:RAM eq 1:1</td><td><p>In Compute Optimized there are several Instance size options including:</p><ol><li>c1.medium.rc with the size 2vCPU and memory 2GB,</li><li>c1.large.rc with the size 4vCPU and memory 4GB,</li><li>c1.xlarge.rc with the size 8vCPU and memory 8GB,</li><li>c1.xxlarge.rc with the size 16vCPU and memory 16GB,</li><li>c1.qlarge.rc with the size 32vCPU and memory 32GB</li></ol></td></tr><tr><td><strong>Shared</strong></td><td>Based on 1 vCPU</td><td><p>In Shared there are several Instance sizes that can be used:</p><ol><li>s1.small.rc with the size 1vCPU and memory 4 GB,</li><li>o1.small.rc with the size 1vCPU and memory 3 GB,</li><li>c1.qsmall.rs with the size 1vCPU and memory 2 GB,</li><li>c1.small.rc with the size 1vCPU and memory 1 GB.</li></ol></td></tr><tr><td><strong>Memory Optimized</strong></td><td>CPU:RAM eq 1:4</td><td><p>In Memory Optimized there are several Instance sizes that can be used:</p><ol><li>o1.xxxxlarge.rc with the size 2vCPU and memory 32 GB,</li><li>o1.xxxLarge.rc with the size 2vCPU dan ukuran memori 16 GB,</li><li>s1.medium.rc with the size 2vCPU and memory 8 GB,</li><li>c1.sxLarge.rc with the size 4vCPU and memory 64 GB,</li><li>c1.xxxLarge.rc with the size 4vCPU dan ukuran memori 32 GB,</li><li>s1.large.rc with the size 4vCPU and memory 16 GB,</li><li>q1.xlarge.rc with the size 8vCPU and memory 128 GB.</li><li>s1.sxlarge.rc with the size 8vCPU and memory 32 GB.</li><li>s1.xlarge.rc with the size 8vCPU and memory 32 GB.</li><li>s1.xxlarge.rc with the size 16vCPU and memory 64 GB,</li><li>s1.qlarge.rc with the size 32vCPU and memory 128 GB,</li><li>a1.xxxlarge.rc with the size 64vCPU and memory 512 GB.</li></ol></td></tr></tbody></table>

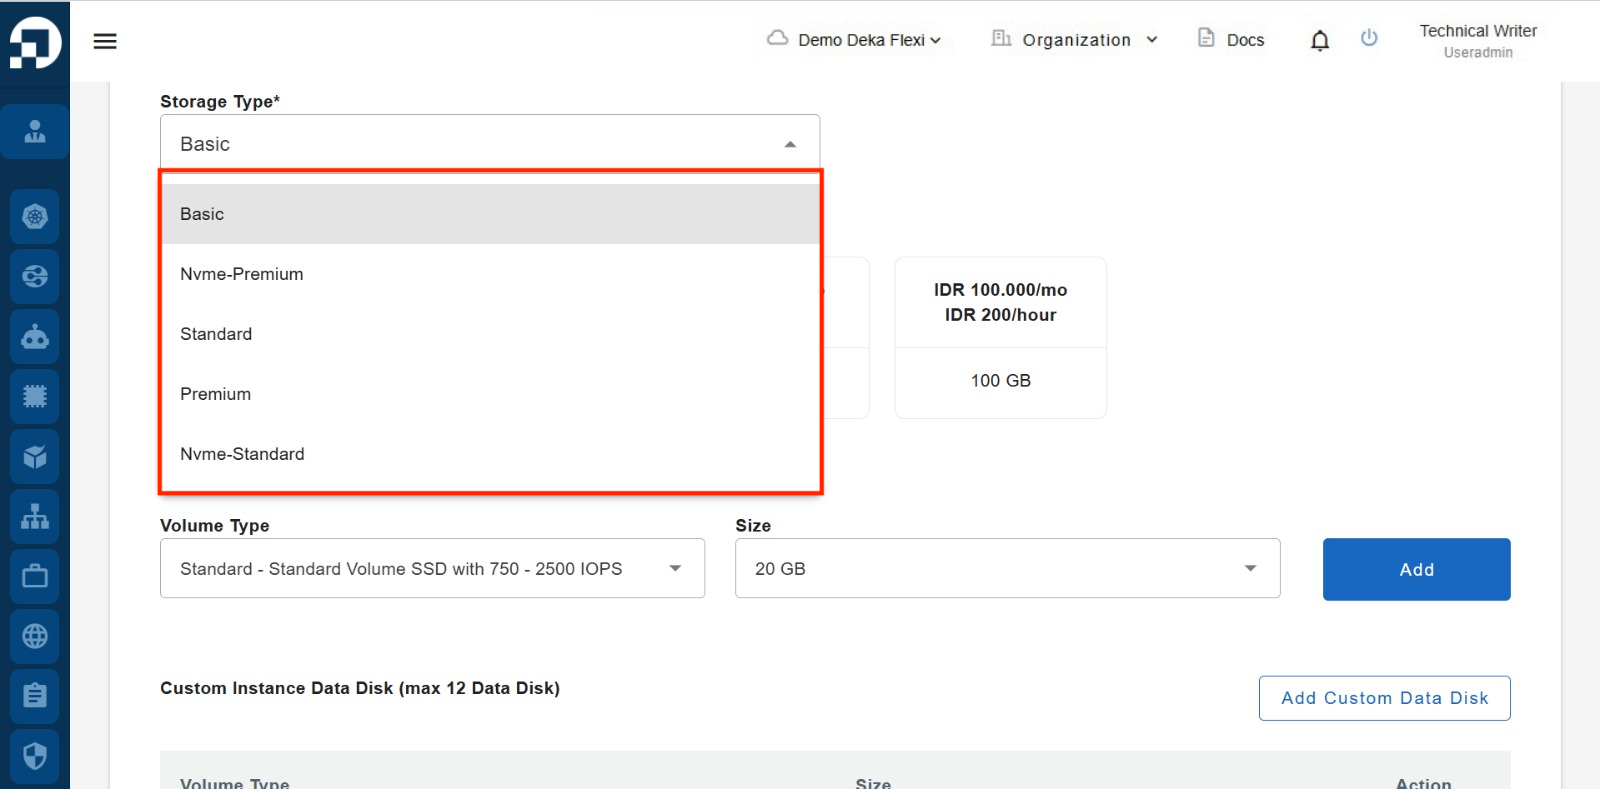
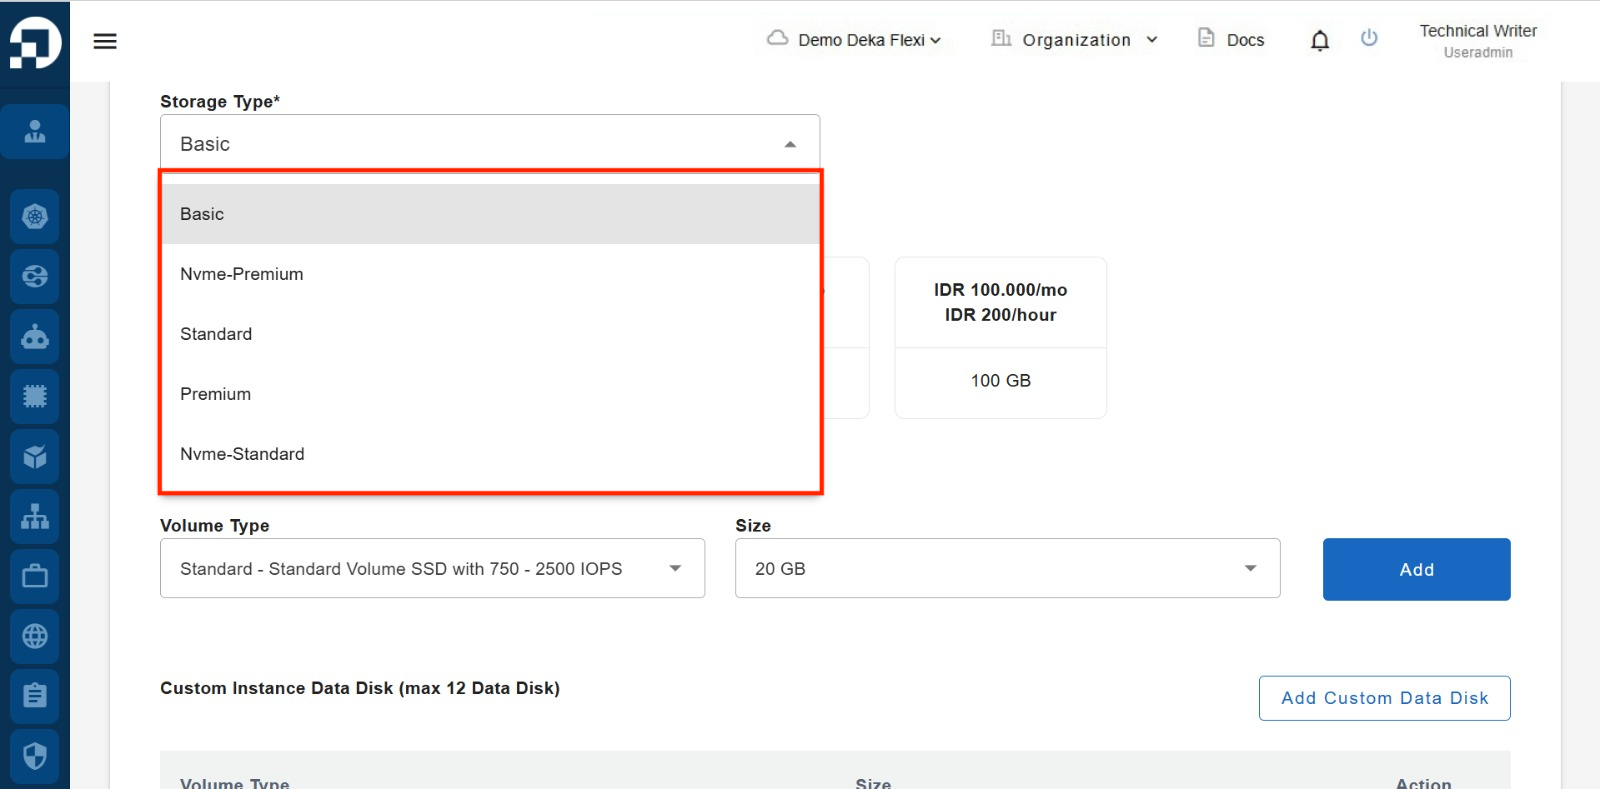
* Tersedia lima tingkatan penyimpanan: Basic, Standard, Premium, NVMe Standard, dan NVMe Premium. Setiap tingkatan menyediakan performa IOPS dan dukungan fitur yang berbeda. Pilih tipe penyimpanan yang akan digunakan.

<figure><img src="https://putri.box.cloudeka.id/cloudeka-assets/docs.cloudeka.ai/6dekaflexi/createvmisntance_10.png" alt=""><figcaption></figcaption></figure>

Cloudeka menawarkan beberapa tingkatan penyimpanan dengan performa dan dukungan fitur yang berbeda. Lihat tabel berikut untuk membandingkan setiap tingkatan dan memilih opsi yang paling sesuai untuk beban kerja Anda.

<table><thead><tr><th>Tier</th><th width="245.5625">IOPS</th><th width="75.453125">TBS</th><th width="95.0677490234375">TKP</th><th width="76.5625">JAH</th></tr></thead><tbody><tr><td>Basic</td><td>No IOPS guarantee</td><td>Yes</td><td>Yes</td><td>No</td></tr><tr><td>Standard</td><td>750 - 2,500 IOPS</td><td>Yes</td><td>Yes</td><td>Yes</td></tr><tr><td>Premium</td><td>2,250 - 4,500 IOPS</td><td>Yes</td><td>Yes</td><td>Yes</td></tr><tr><td>NVMe Standard</td><td>4,500 - 10,000 IOPS</td><td>Yes</td><td>No</td><td>No</td></tr><tr><td>NVMe Premium</td><td>10,000 - 15,000 IOPS</td><td>Yes</td><td>No</td><td>No</td></tr></tbody></table>

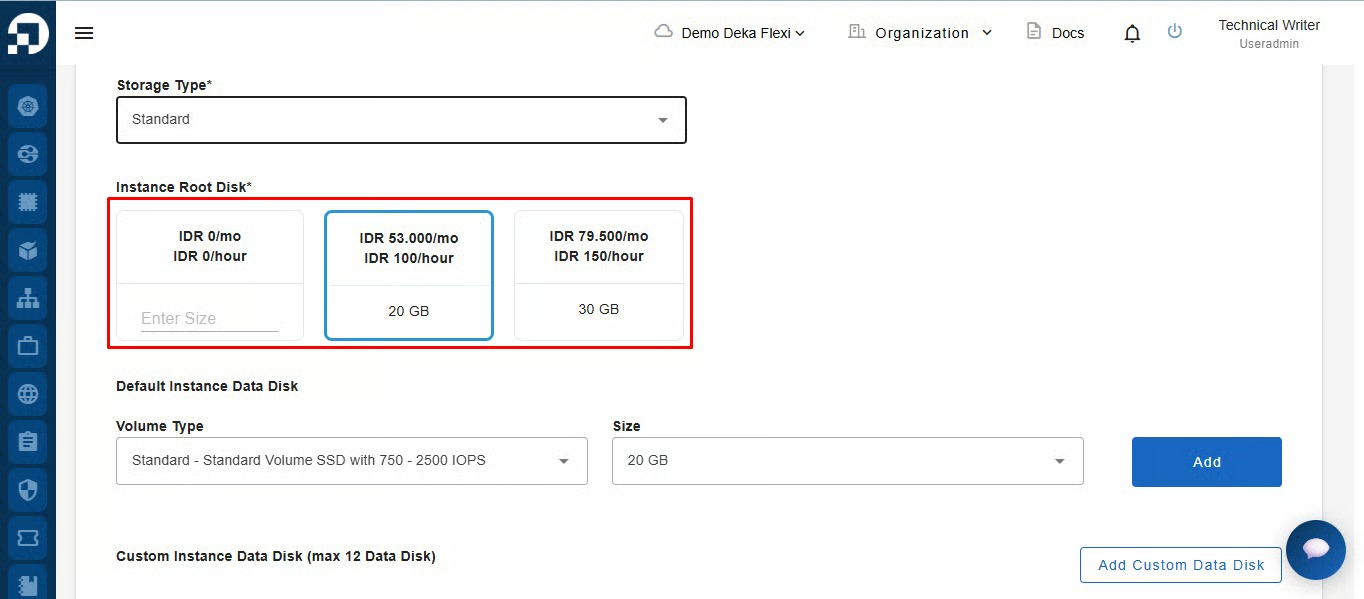
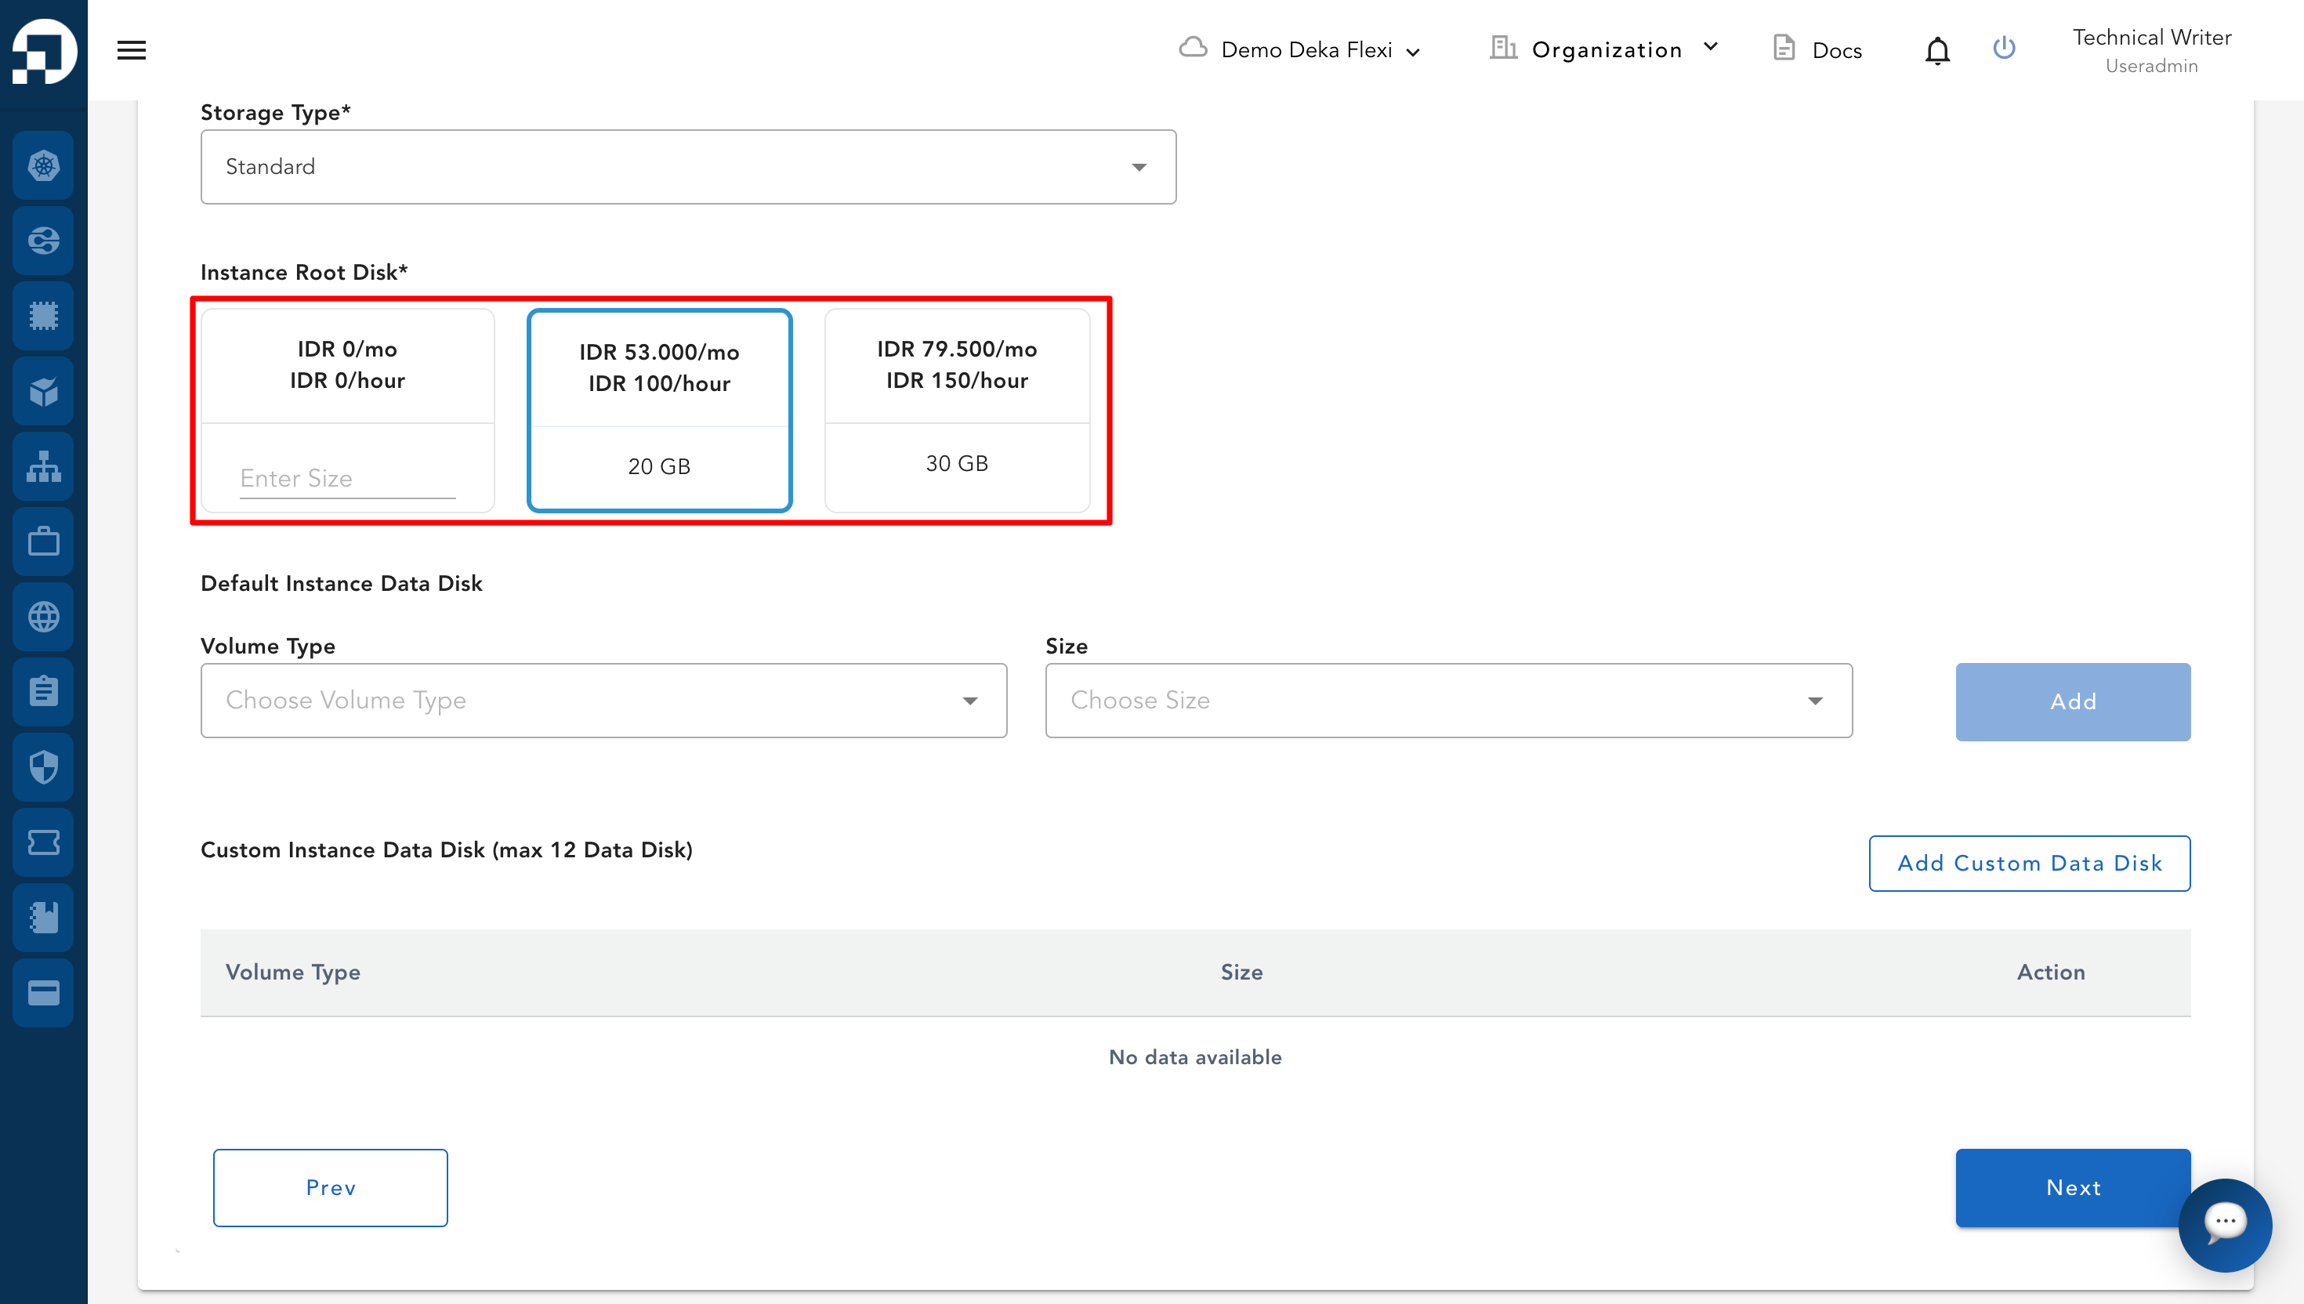
Pada kolom Instance Root disk, masukkan atau pilih ukuran disk OS yang akan digunakan. **Ukuran minimum root disk yang dapat digunakan adalah 20 GB.**

<figure><img src="https://putri.box.cloudeka.id/cloudeka-assets/docs.cloudeka.ai/6dekaflexi/createvminstance_11.png" alt=""><figcaption></figcaption></figure>

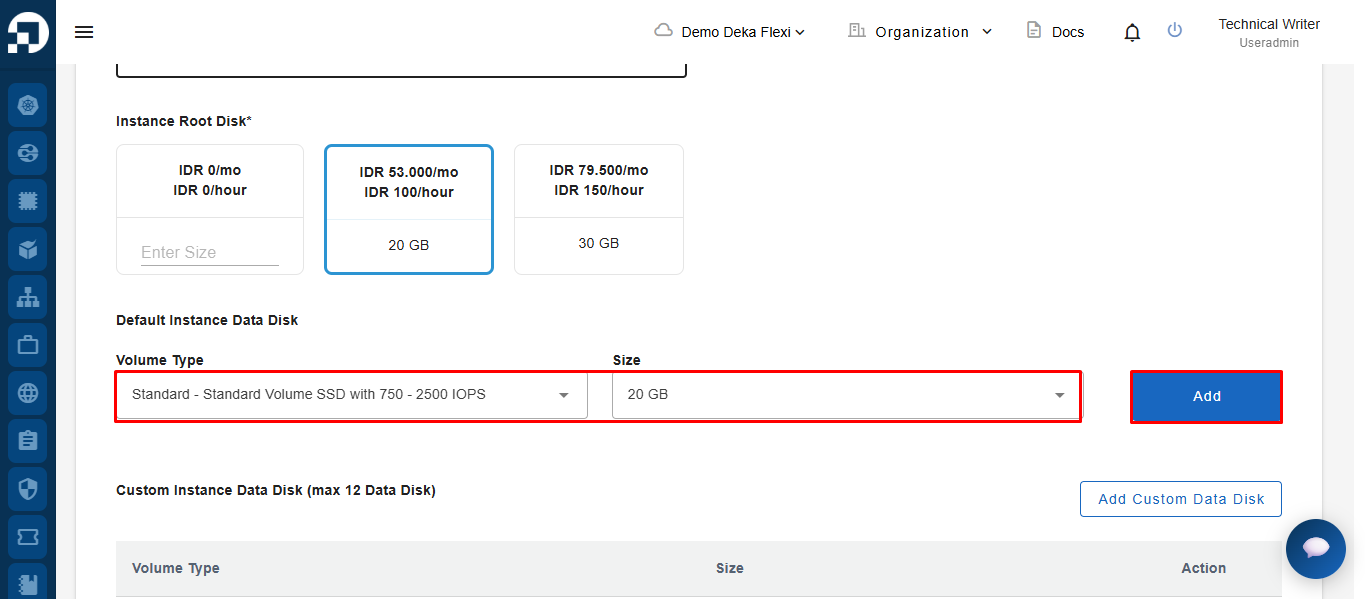
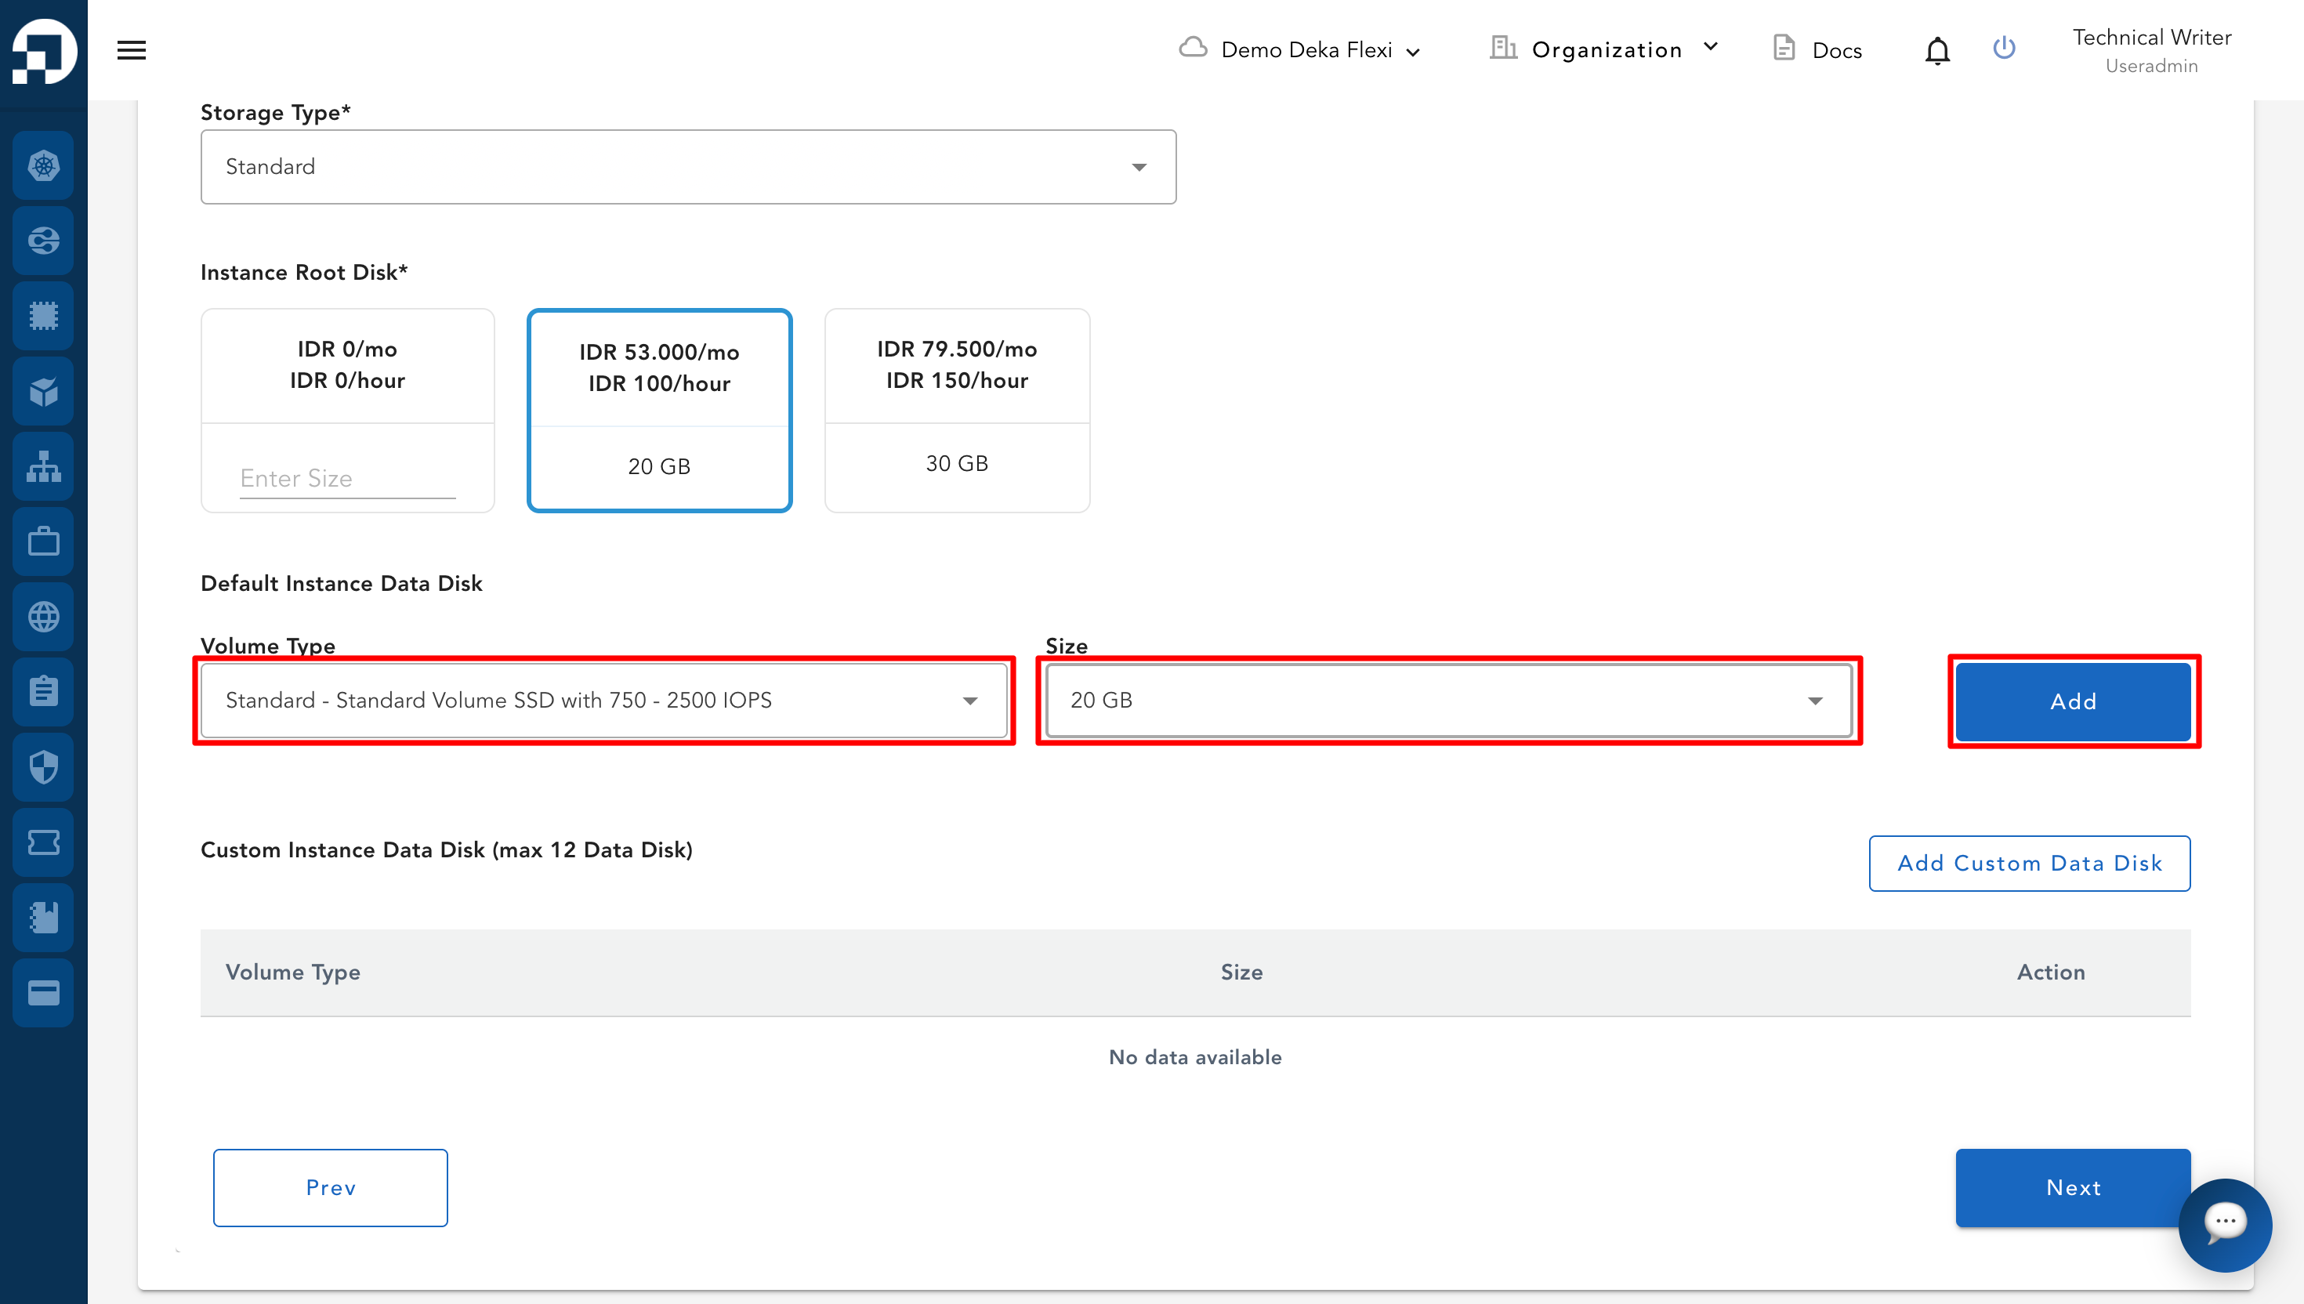
Terdapat dua jenis Volume Type, yaitu Standard Volume SSD dengan 750–2500 IOPS dan Premium Volume SSD dengan 2250–4500 IOPS. Pilih tipe Volume yang akan digunakan untuk data disk. Data disk digunakan untuk menambahkan penyimpanan pada VM di luar root disk/disk OS, lalu klik tombol Add.

<figure><img src="https://putri.box.cloudeka.id/cloudeka-assets/docs.cloudeka.ai/6dekaflexi/createvminstance_12.png" alt=""><figcaption></figcaption></figure>

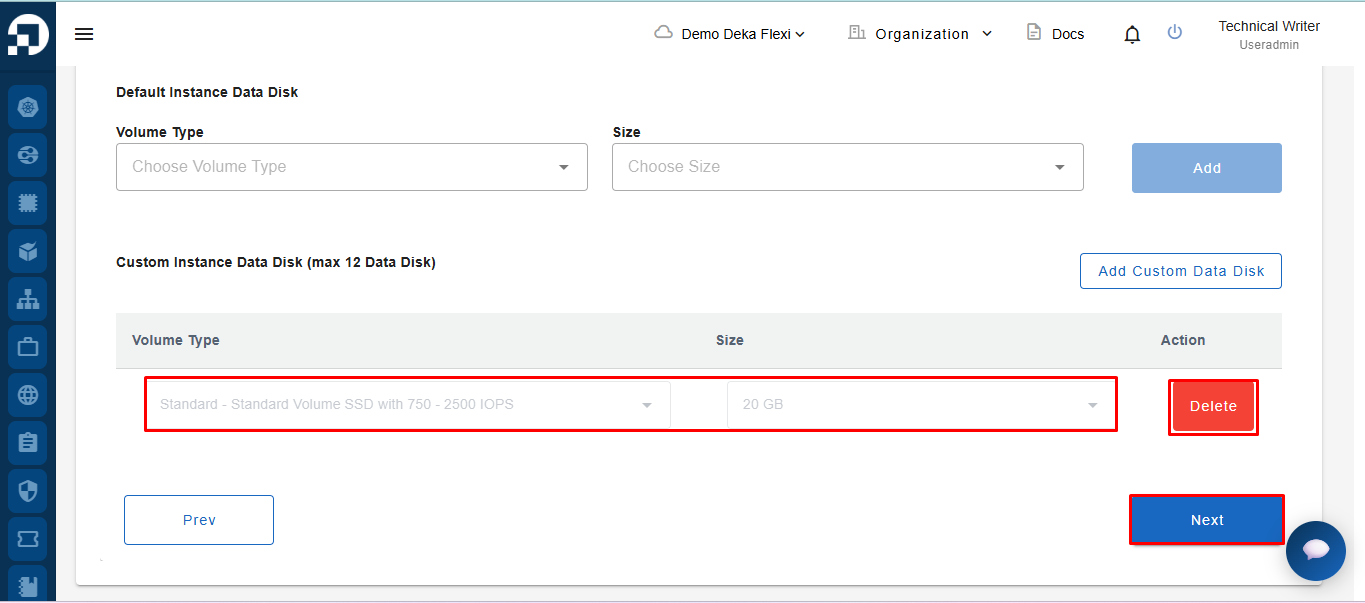
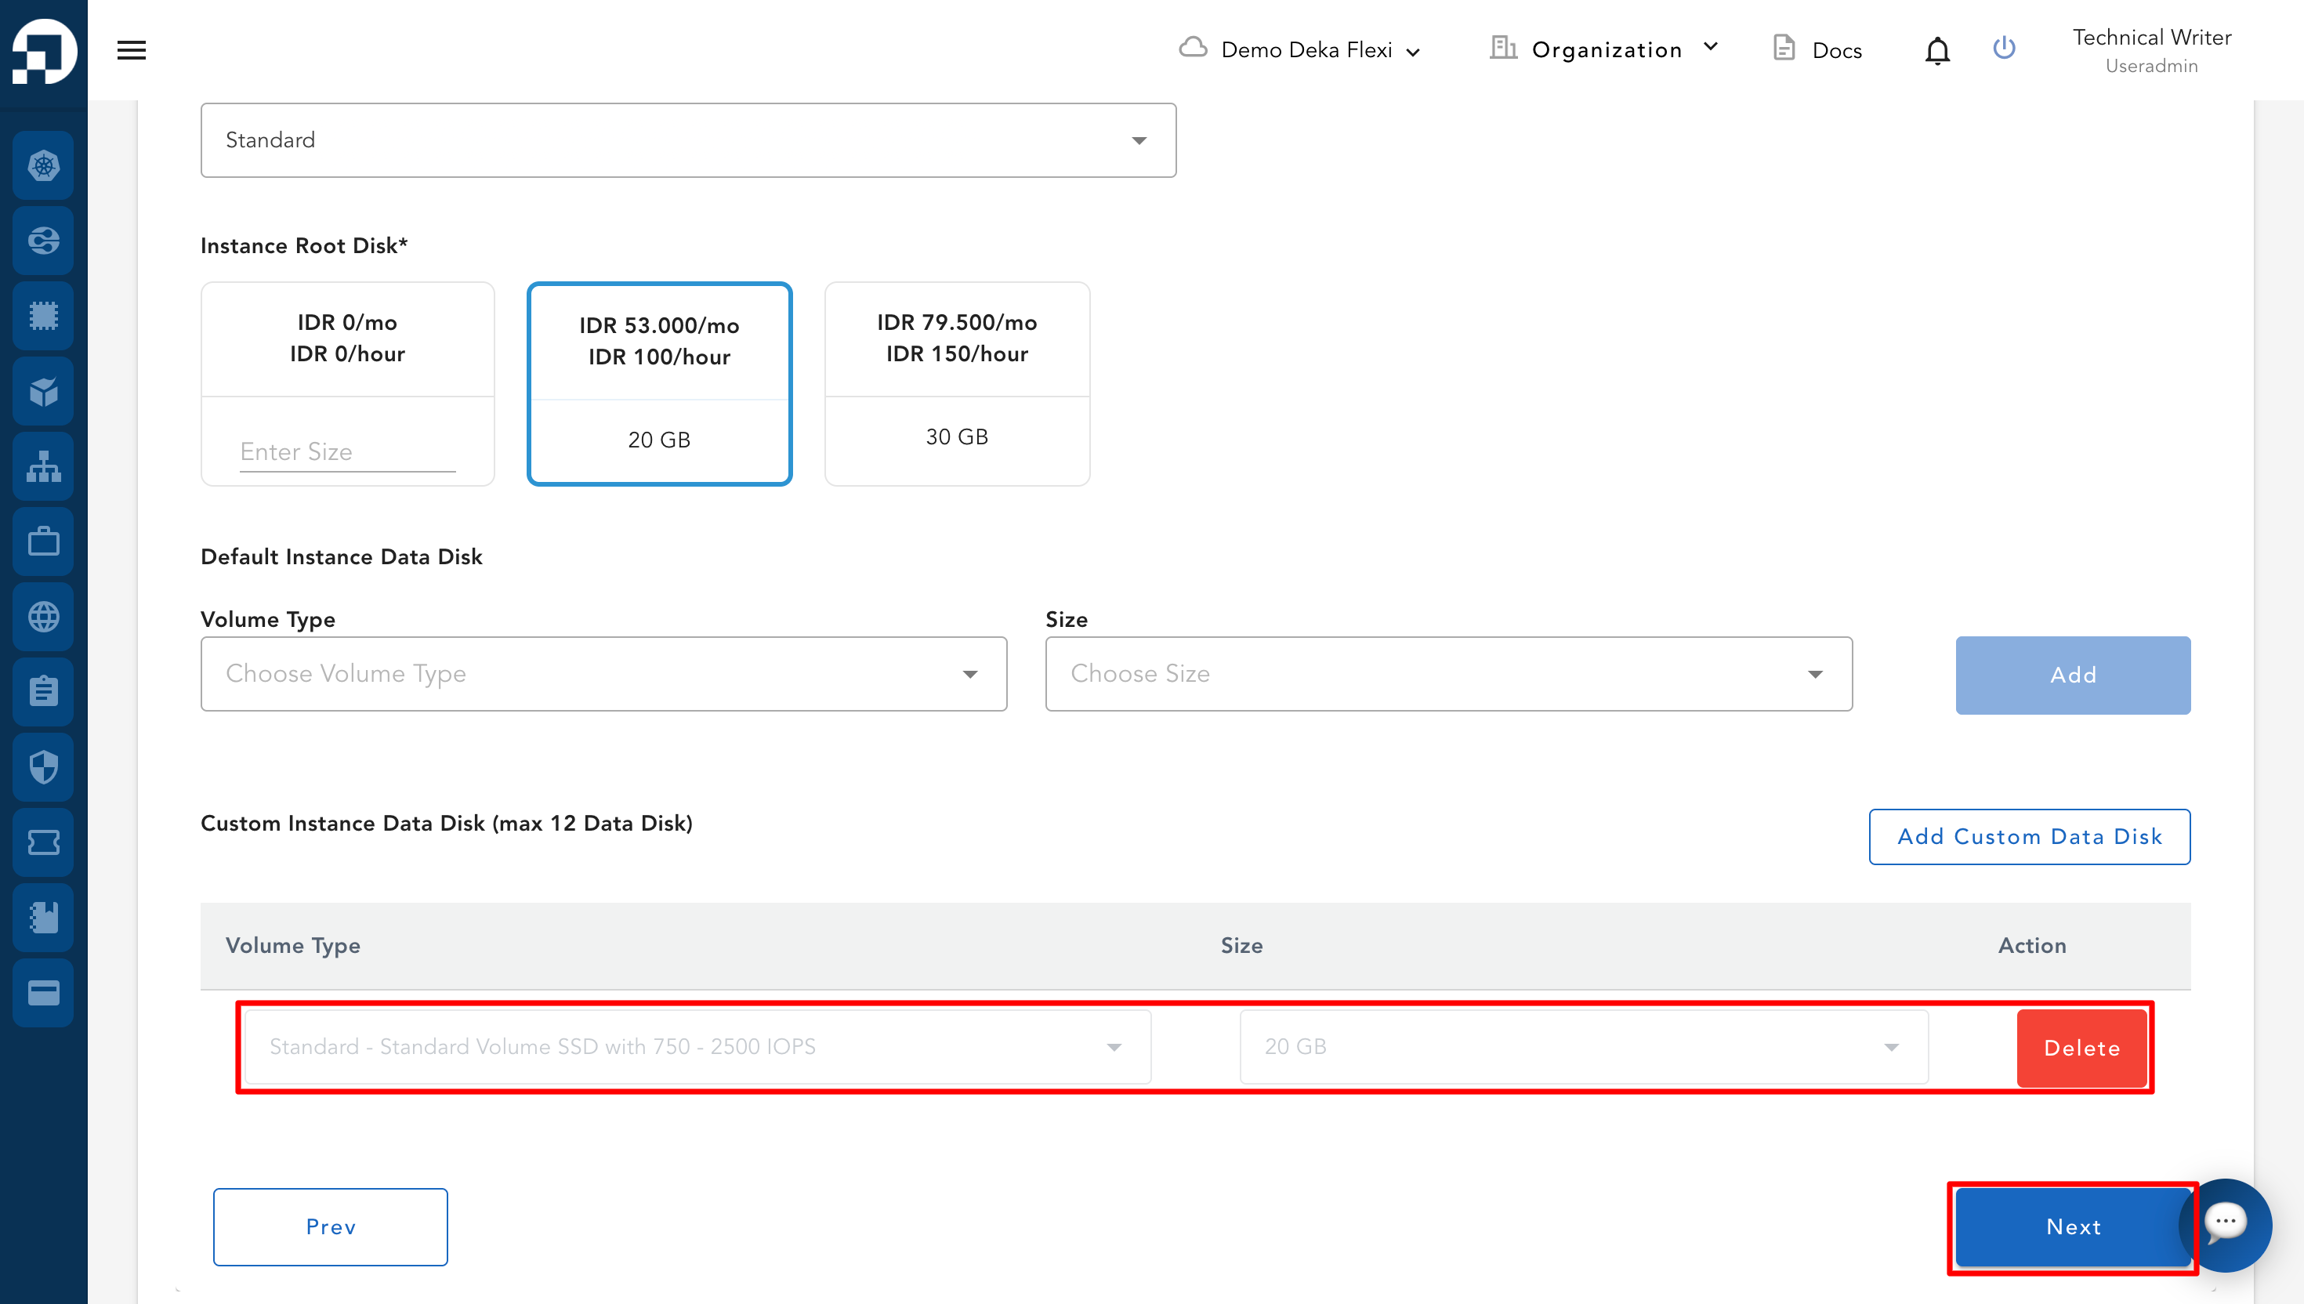
Setelah Instance Data Disk ditambahkan, disk akan muncul pada bagian Custom Instance Data Disk. Anda dapat menambahkan Data Disk dengan menekan tombol Add Custom Data Disk atau menghapus konfigurasi Data Disk yang telah ditambahkan dengan menekan tombol Delete. Jika Data Disk telah dikonfigurasi, tekan tombol Next untuk menuju tahap berikutnya.

<figure><img src="https://putri.box.cloudeka.id/cloudeka-assets/docs.cloudeka.ai/6dekaflexi/createvminstance_13.png" alt=""><figcaption></figcaption></figure>

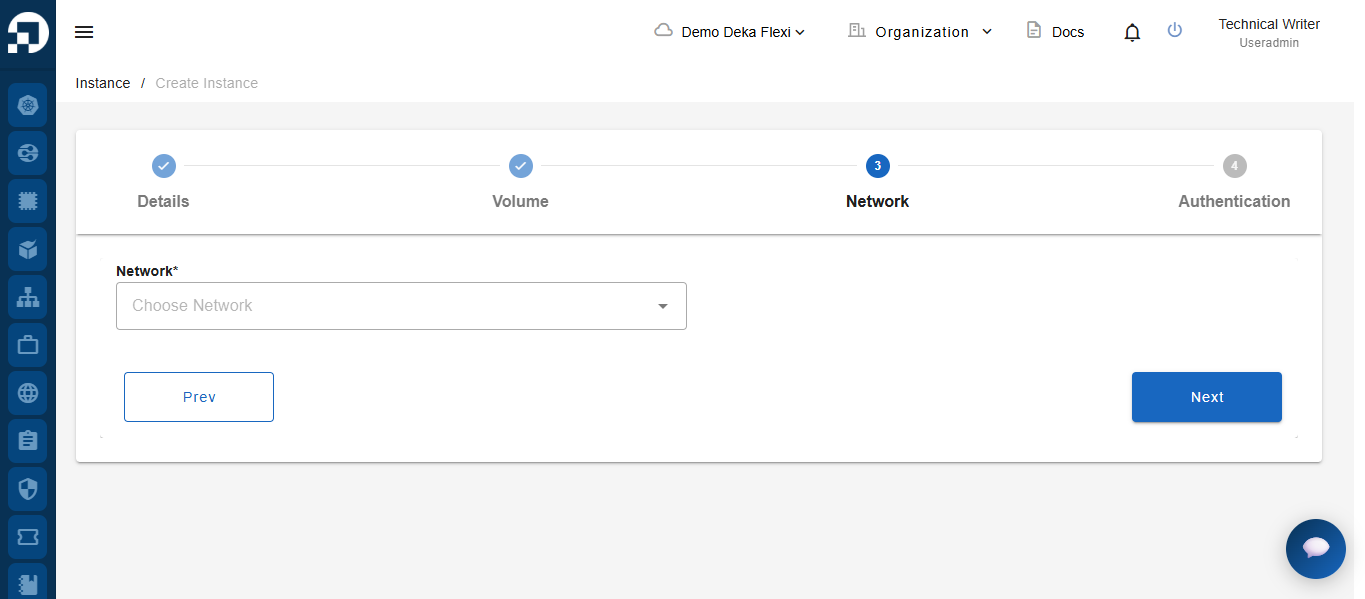
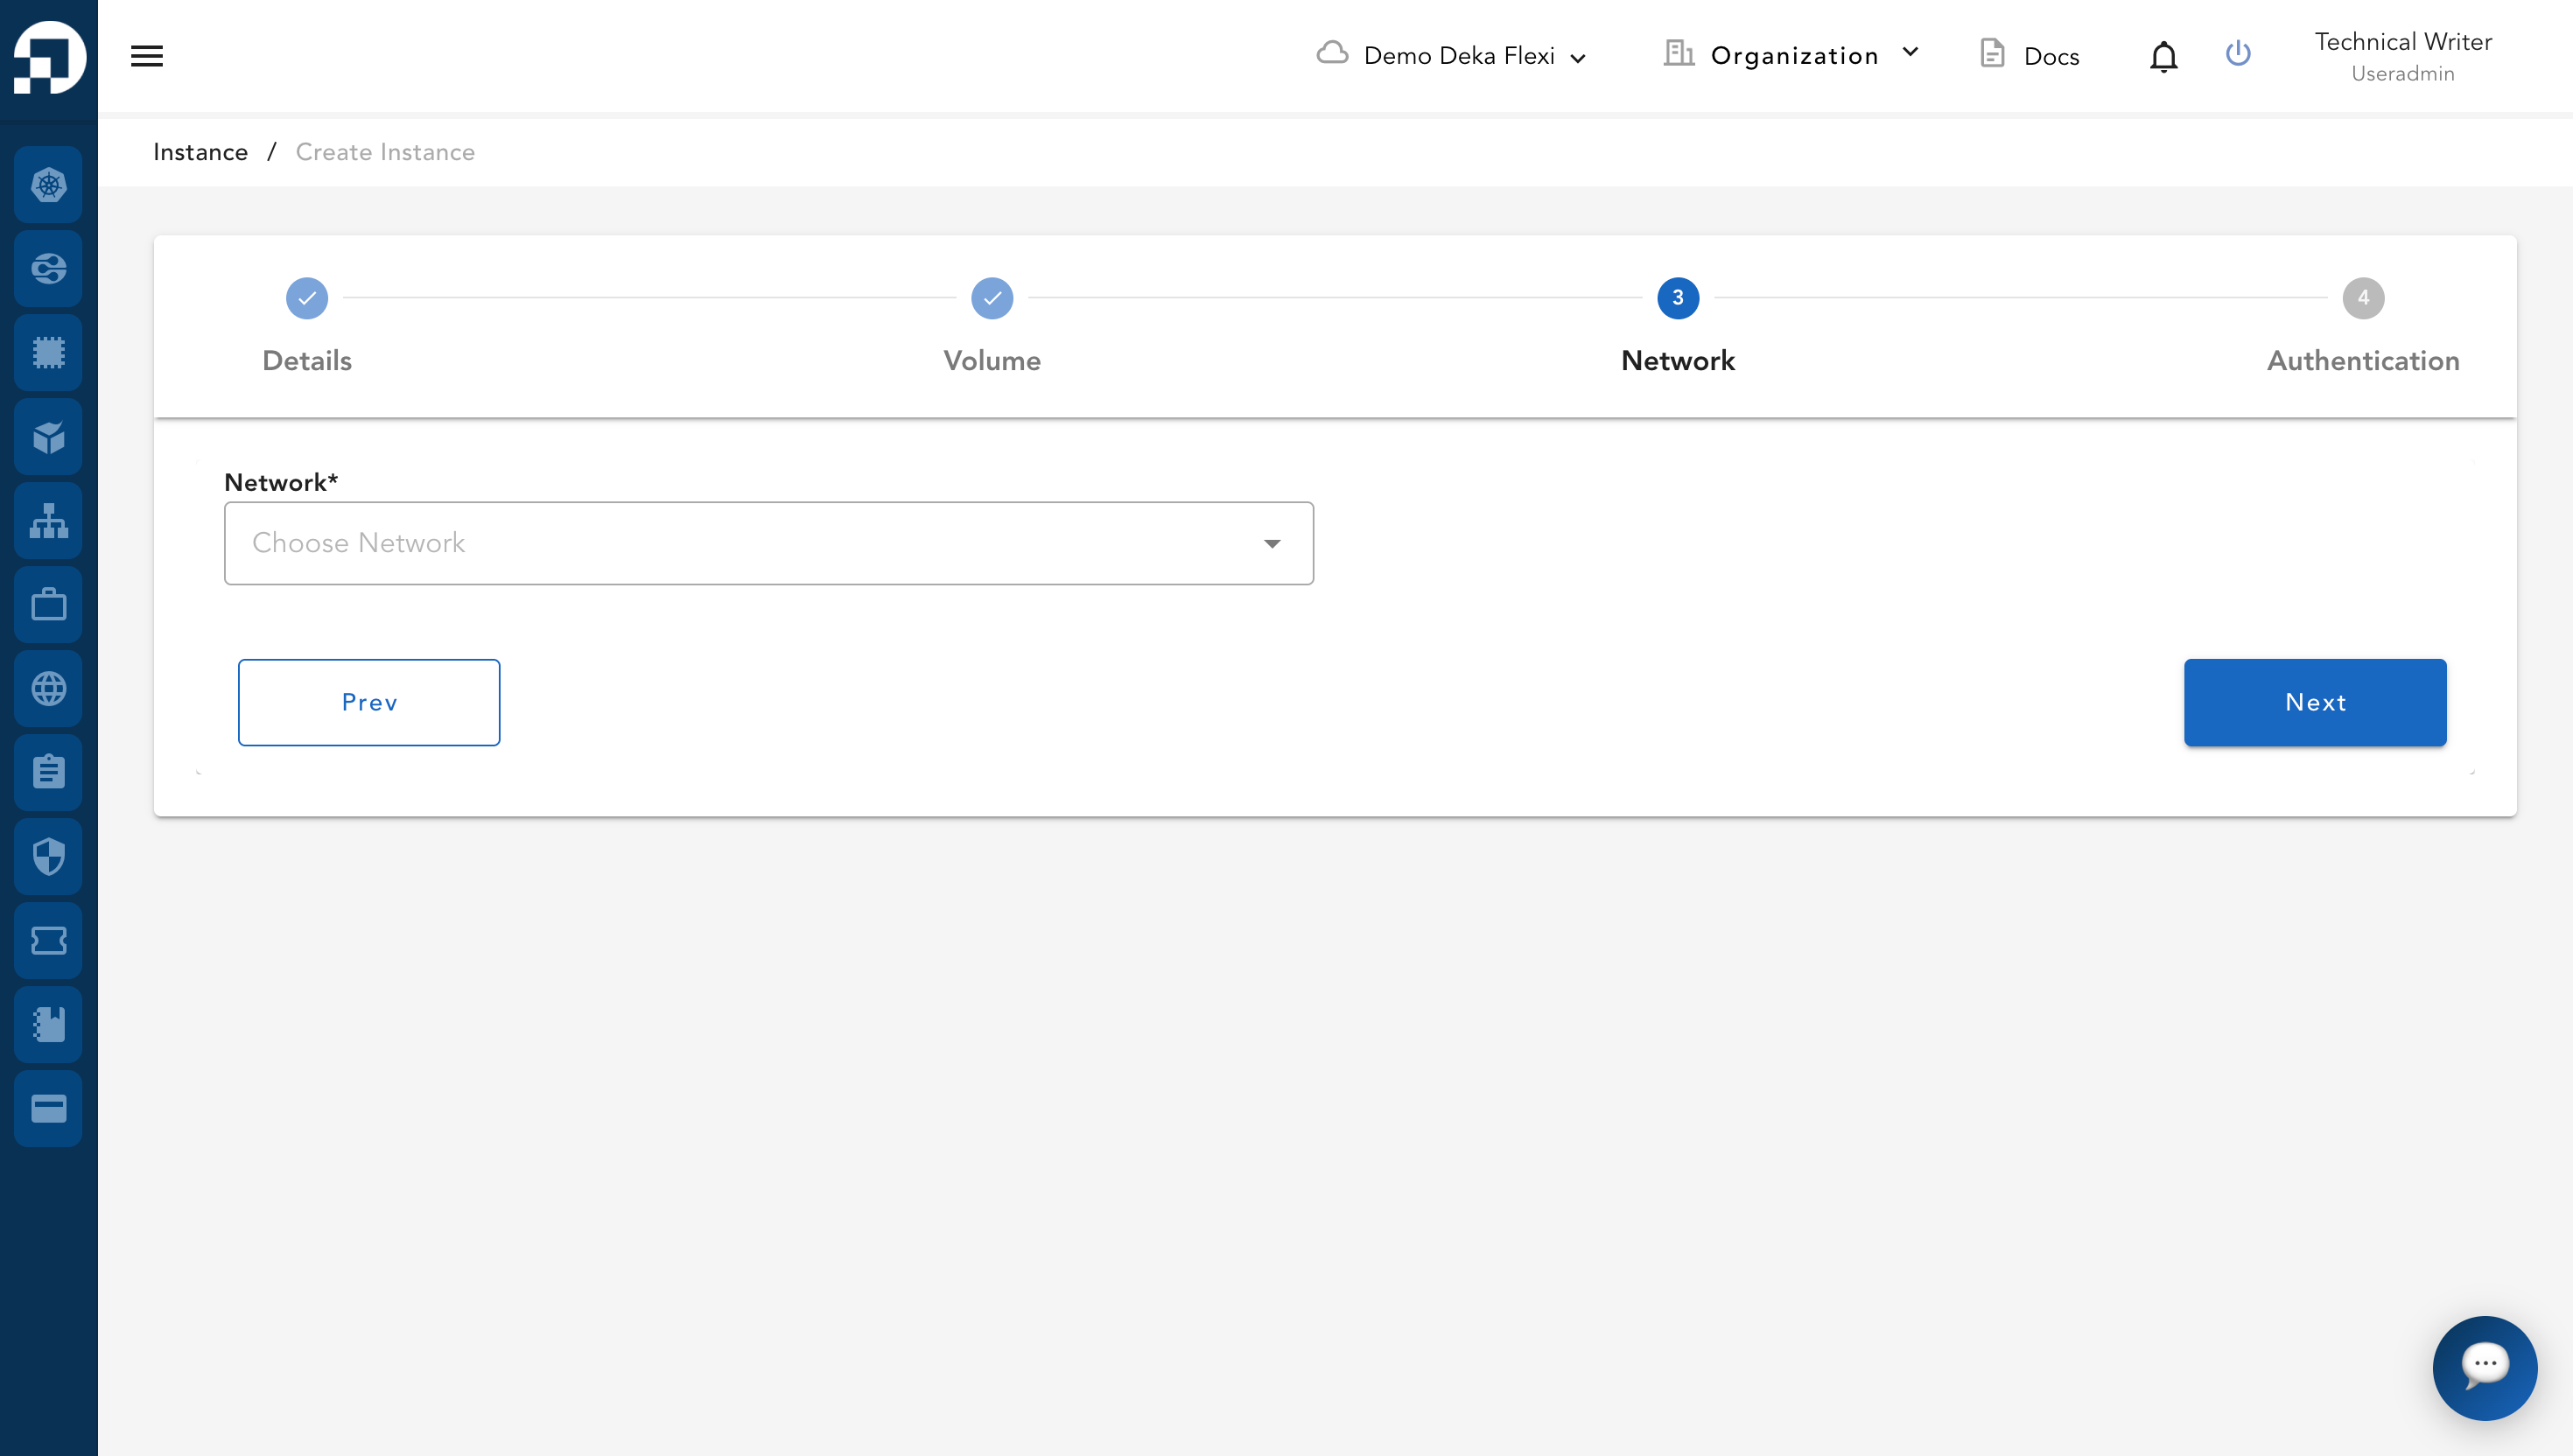
Pada tahap ketiga, yaitu Network, terdapat VPC Network. Pastikan Anda telah membuat VPC yang akan digunakan VM. Untuk penjelasan lebih lanjut tentang VPC yang digunakan, [klik di sini.](/deka-gpu-documentations/panduan-untuk-enterprise/deka-flexi/deka-flexi-network/vpc-network.md)

<figure><img src="https://putri.box.cloudeka.id/cloudeka-assets/docs.cloudeka.ai/6dekaflexi/createvminstance_14.png" alt=""><figcaption></figcaption></figure>

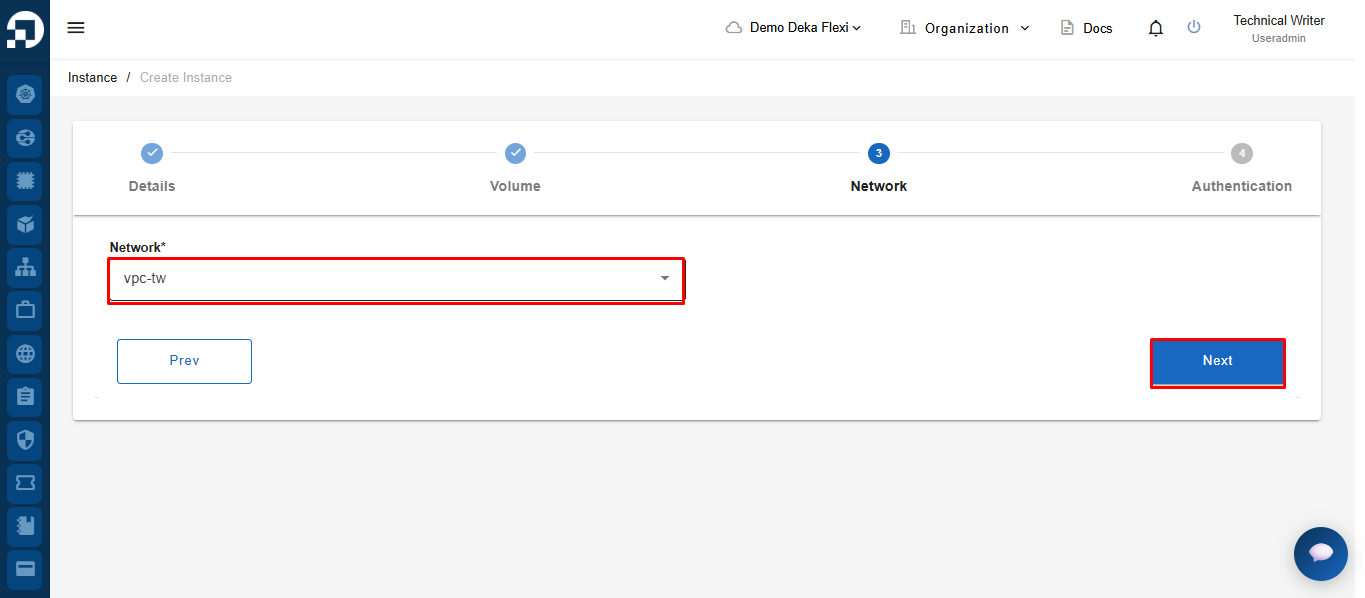
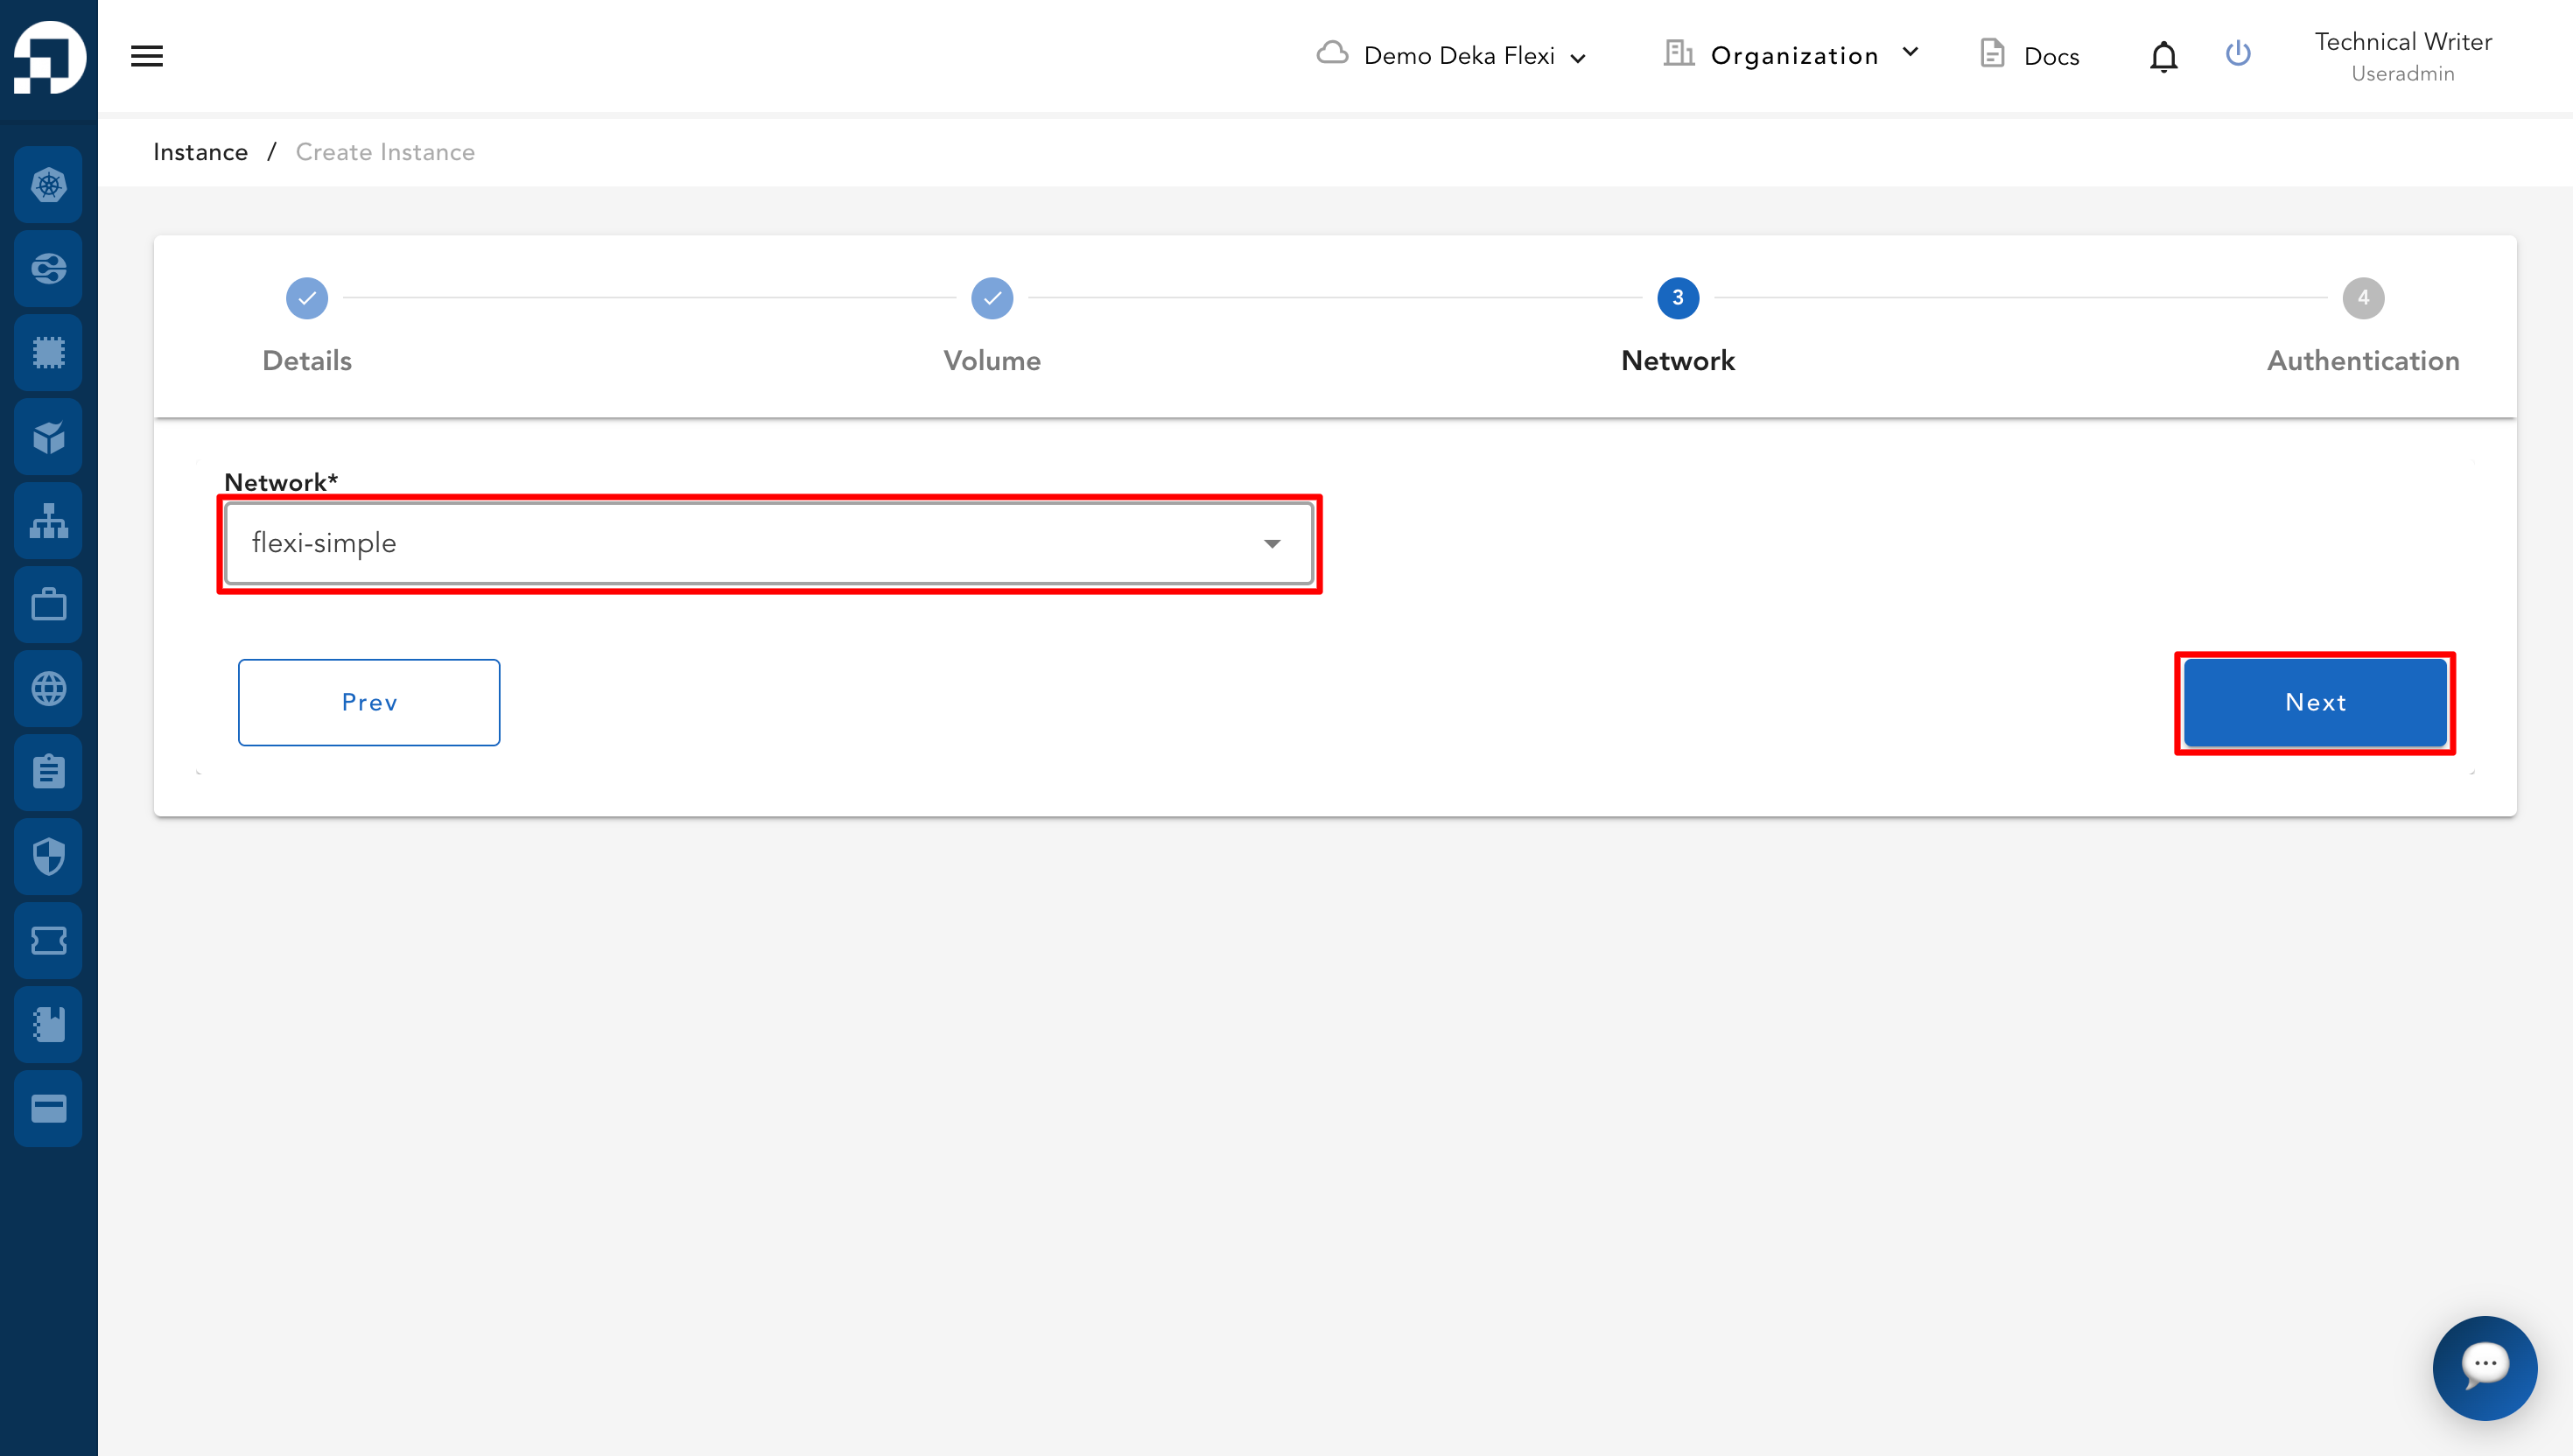
* Tentukan VPC yang akan digunakan. Klik tombol **Next** untuk menuju tahap berikutnya.

<figure><img src="https://putri.box.cloudeka.id/cloudeka-assets/docs.cloudeka.ai/6dekaflexi/createvminstance_15.png" alt=""><figcaption></figcaption></figure>

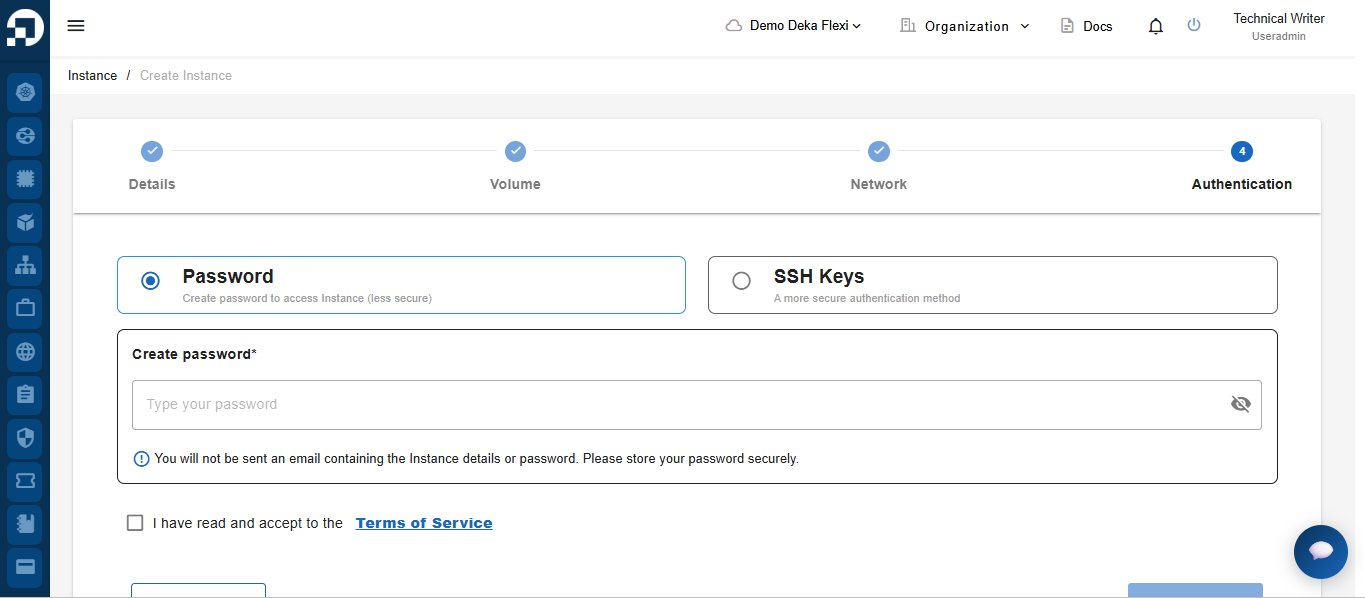
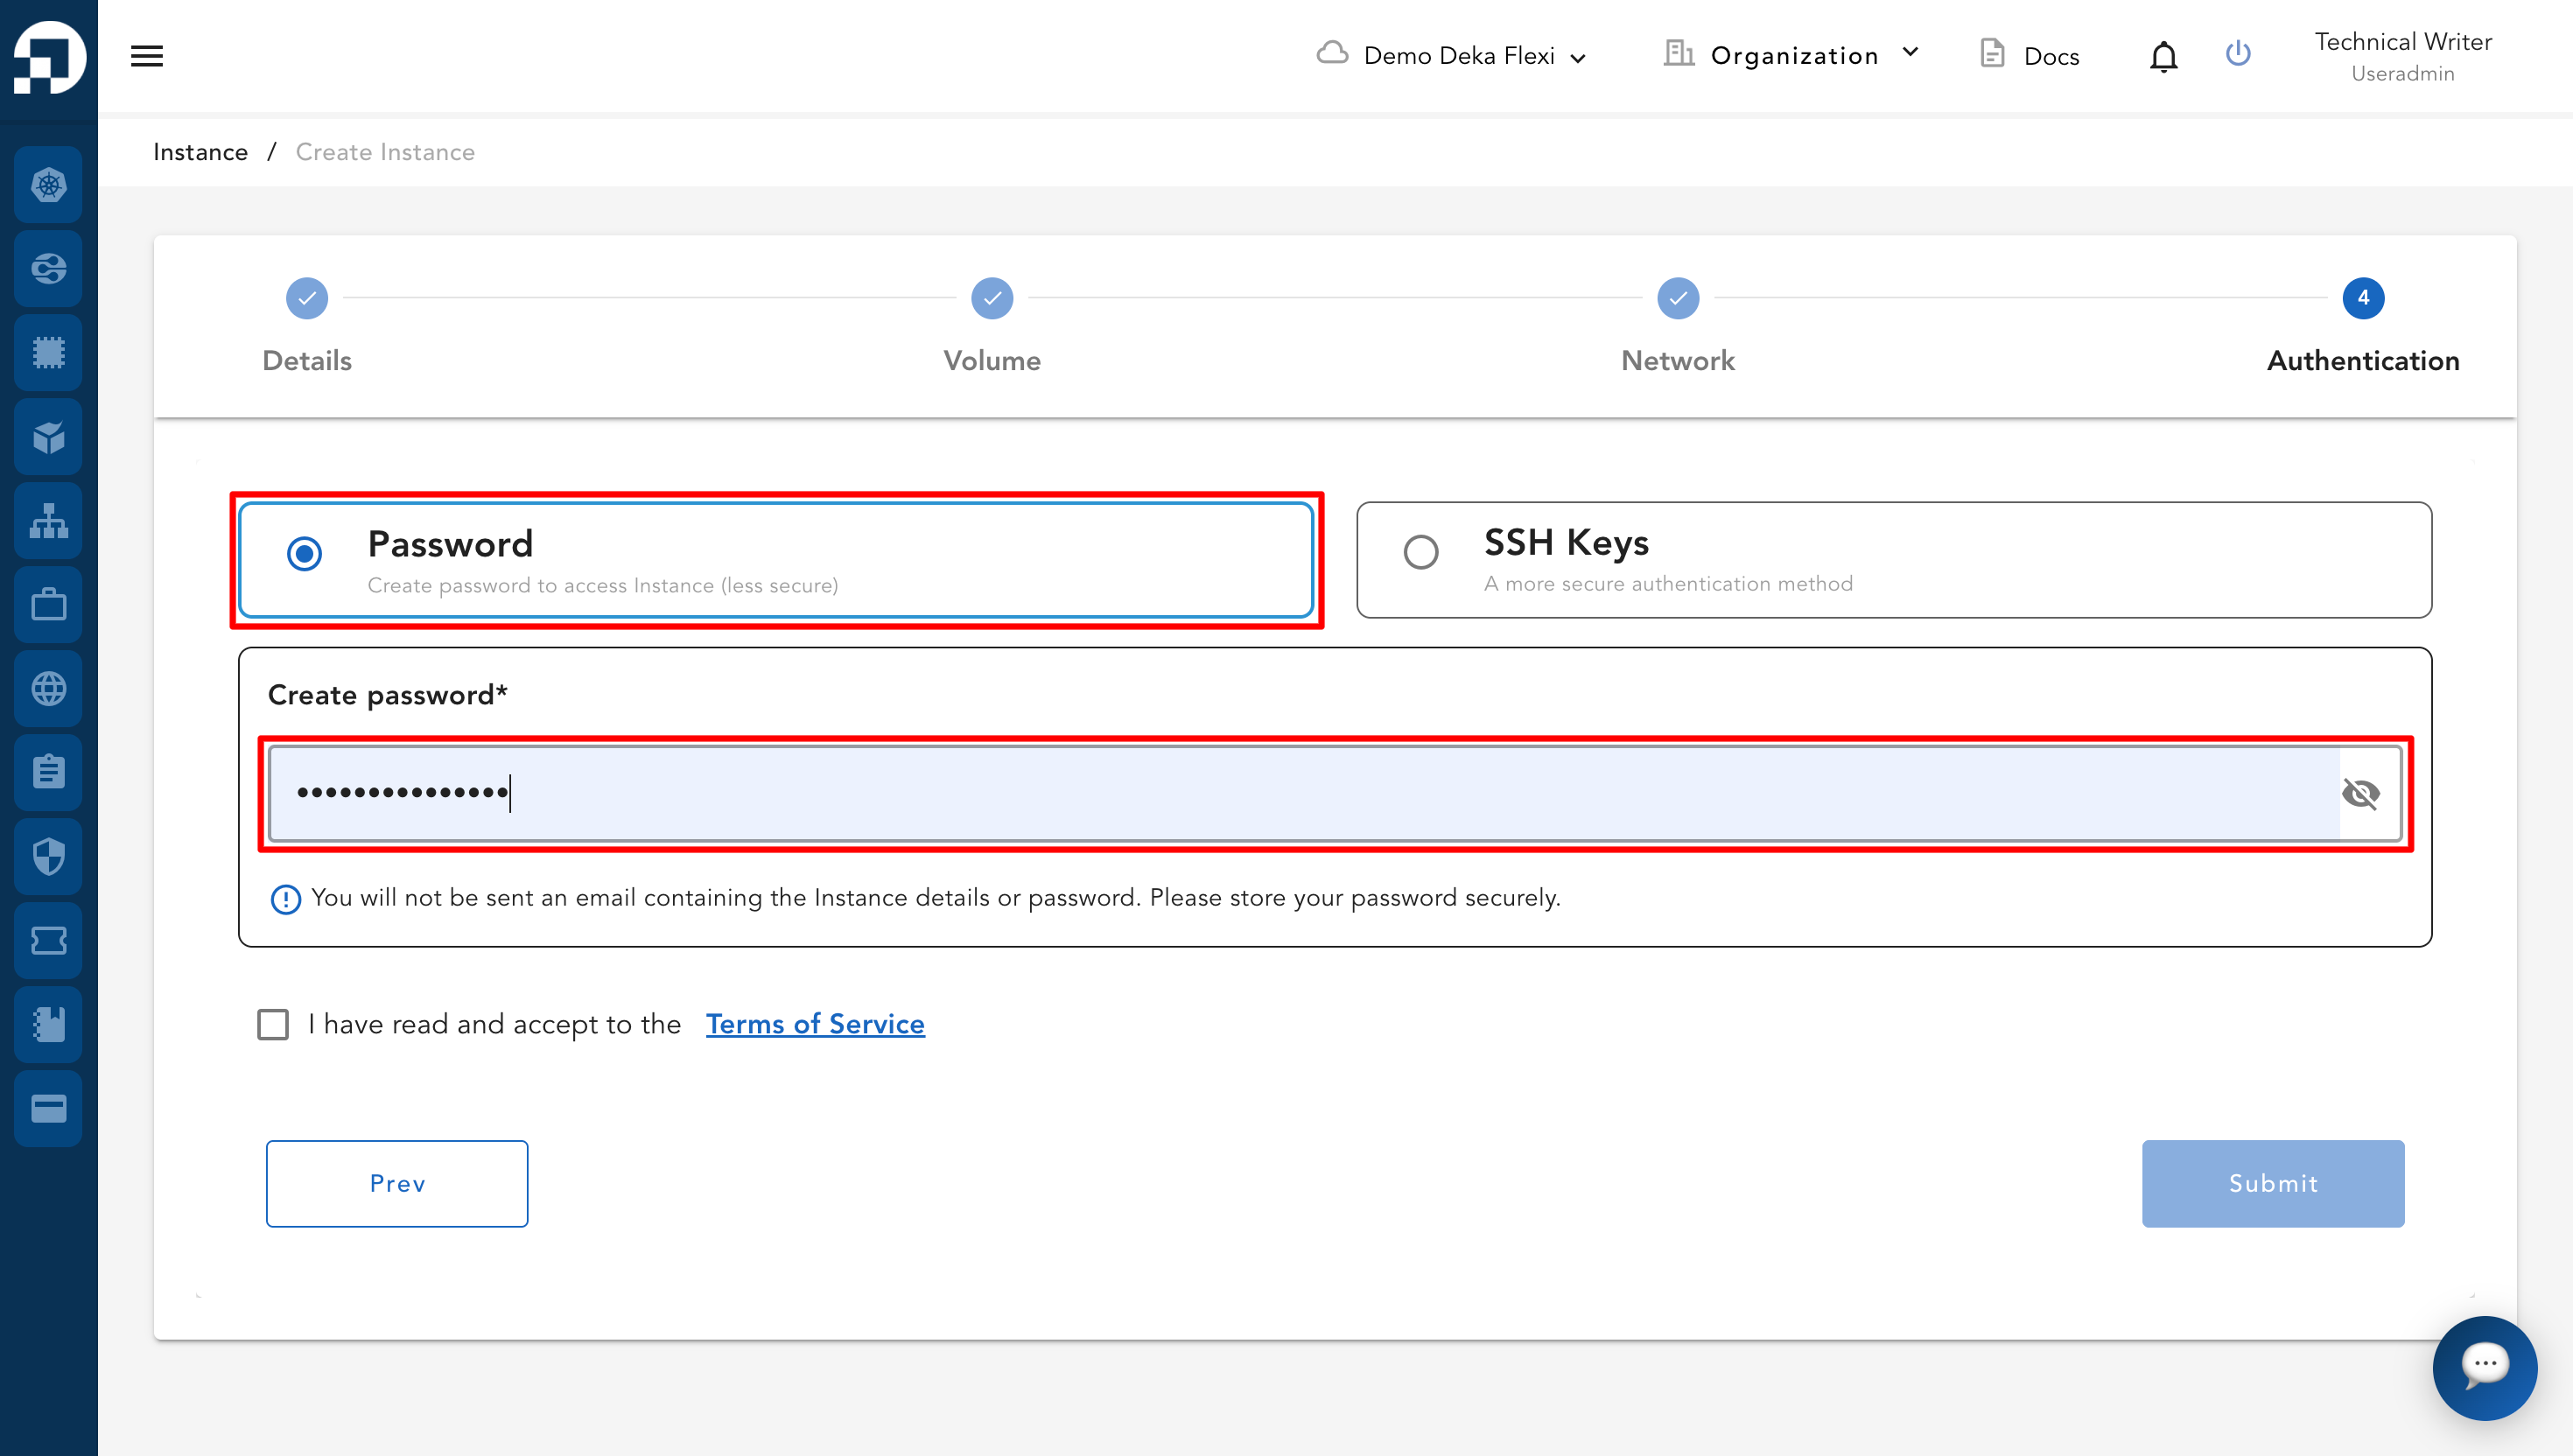
* Pada tahap keempat, yaitu Authentication, terdapat dua metode autentikasi untuk masuk ke VM, yaitu SSH Keys dan Passwords.

<figure><img src="https://putri.box.cloudeka.id/cloudeka-assets/docs.cloudeka.ai/6dekaflexi/createvminstance_16.png" alt=""><figcaption></figcaption></figure>

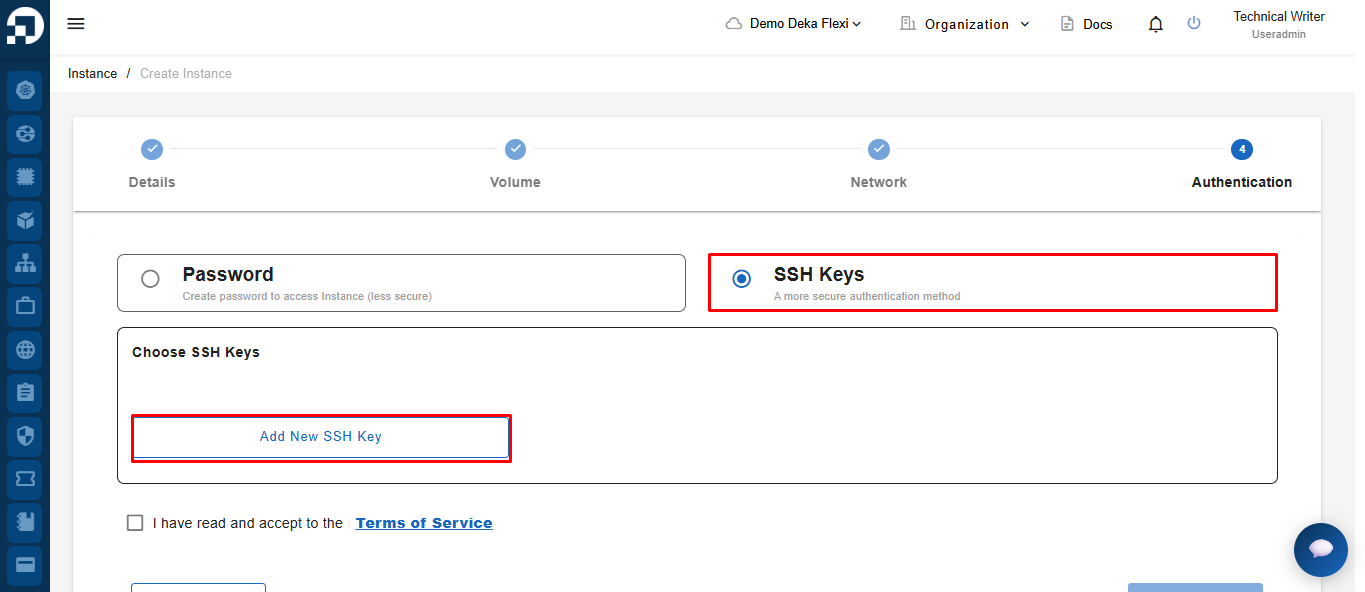
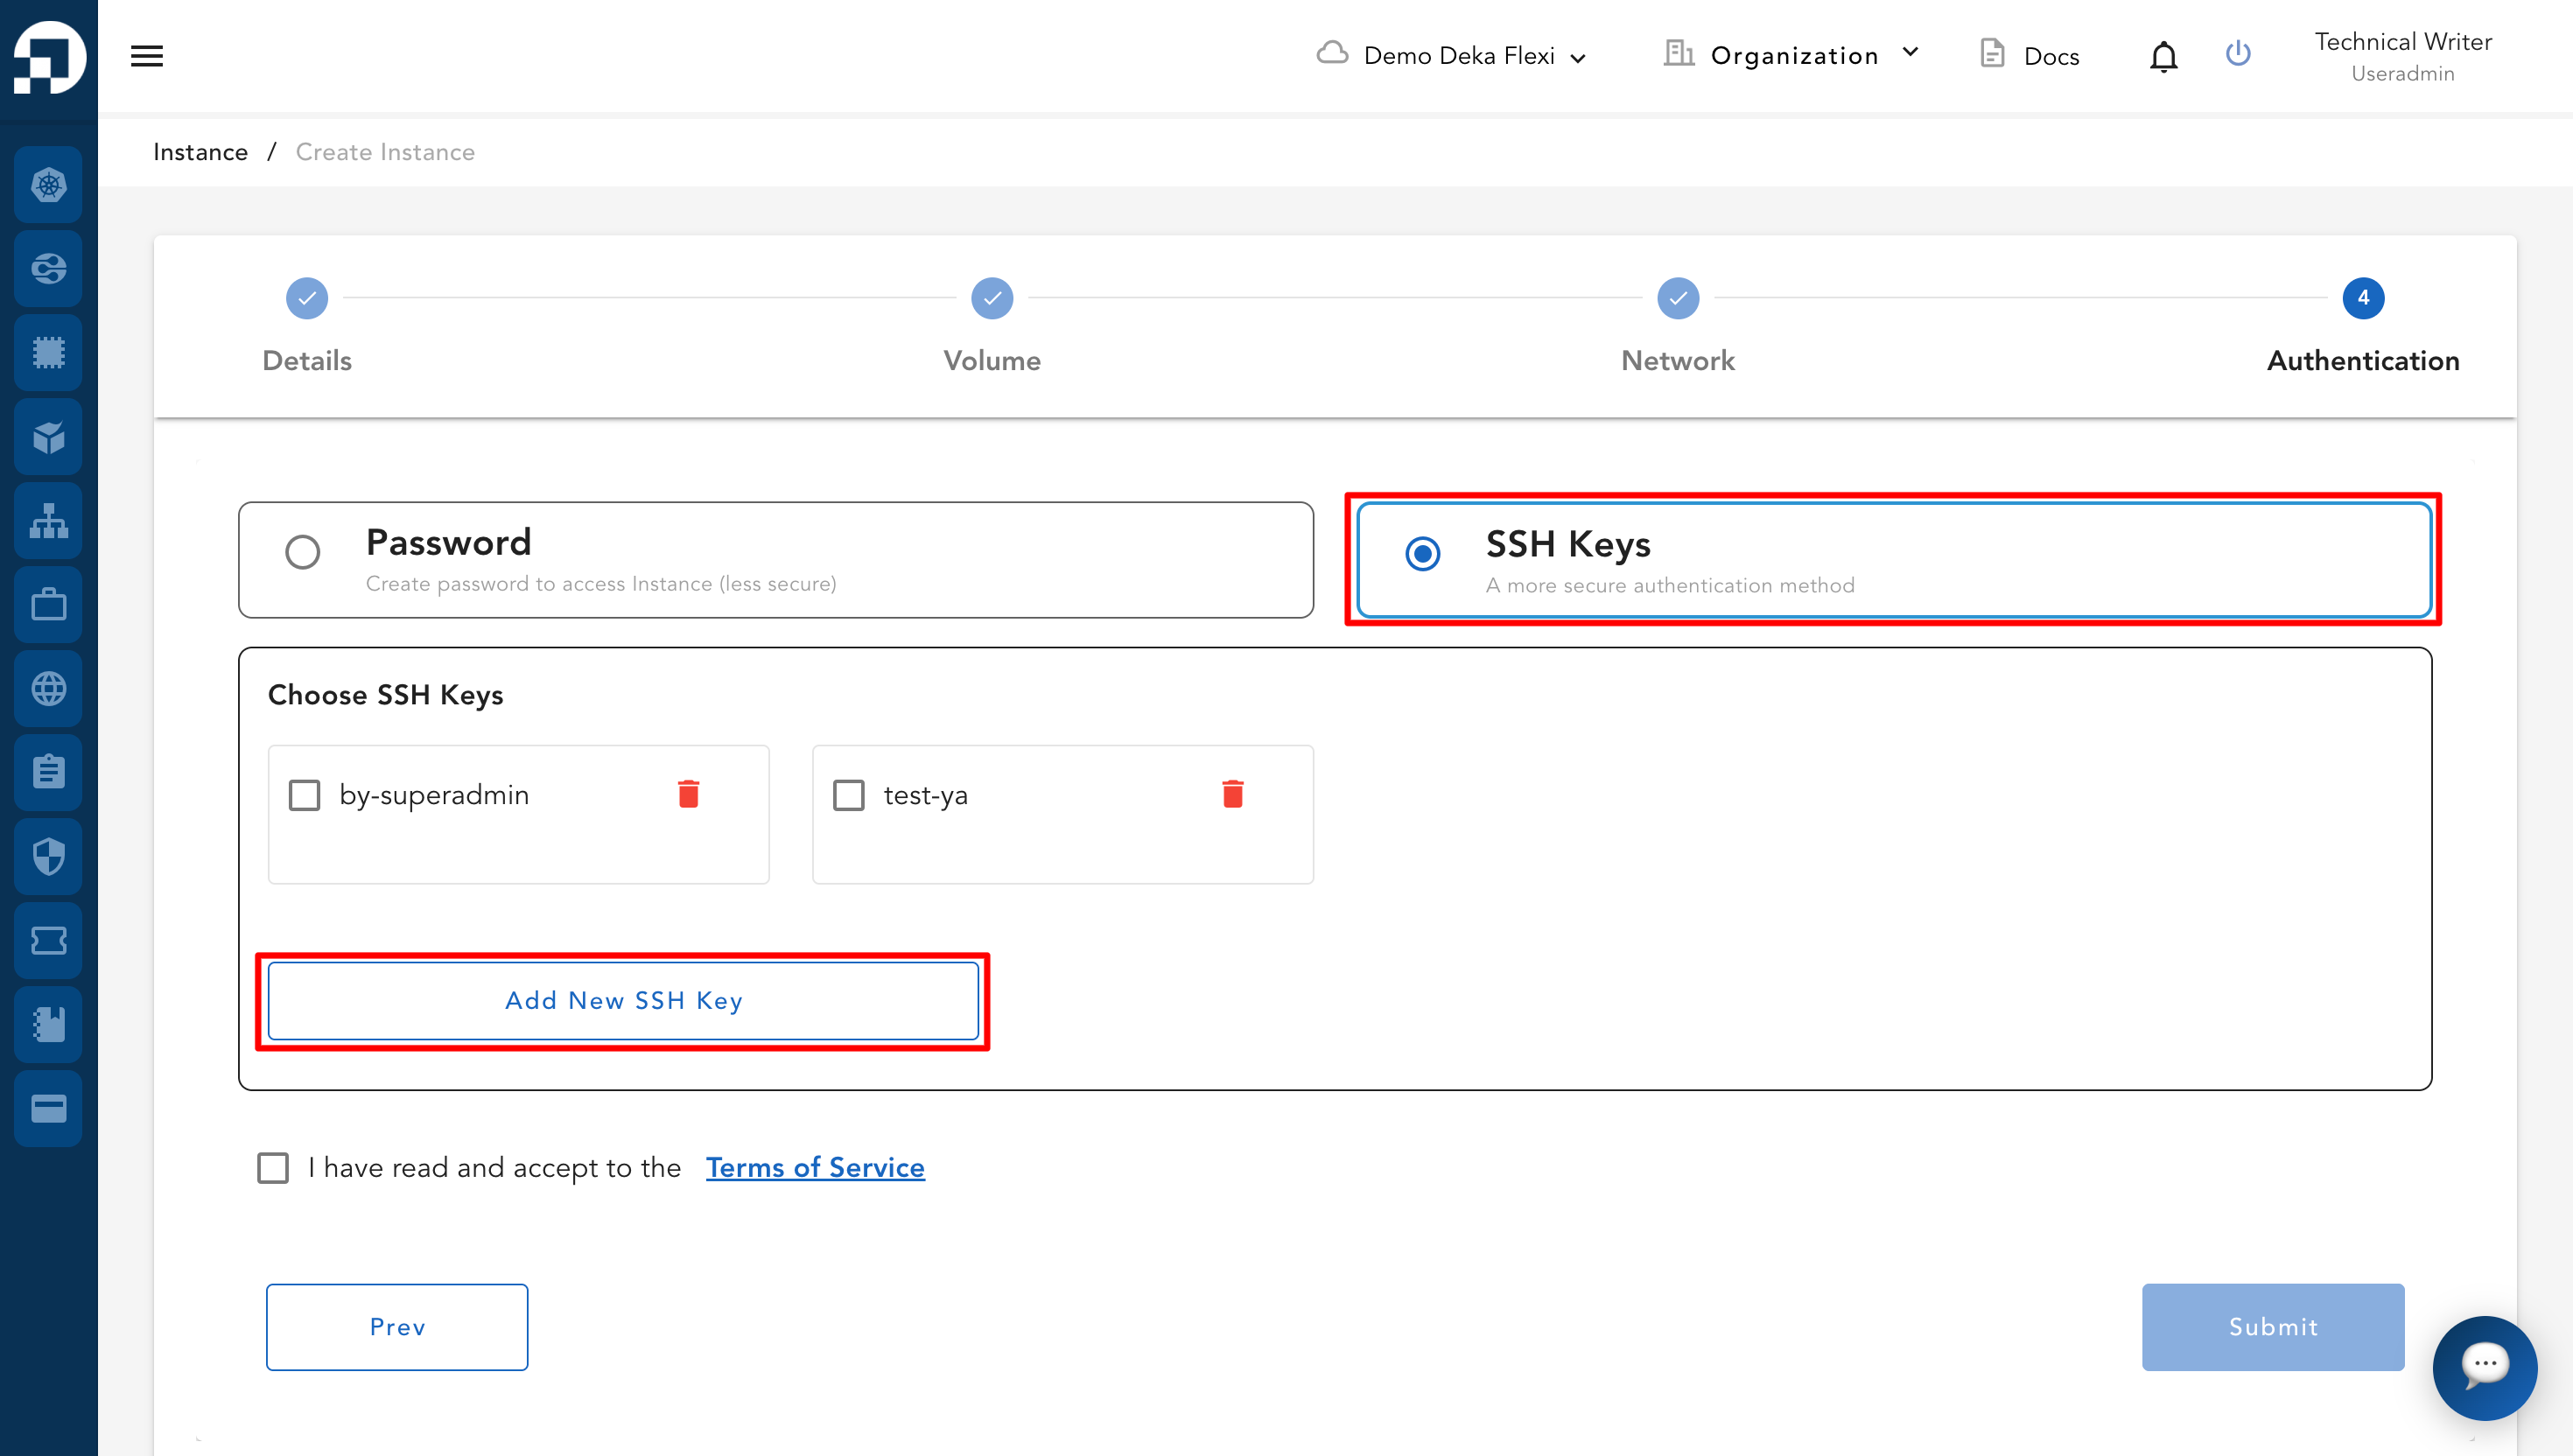
1. **SSH Keys** lebih aman daripada password standar. Untuk menggunakan autentikasi ini, Anda harus membuat SSH Key terlebih dahulu. Berikut langkah-langkah untuk menambahkan SSH key:

Pilih SSH Keys sebagai metode autentikasi, lalu klik New SSH Key.

<figure><img src="https://putri.box.cloudeka.id/cloudeka-assets/docs.cloudeka.ai/6dekaflexi/createvminstance_17.png" alt=""><figcaption></figcaption></figure>

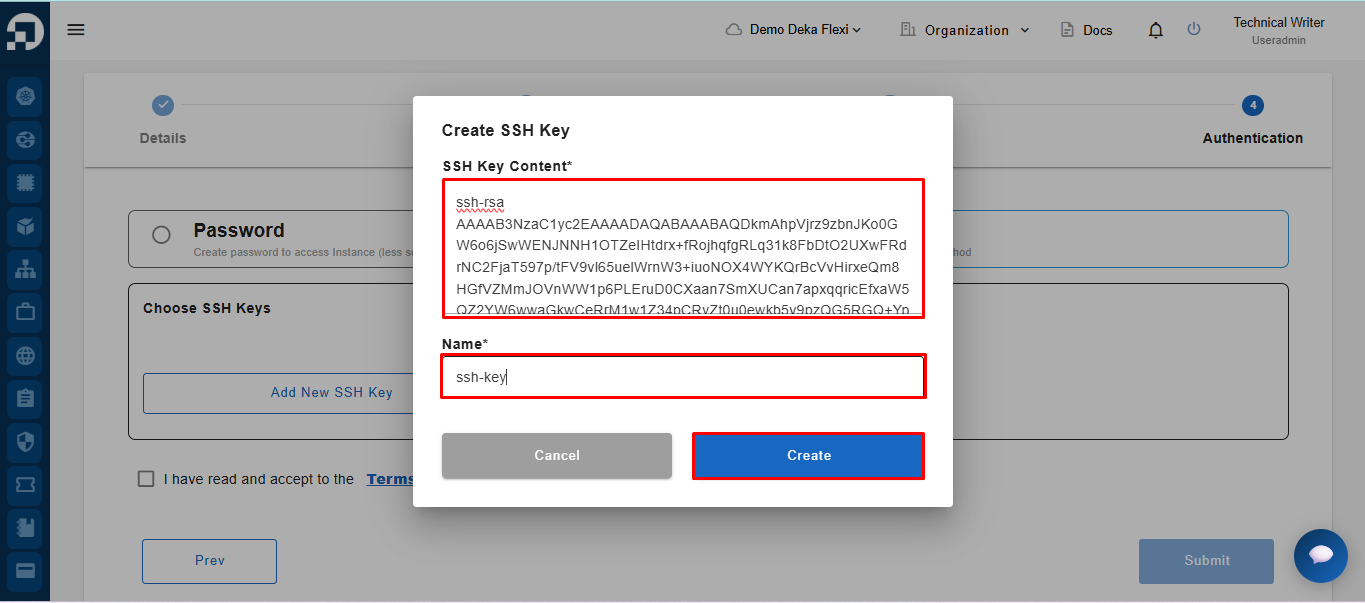
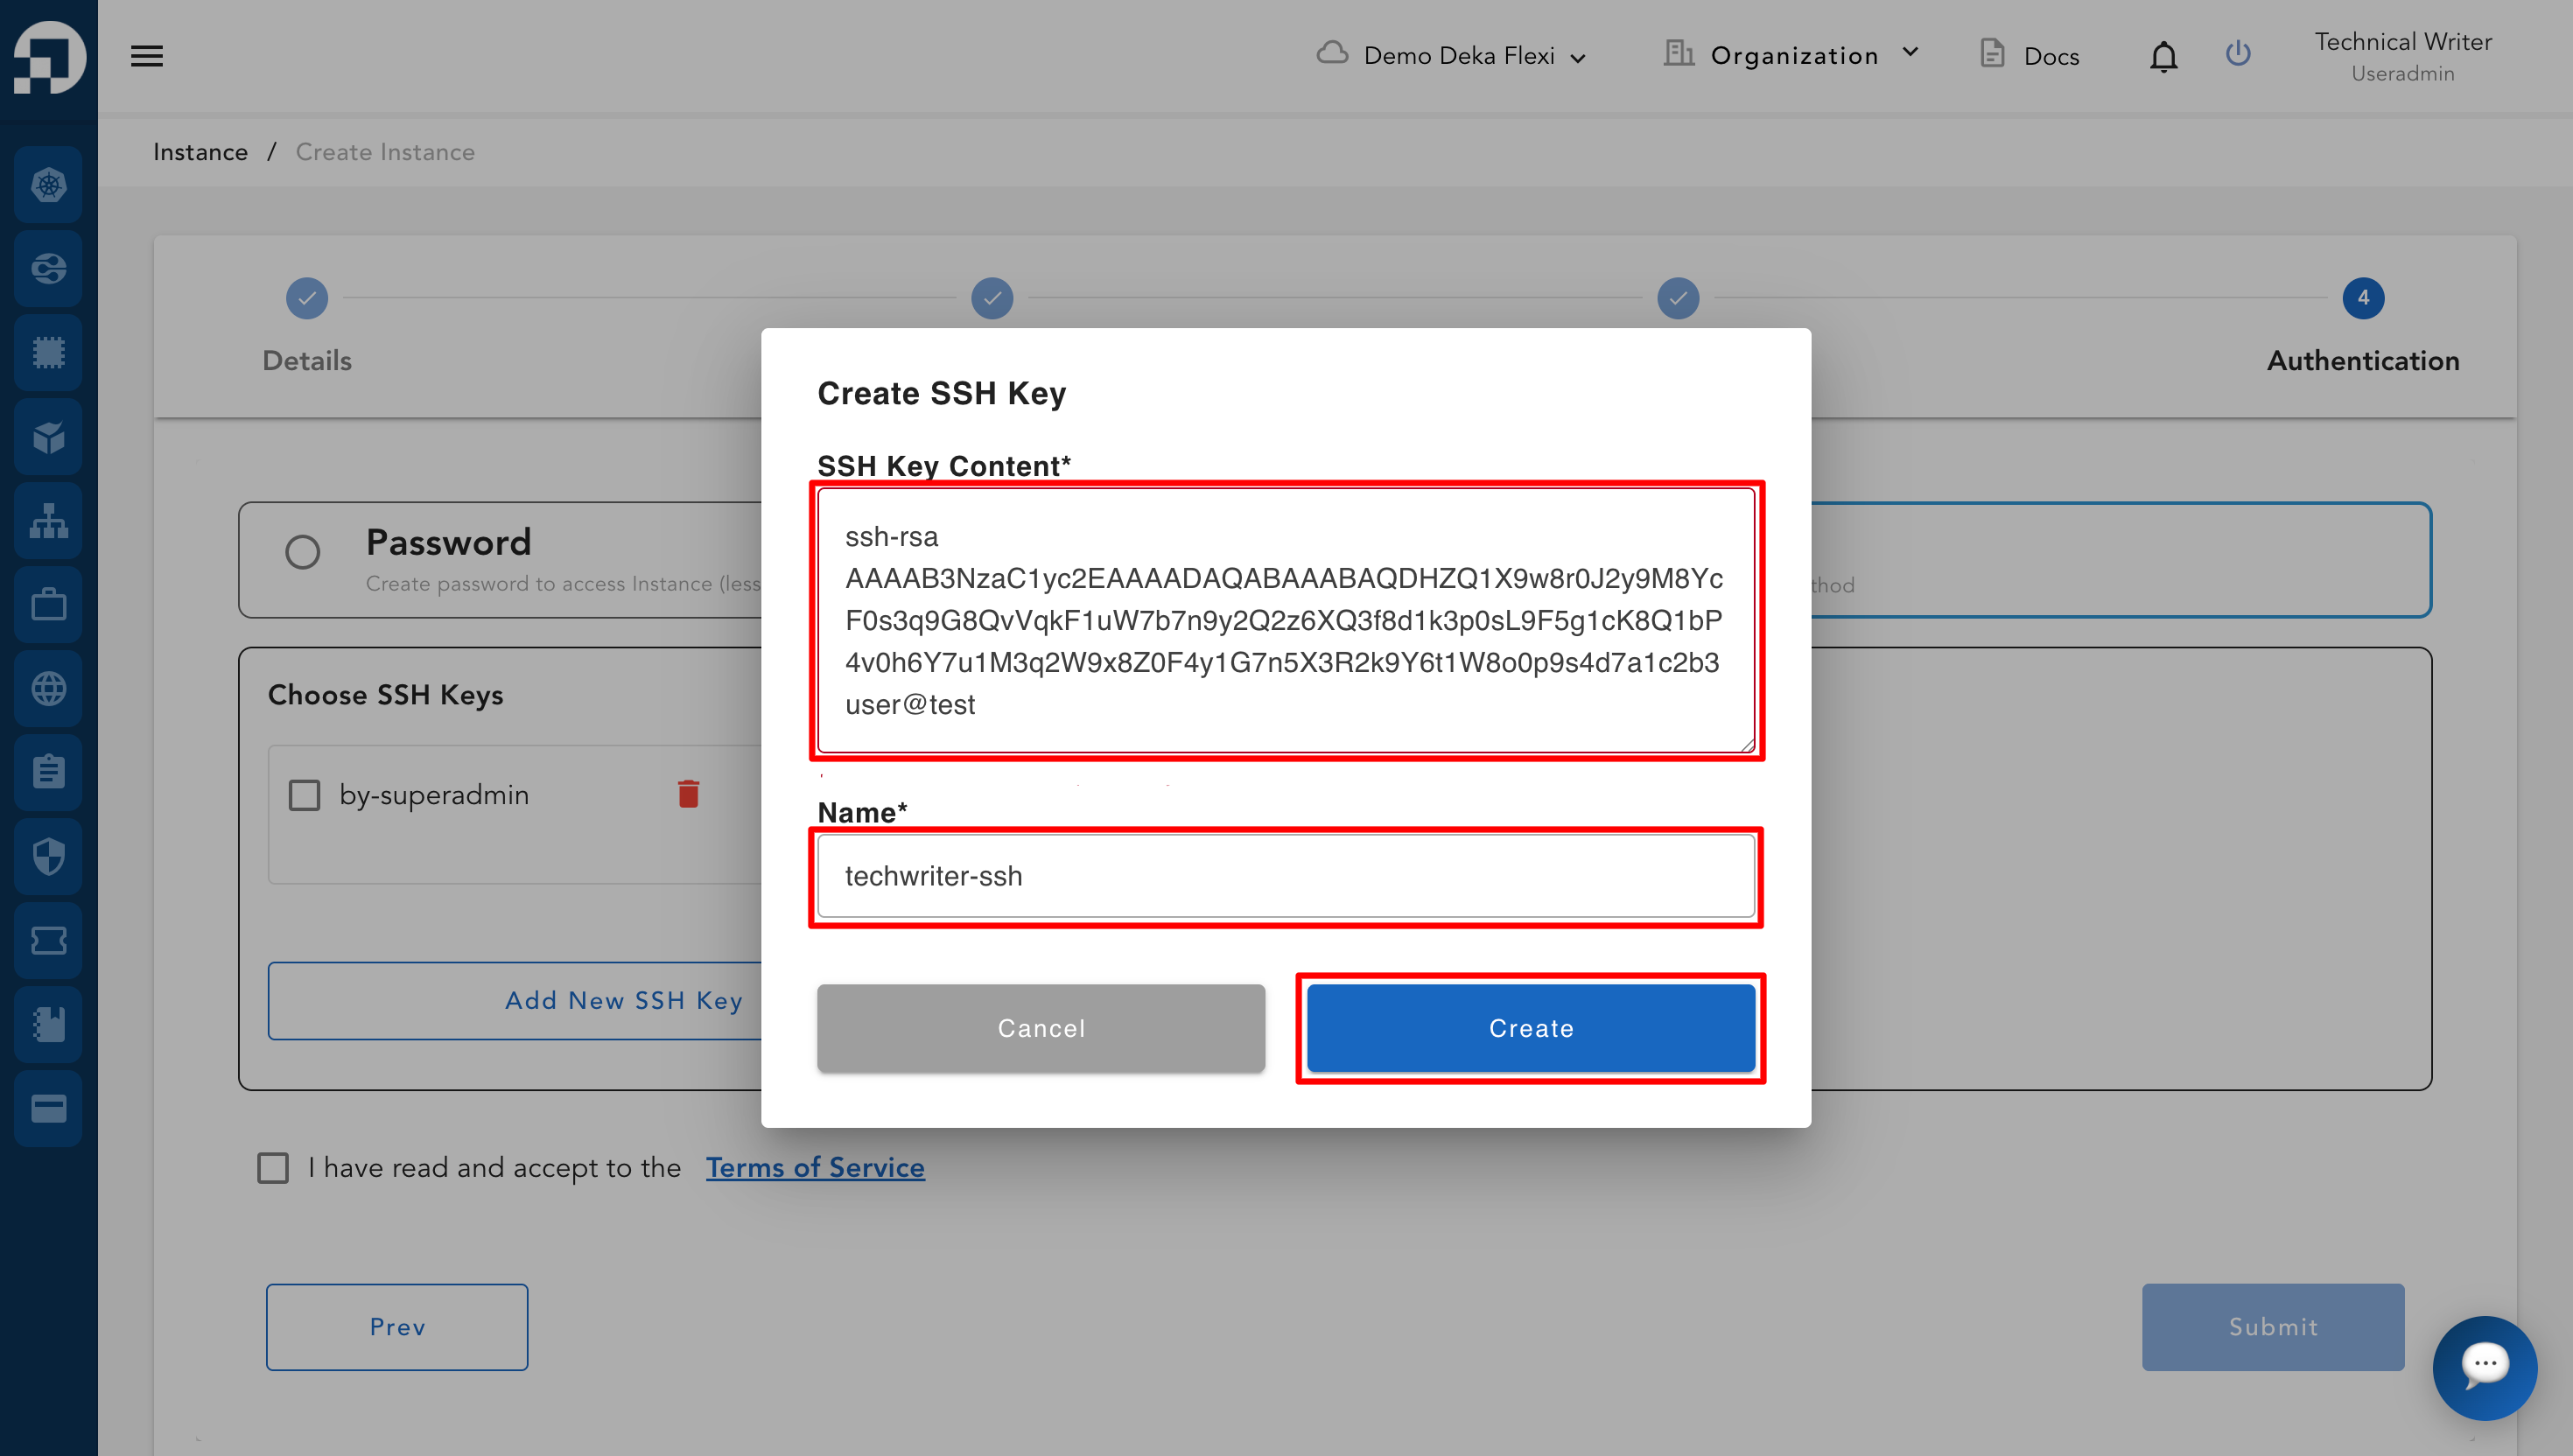
Tempelkan Public Key yang diperoleh sebelumnya, masukkan nama key, lalu klik **Create**.

<figure><img src="https://putri.box.cloudeka.id/cloudeka-assets/docs.cloudeka.ai/6dekaflexi/createvminstance_18.png" alt=""><figcaption></figcaption></figure>

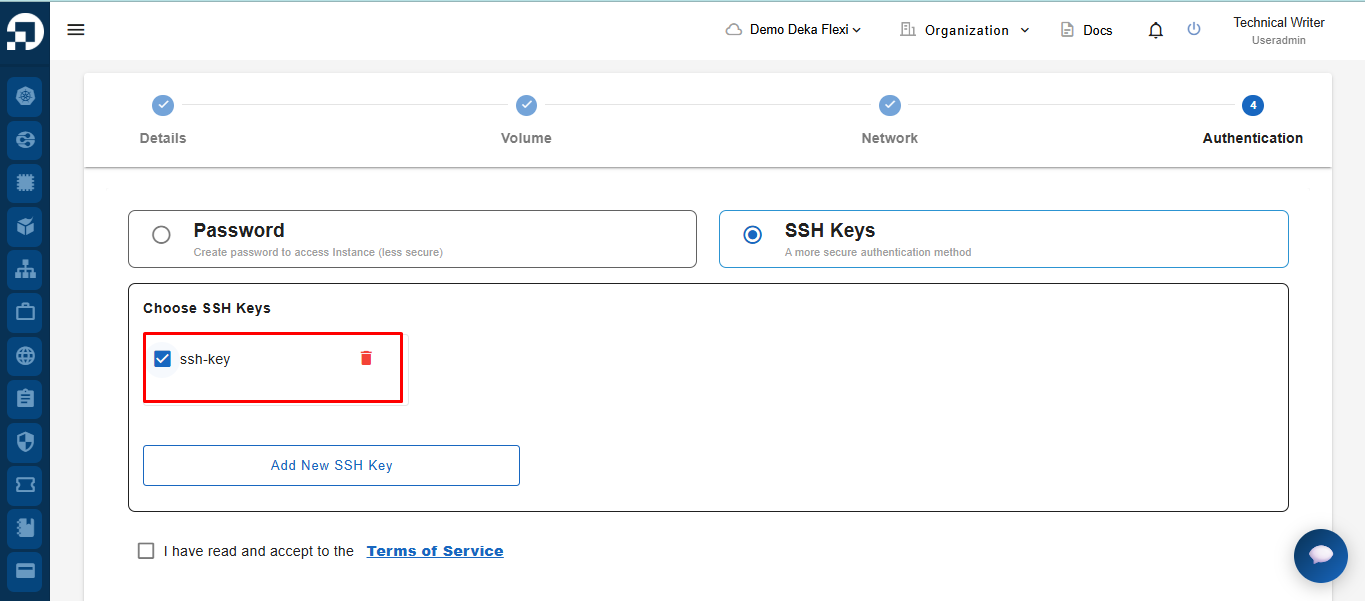
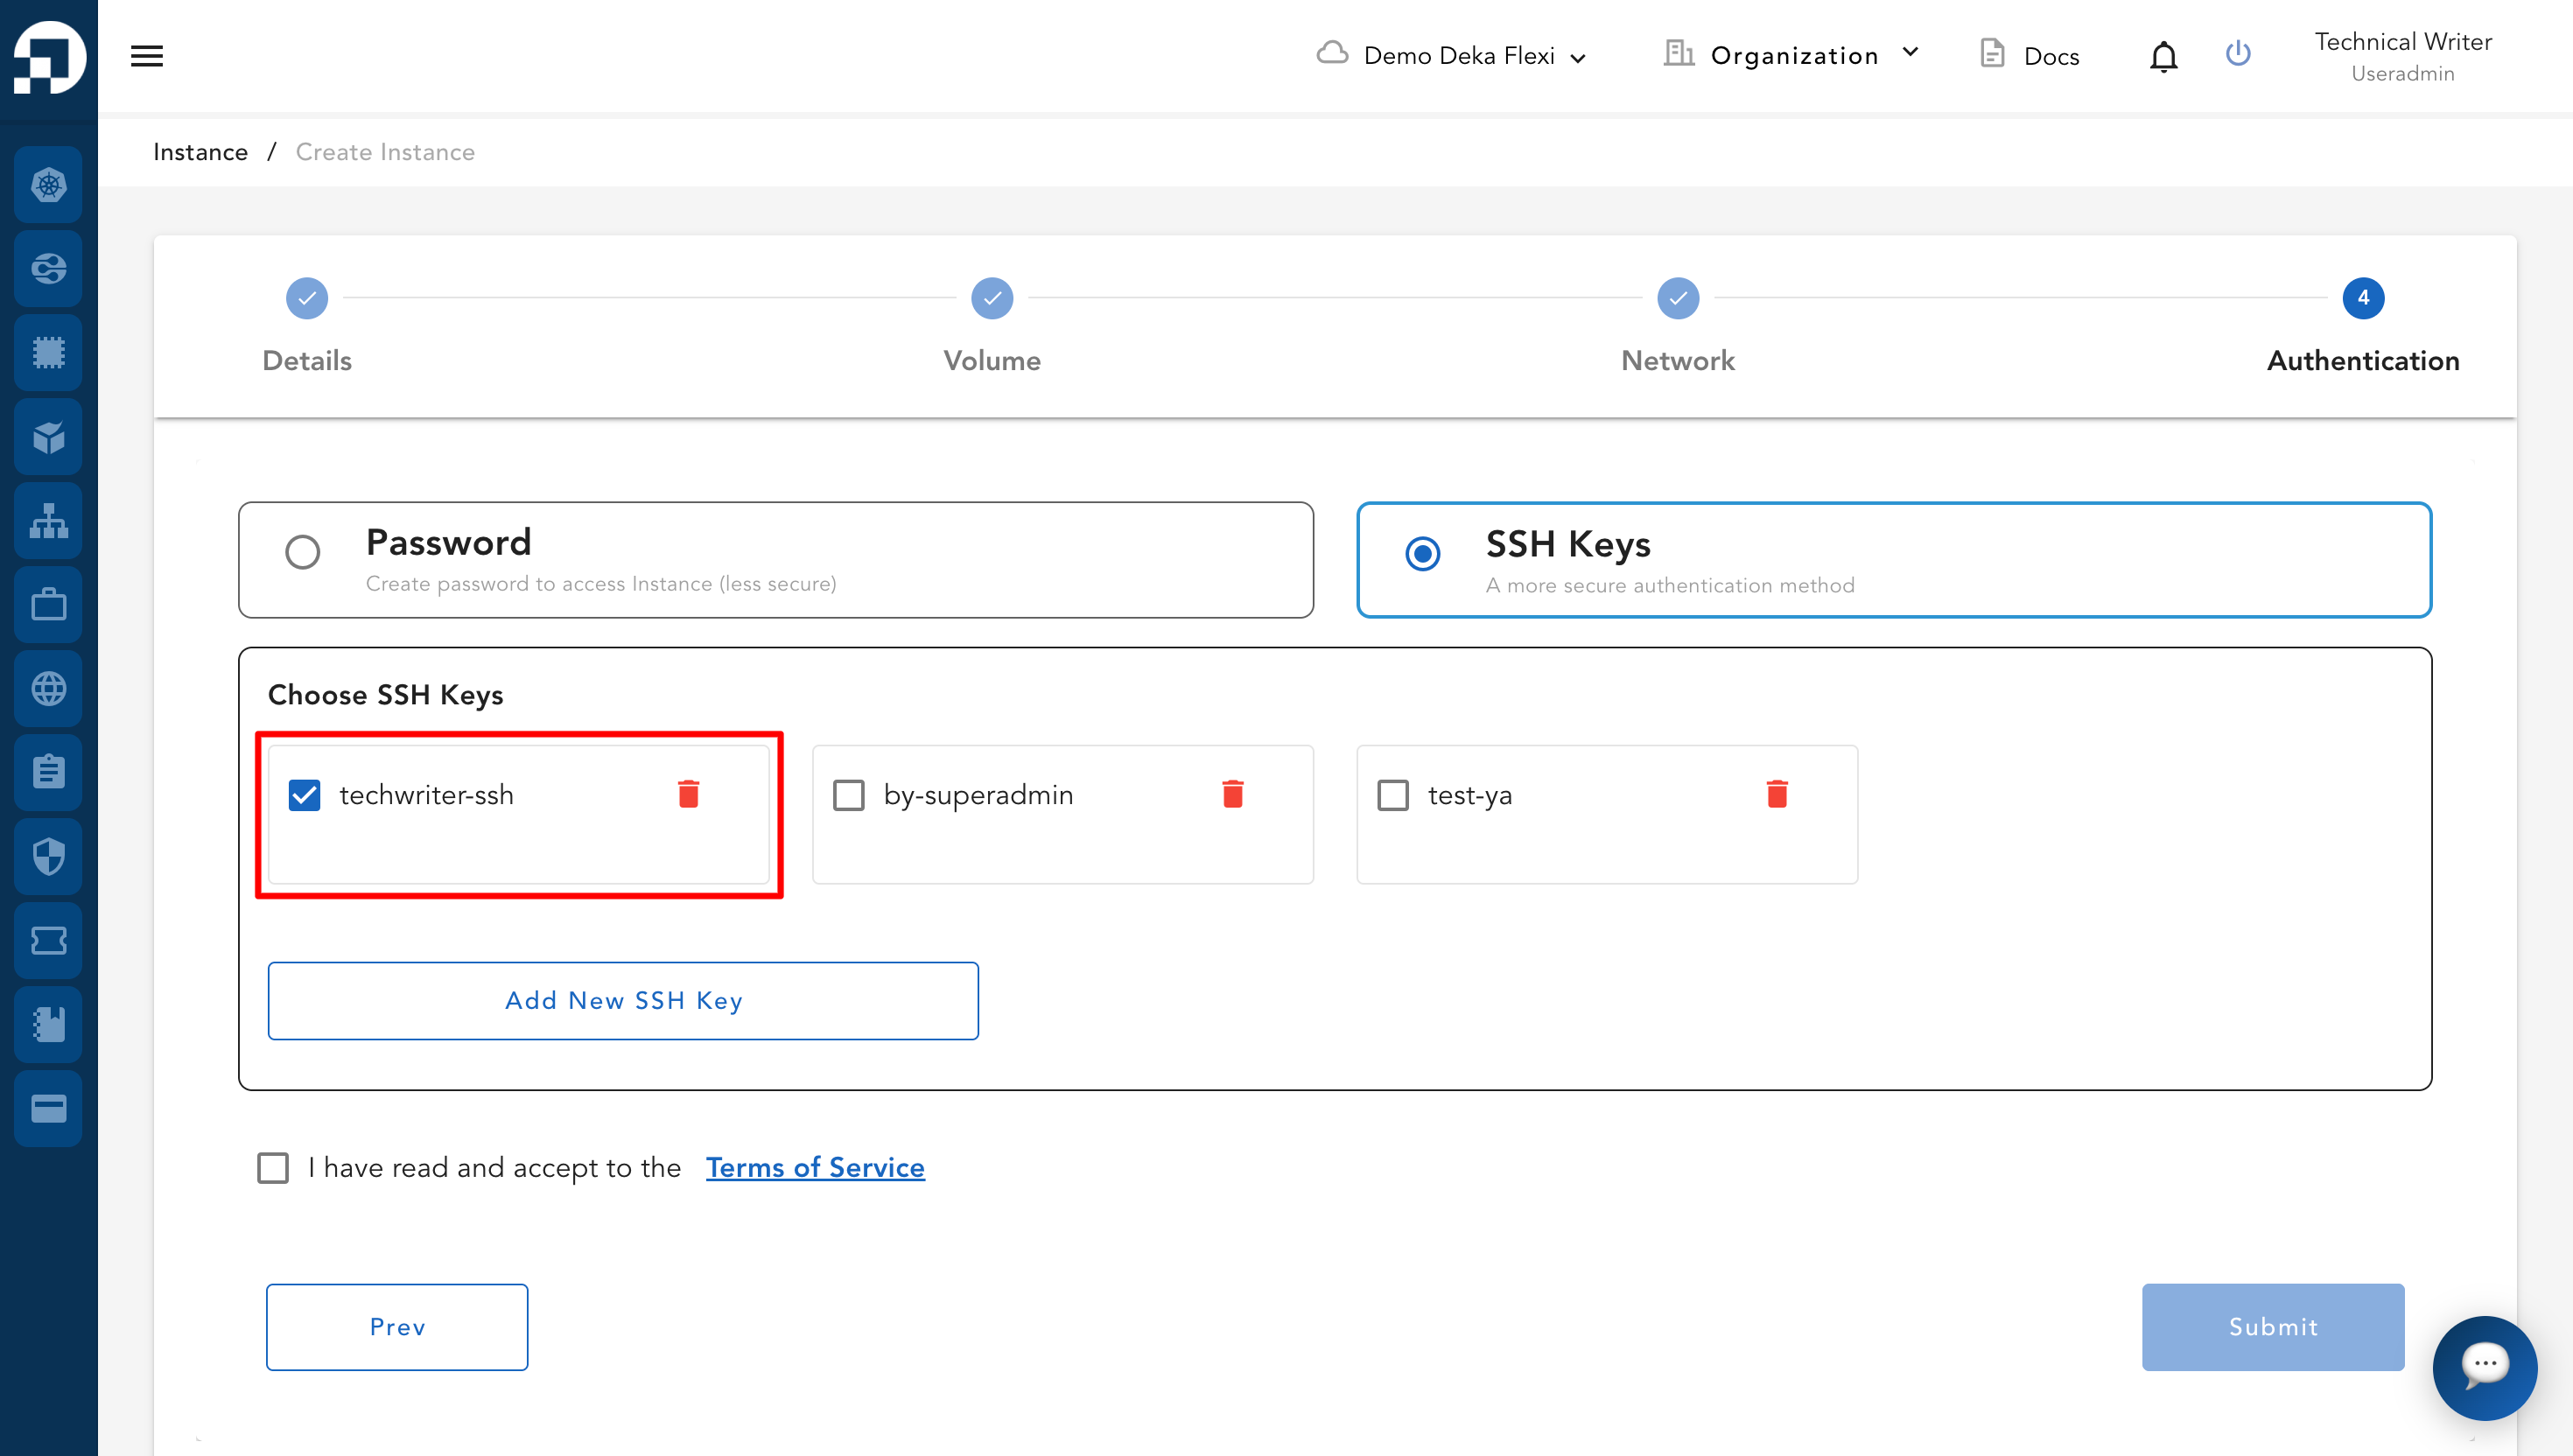
Centang SSH Key yang baru ditambahkan.

<figure><img src="https://putri.box.cloudeka.id/cloudeka-assets/docs.cloudeka.ai/6dekaflexi/createvminstance_19.png" alt=""><figcaption></figcaption></figure>

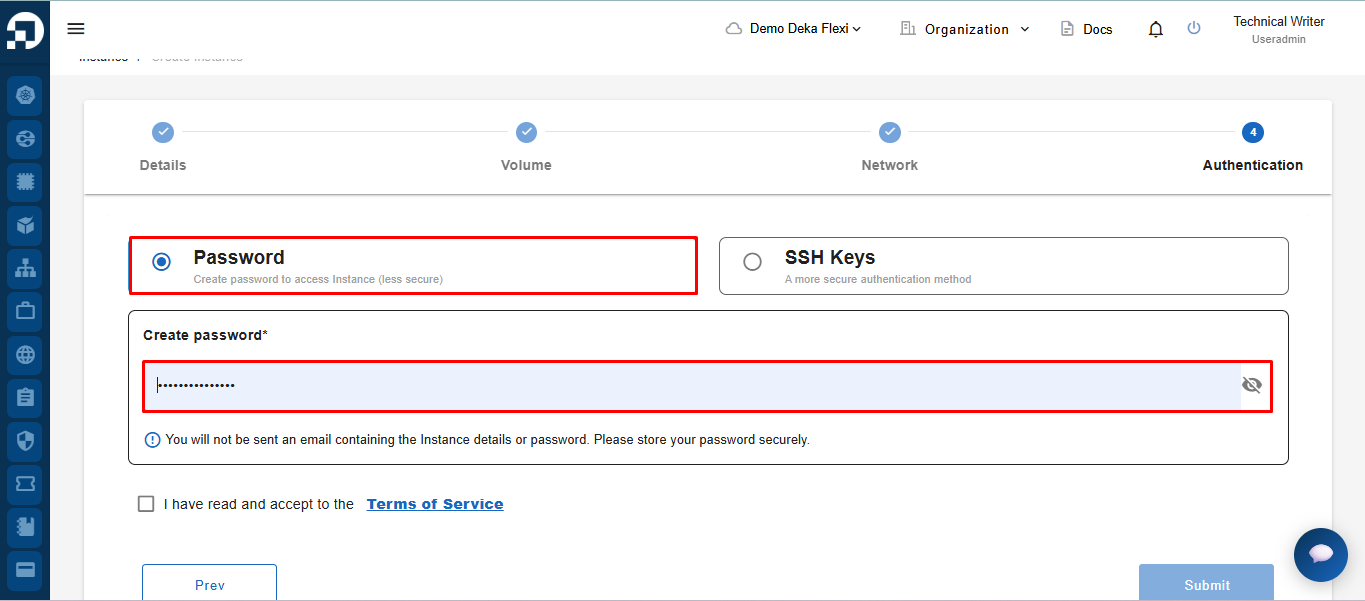
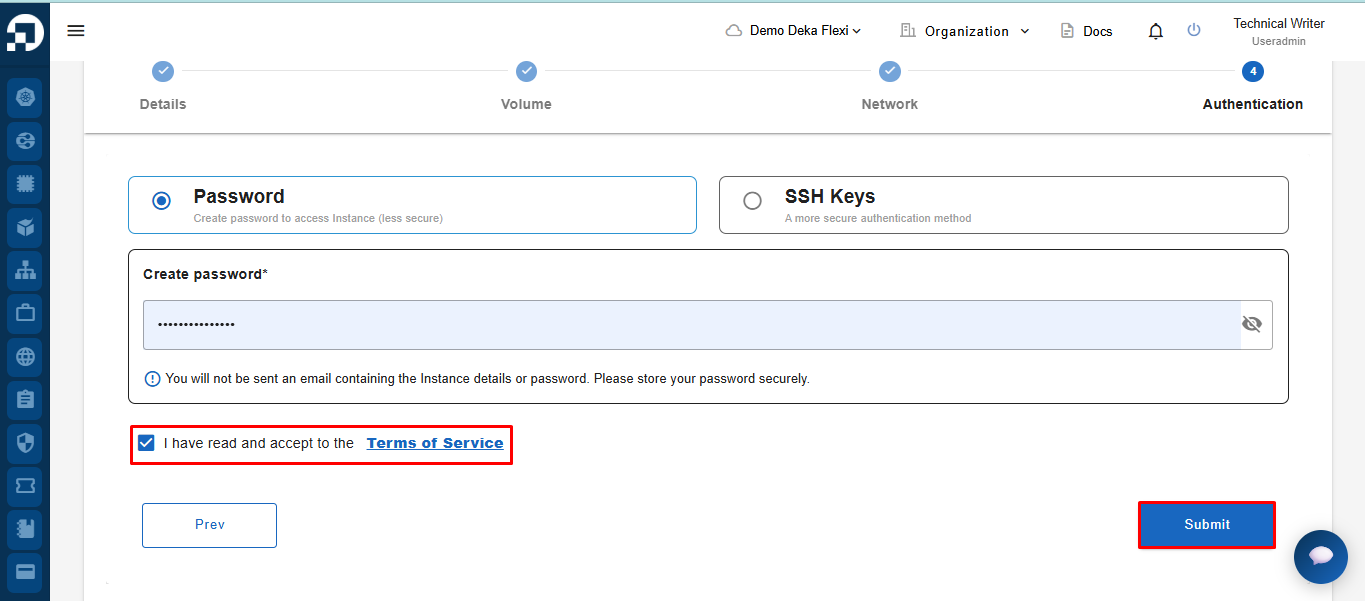
2. **Password**, masukkan password default untuk metode autentikasi.

<figure><img src="https://putri.box.cloudeka.id/cloudeka-assets/docs.cloudeka.ai/6dekaflexi/createvminstance_20.png" alt=""><figcaption></figcaption></figure>

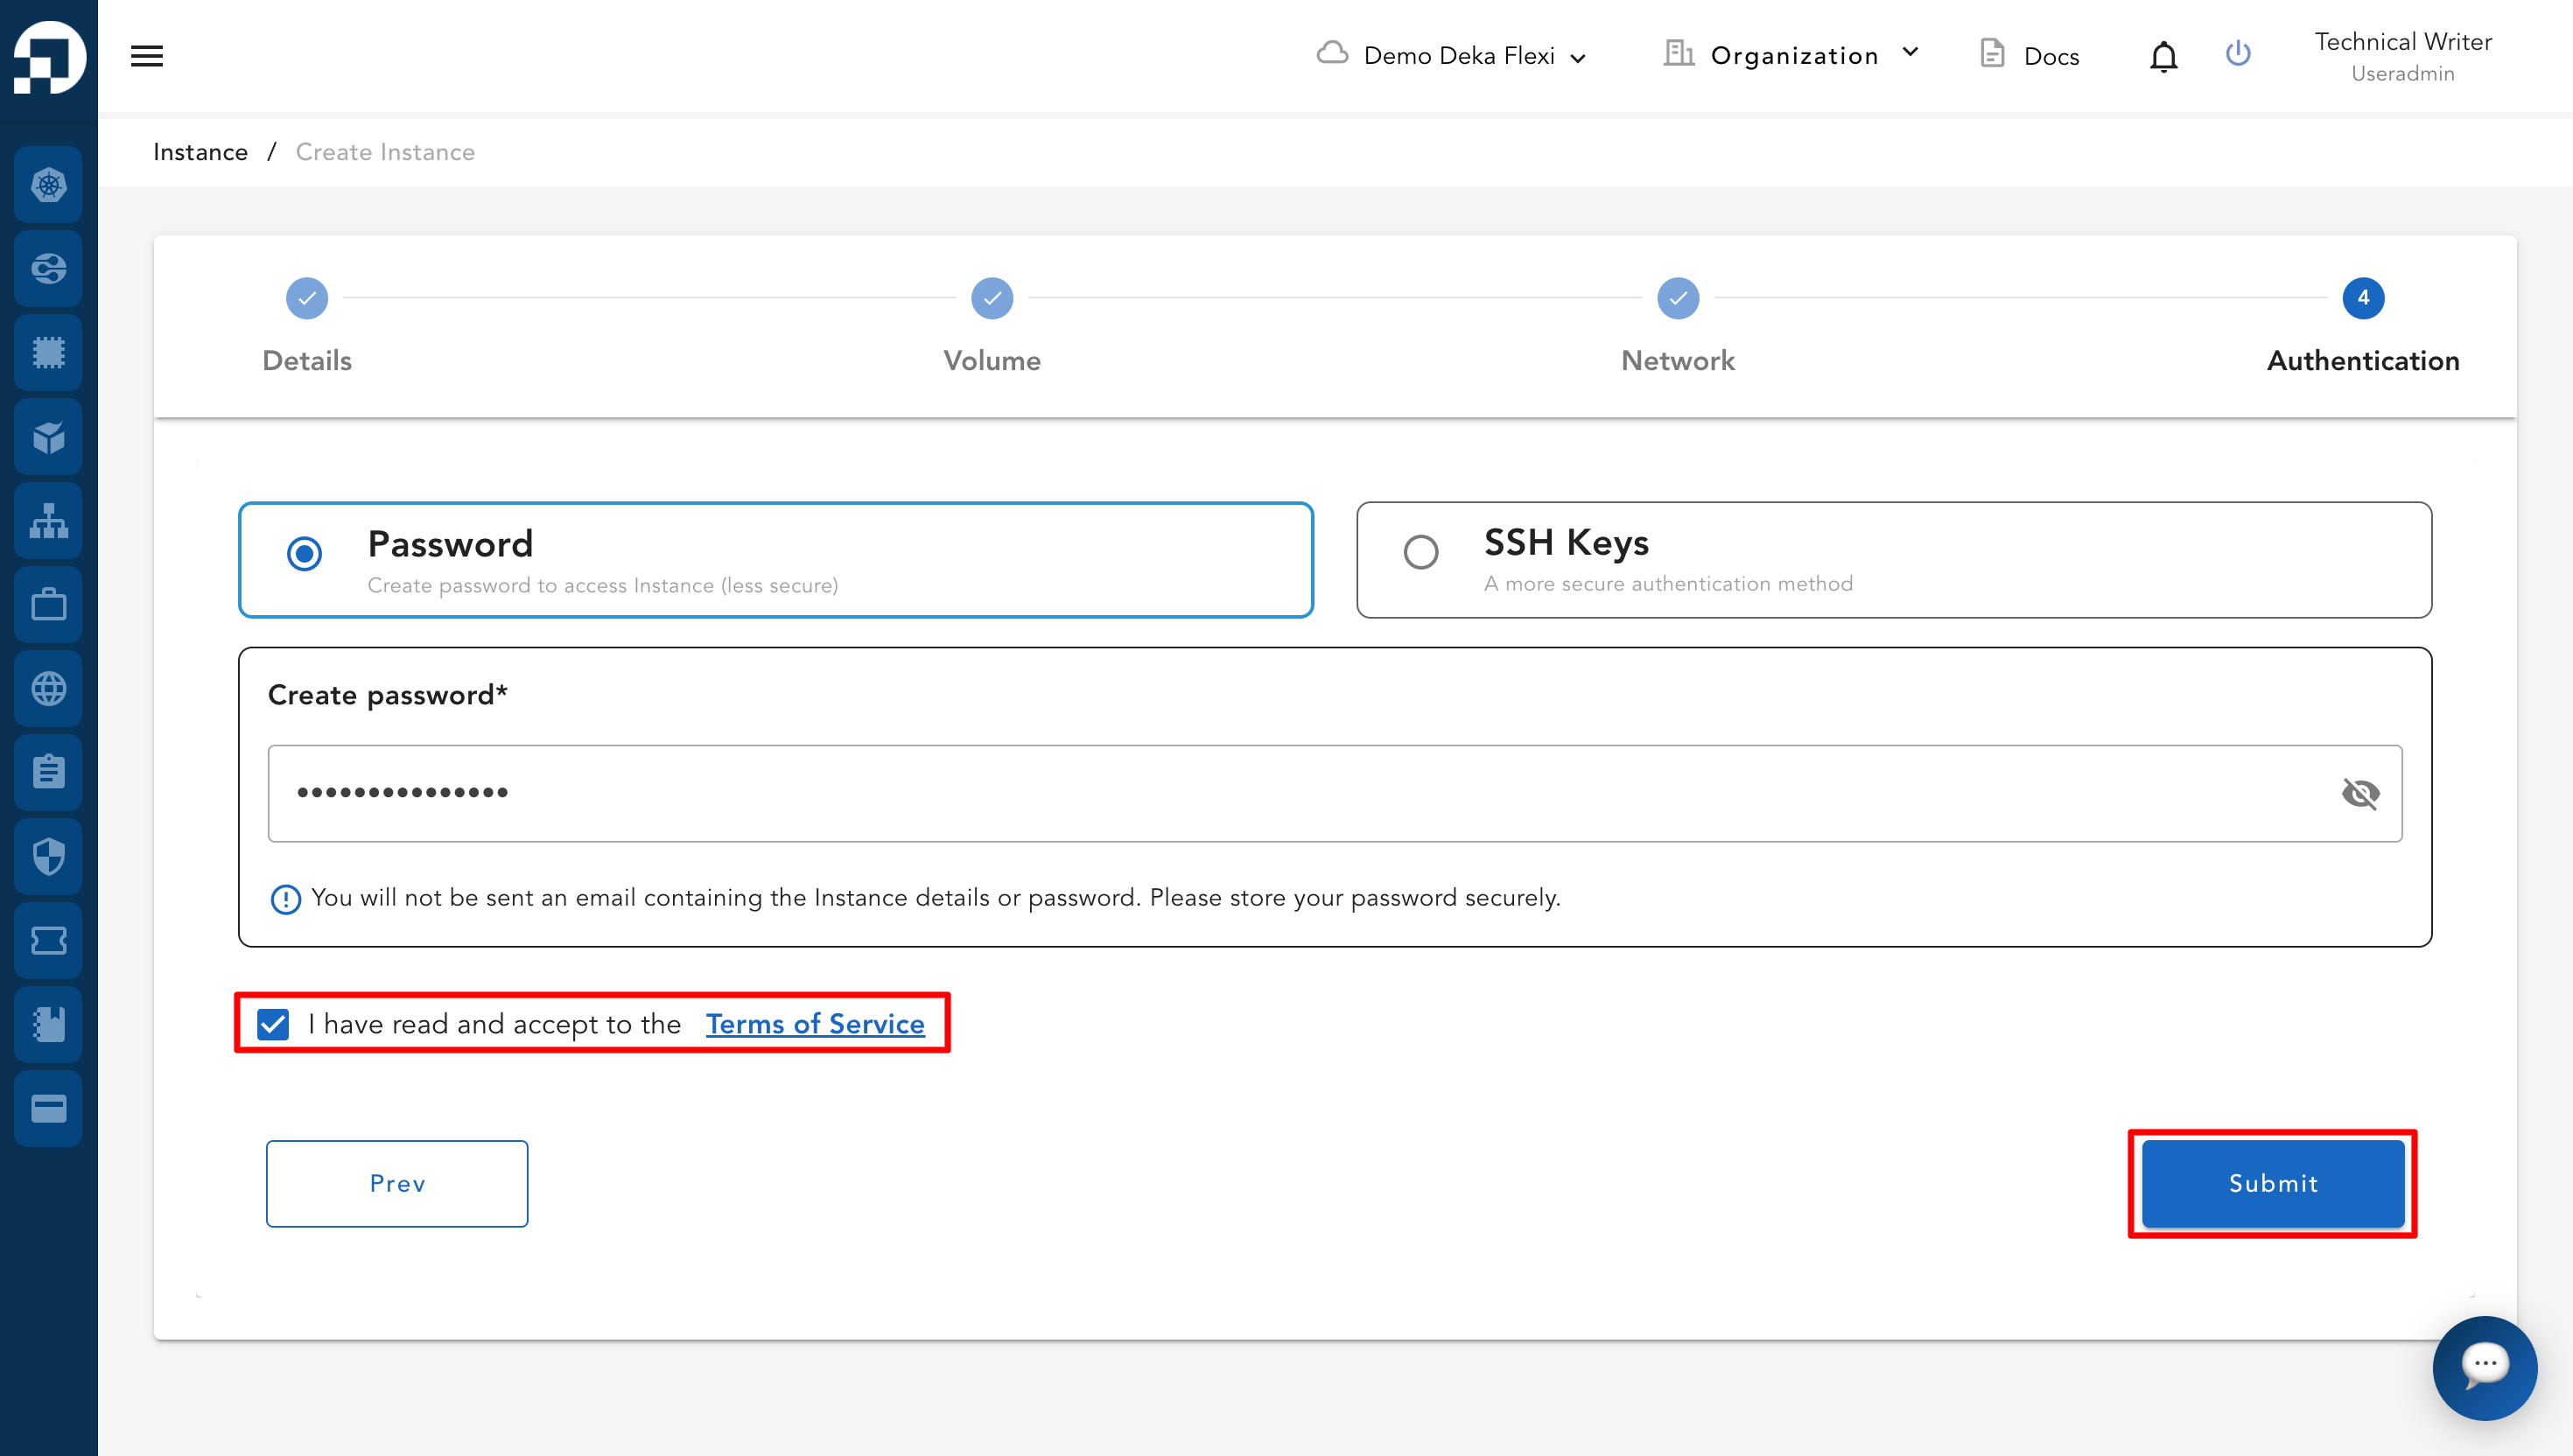
* Setelah menentukan metode autentikasi, centang kotak Terms of Service, lalu klik tombol Submit untuk melanjutkan proses pembuatan VM pada Instance.

<figure><img src="https://putri.box.cloudeka.id/cloudeka-assets/docs.cloudeka.ai/6dekaflexi/createvminstance_21.png" alt=""><figcaption></figcaption></figure>

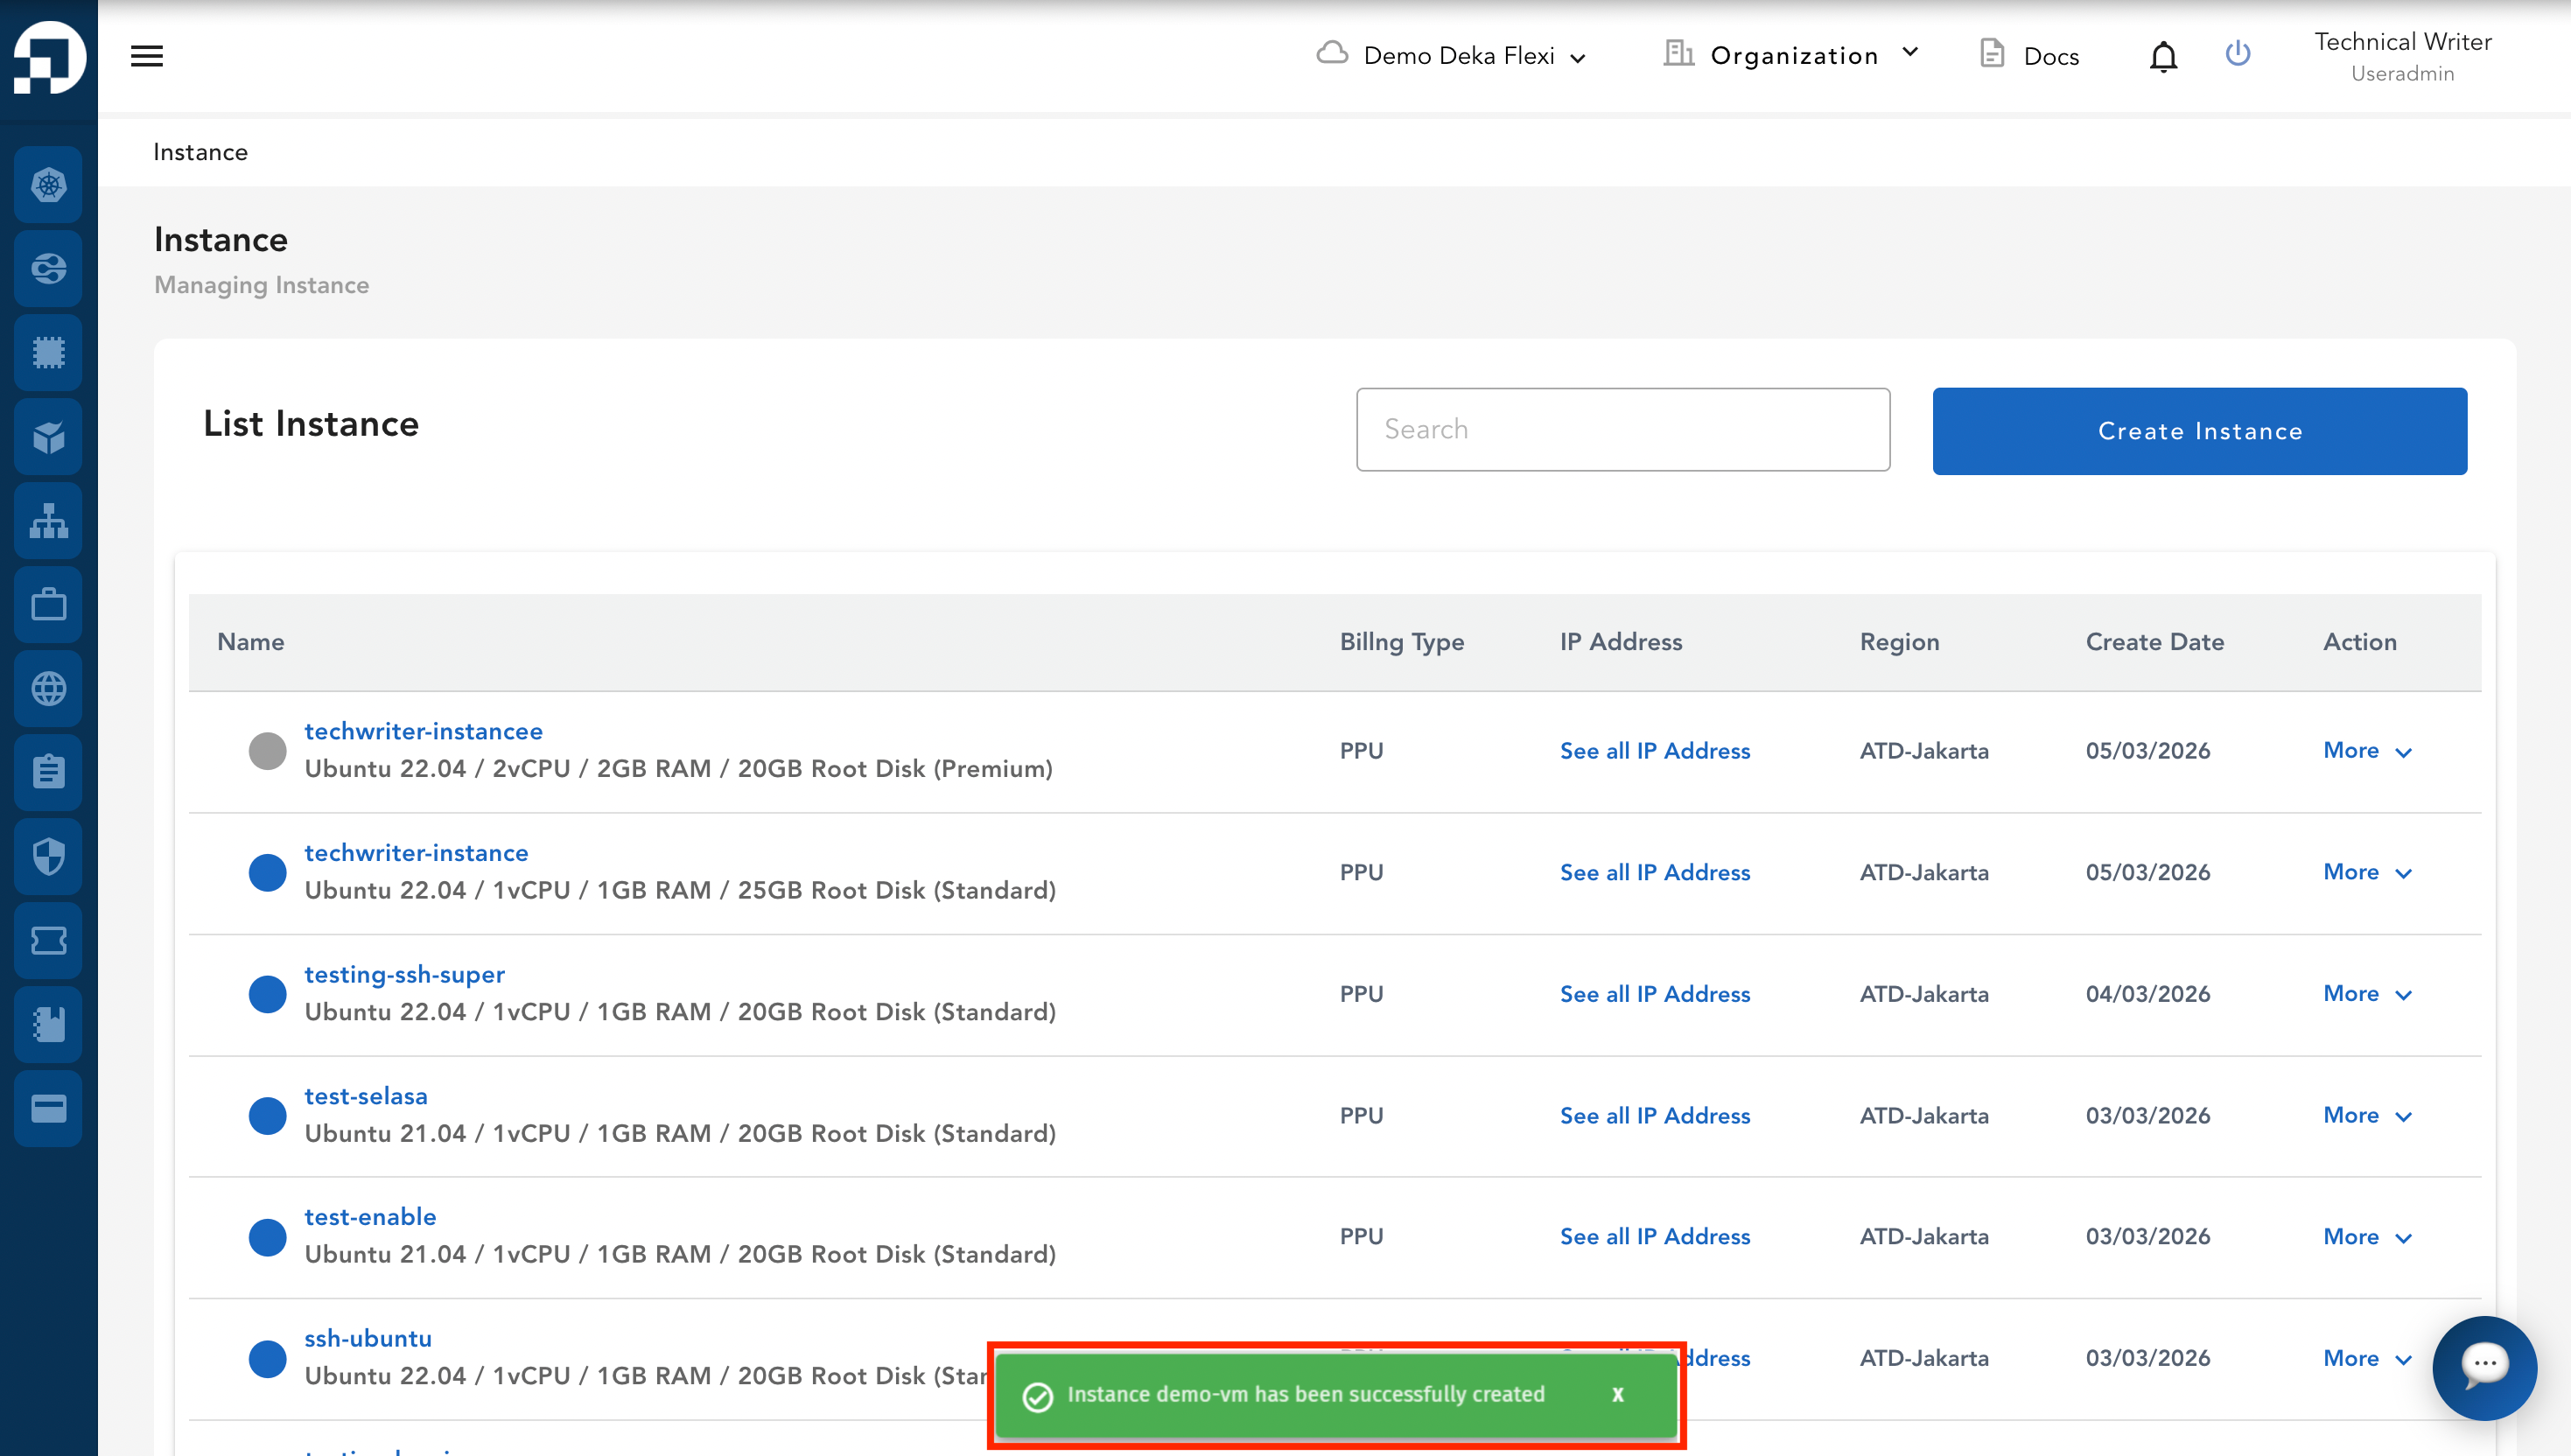
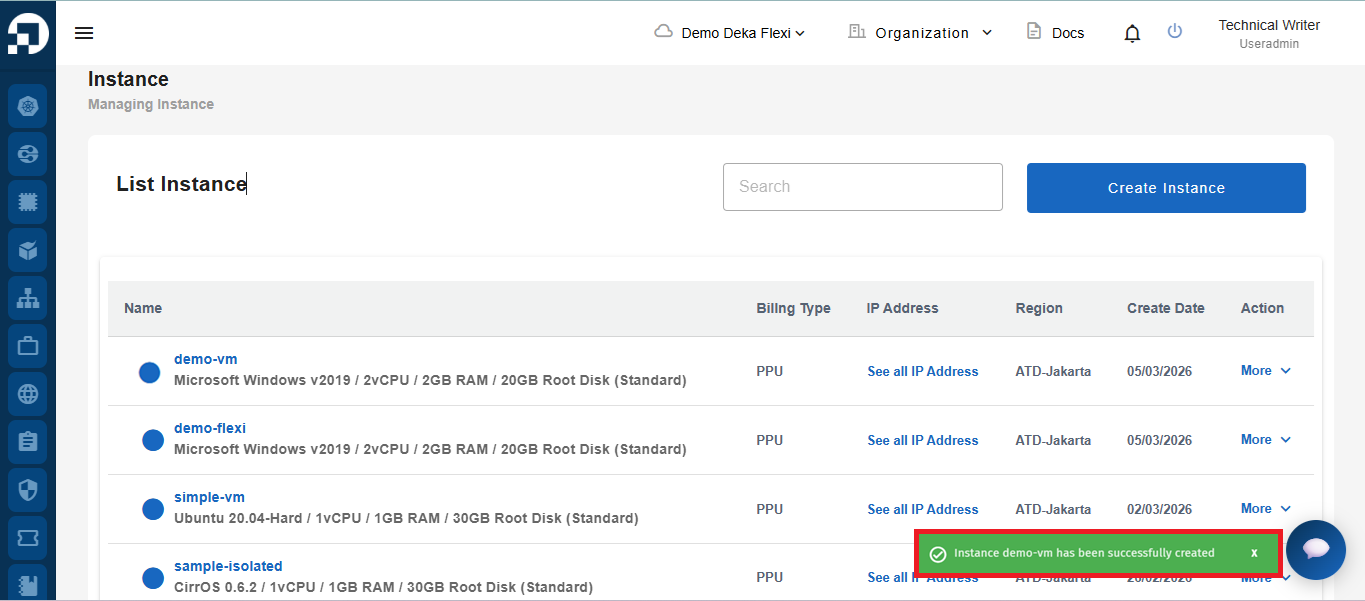
* Setelah Instance berhasil dibuat, notifikasi **"Instance (instance name) has been successfully created"** akan muncul.

<figure><img src="https://putri.box.cloudeka.id/cloudeka-assets/docs.cloudeka.ai/6dekaflexi/createvminstance_22.png" alt=""><figcaption></figcaption></figure>

### Membuat Instance dengan Instance Image

Opsi *Instance Image* memungkinkan Anda membuat instance menggunakan image yang telah dikonfigurasi sebelumnya. Image ini sudah berisi pengaturan yang ditentukan, seperti aplikasi, dependensi, dan konfigurasi, sehingga Anda tidak perlu menginstal atau mengonfigurasi semuanya dari awal. Opsi ini berguna untuk deployment yang lebih cepat dan konsisten.

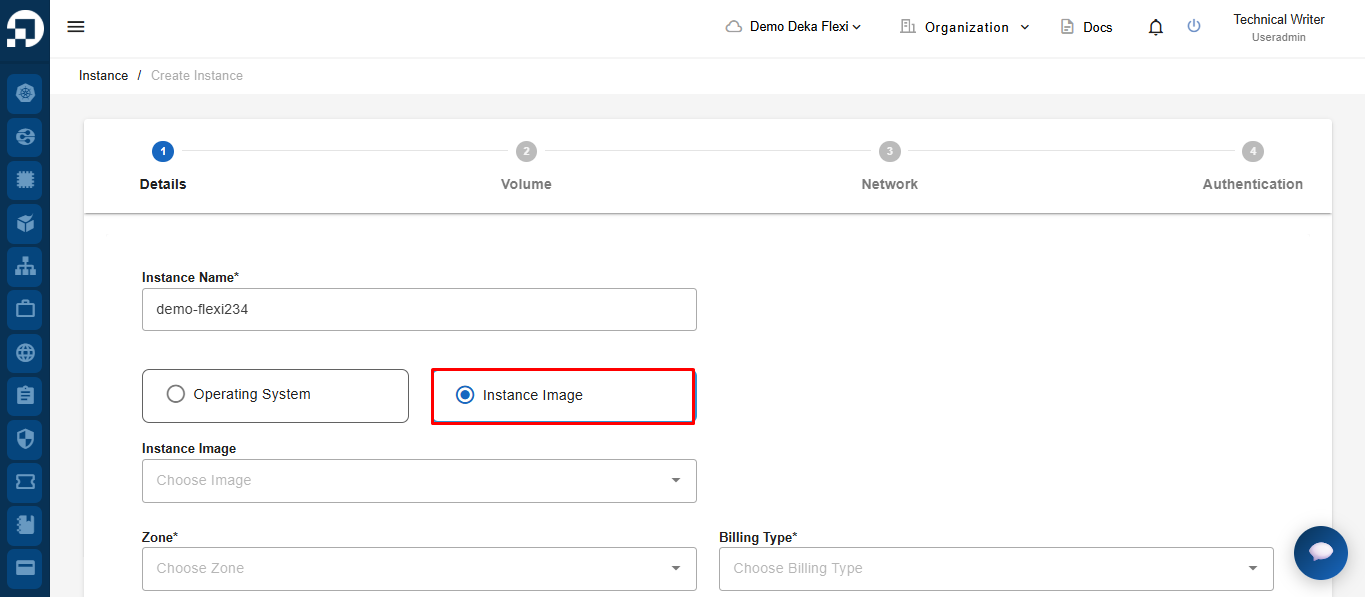
* Pada formulir pembuatan instance, pilih opsi **Instance Image**.

<figure><img src="https://putri.box.cloudeka.id/cloudeka-assets/docs.cloudeka.ai/6dekaflexi/createvminstance_23.png" alt=""><figcaption></figcaption></figure>

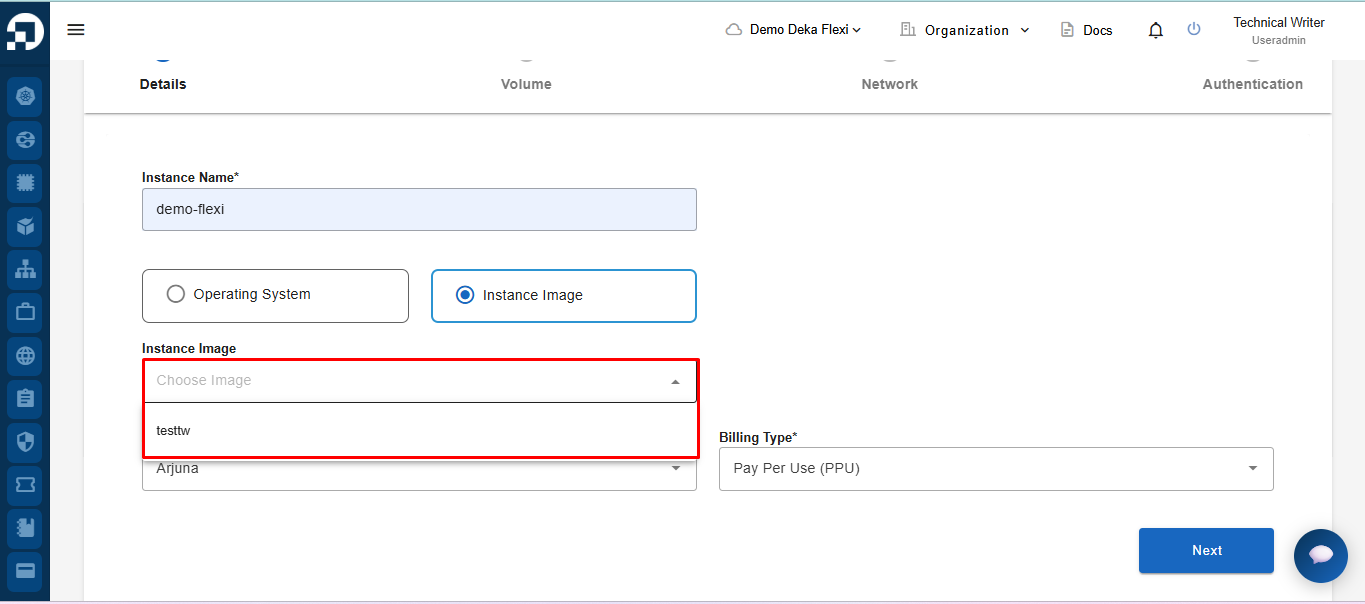
* Lengkapi kolom yang diperlukan dengan memilih image dari drop-down **Instance Image**. Daftar akan menampilkan image yang telah dibuat atau diimpor sebelumnya. Pilih image yang diinginkan untuk melanjutkan.

<figure><img src="https://putri.box.cloudeka.id/cloudeka-assets/docs.cloudeka.ai/6dekaflexi/createvminstance_24.png" alt=""><figcaption></figcaption></figure>

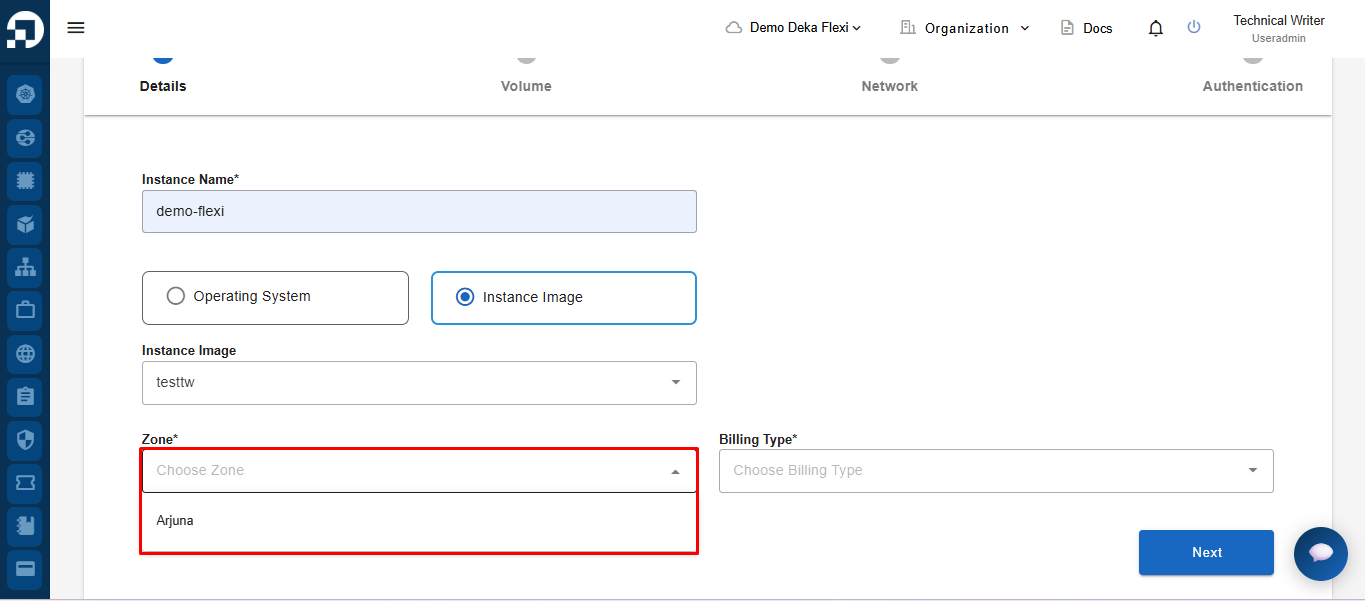
* Selanjutnya, pilih **Zone** dengan mengklik drop-down dan memilih salah satu zone yang tersedia. Zone menentukan lokasi deployment instance Anda.

<figure><img src="https://putri.box.cloudeka.id/cloudeka-assets/docs.cloudeka.ai/6dekaflexi/createvminstance_25.png" alt=""><figcaption></figcaption></figure>

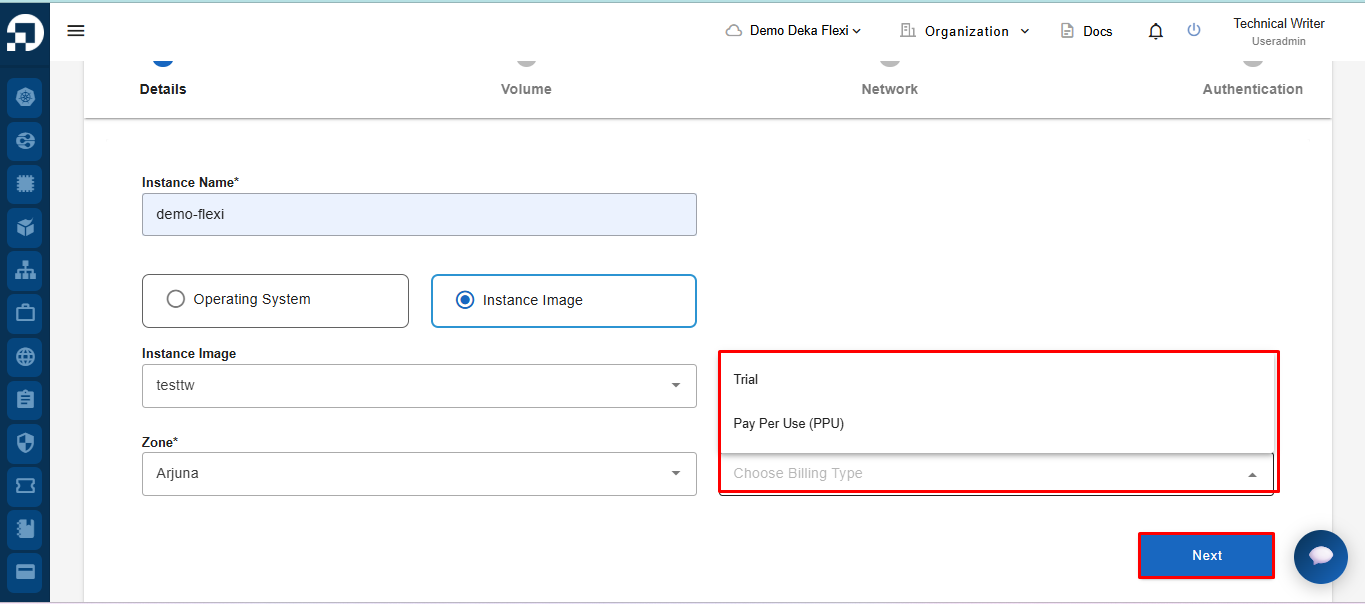
* Selanjutnya, pilih **Billing Type** dengan memilih salah satu opsi: **Trial** atau **Pay Per Use (PPU)**. Setelah memilih tipe billing, klik tombol **Next** untuk melanjutkan.

<figure><img src="https://putri.box.cloudeka.id/cloudeka-assets/docs.cloudeka.ai/6dekaflexi/createvminstance_26.png" alt=""><figcaption></figcaption></figure>

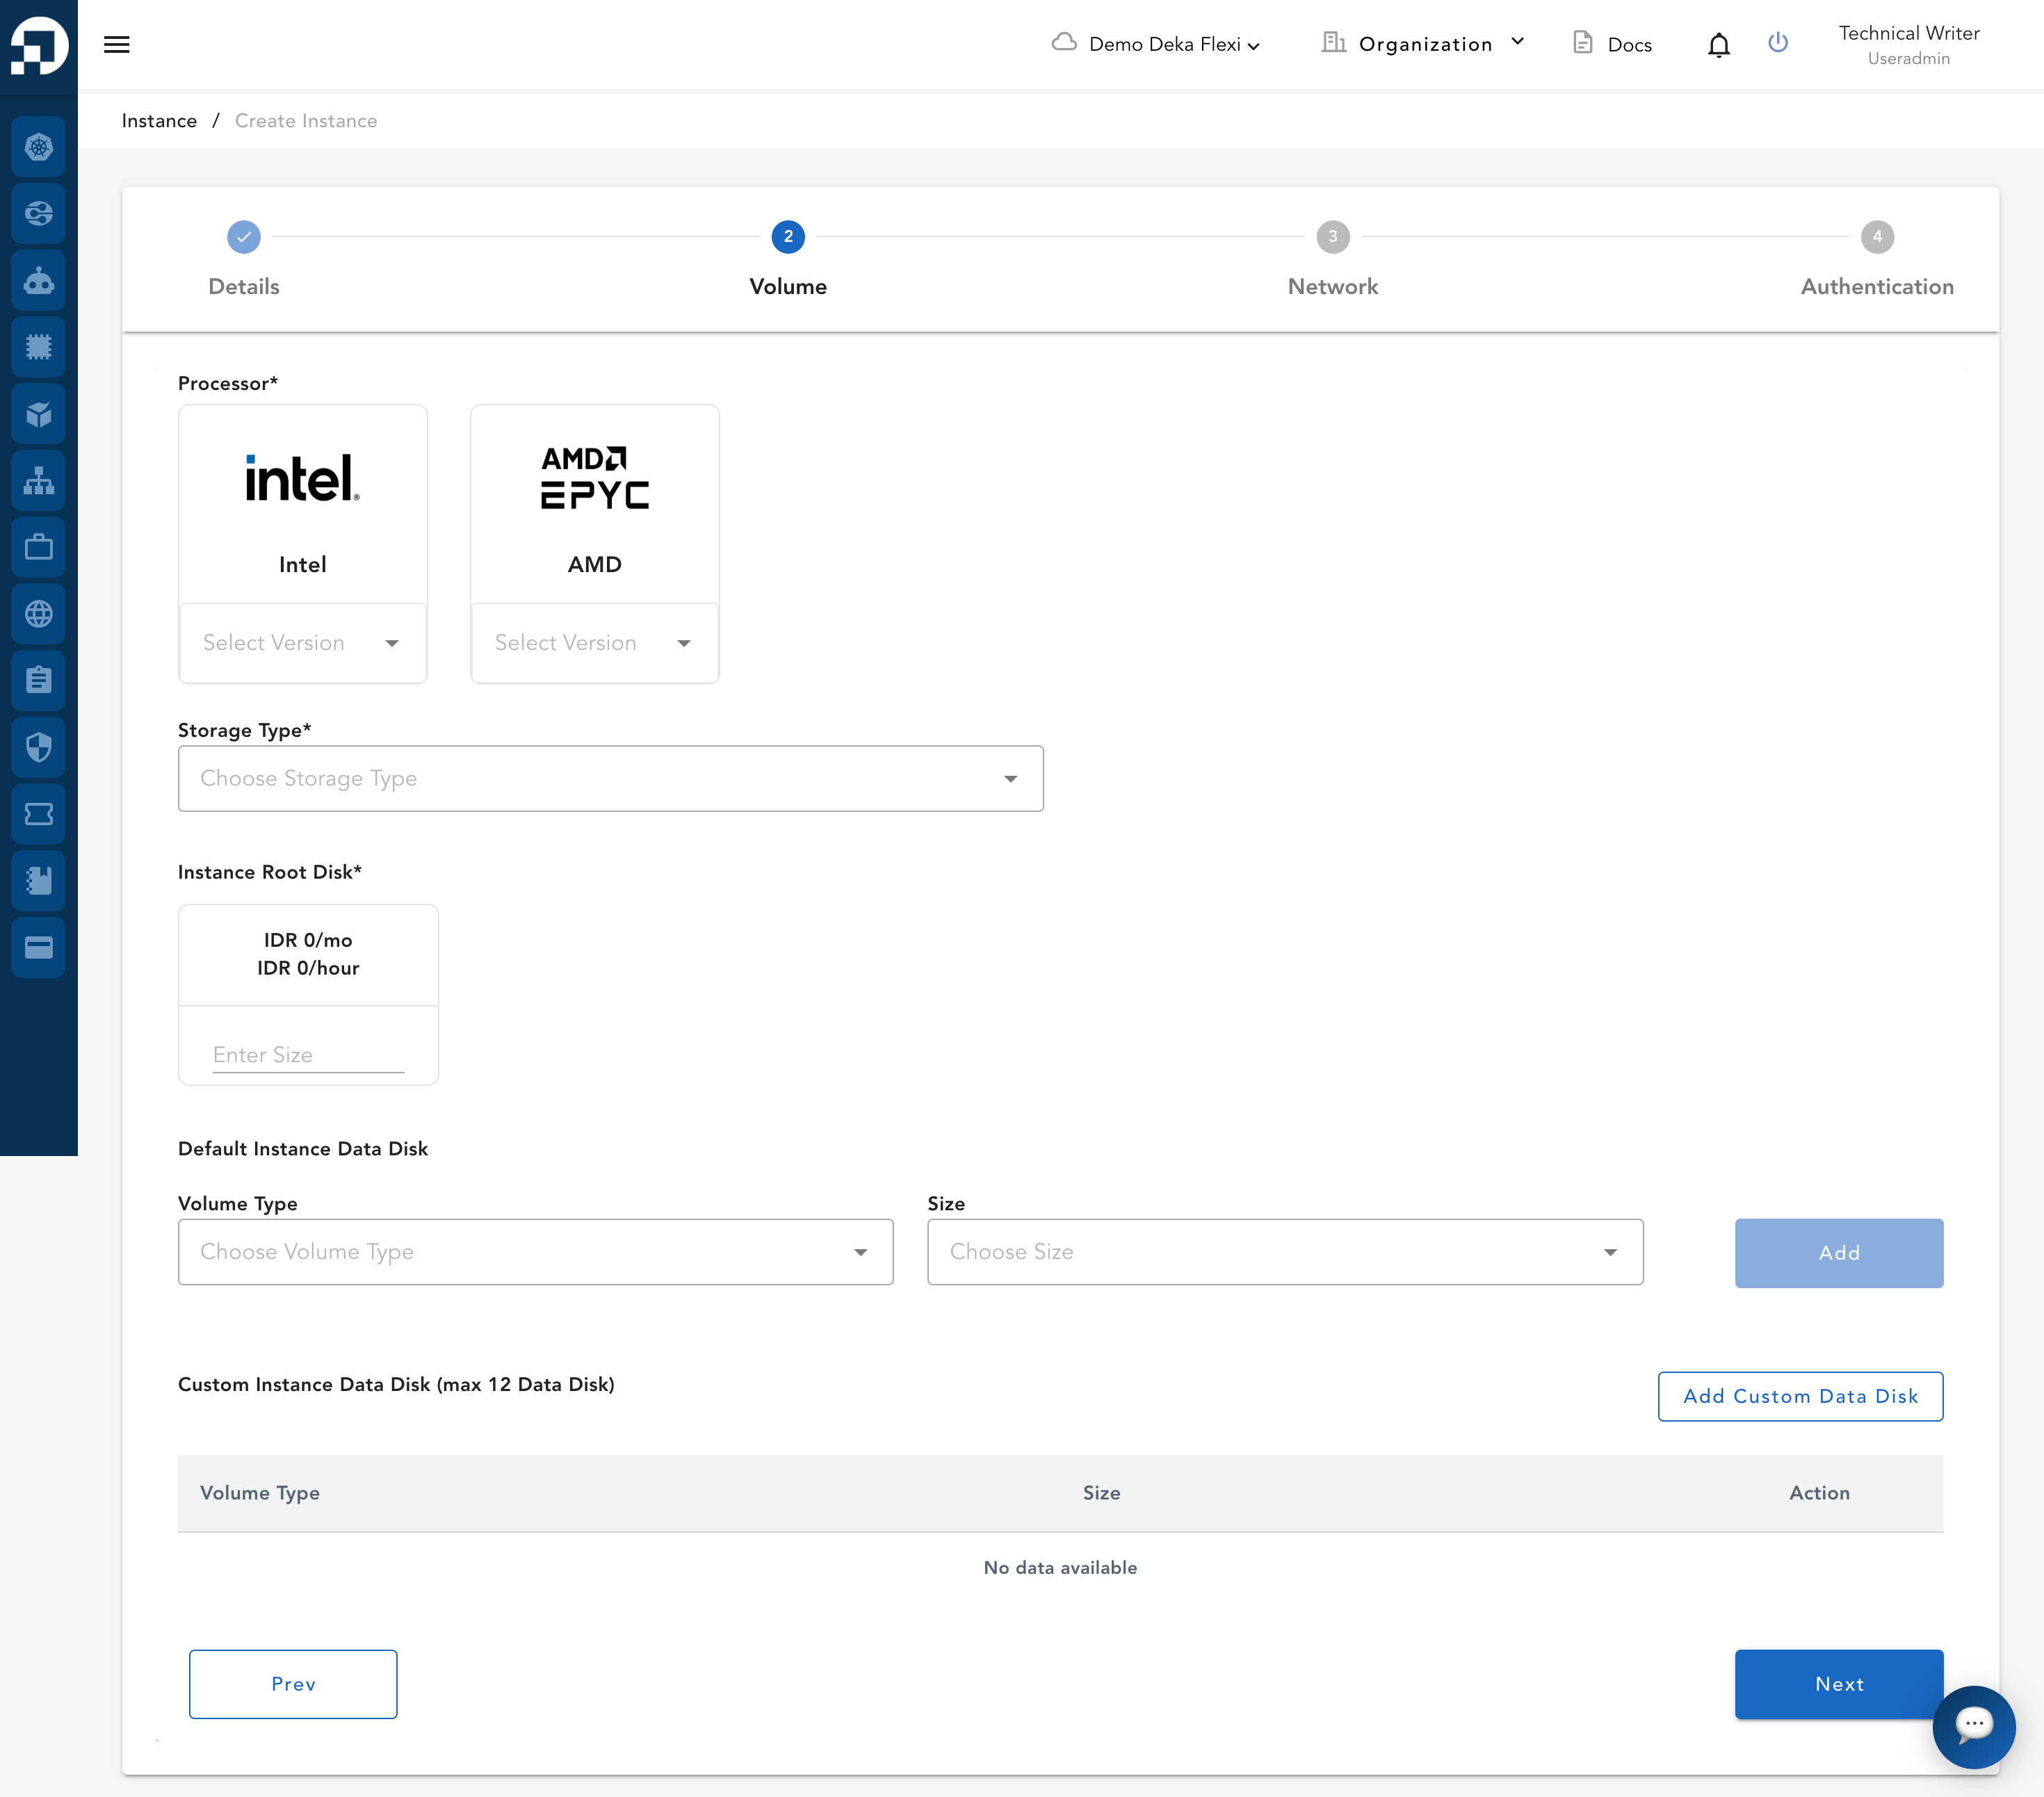
* Pada tahap kedua, yaitu Volume, terdapat Processor, Storage Type, Default Instance Data Disk, dan Custom Instance Data Disk.

<figure><img src="https://putri.box.cloudeka.id/cloudeka-assets/docs.cloudeka.ai/6dekaflexi/createvminstance_27.png" alt=""><figcaption></figcaption></figure>

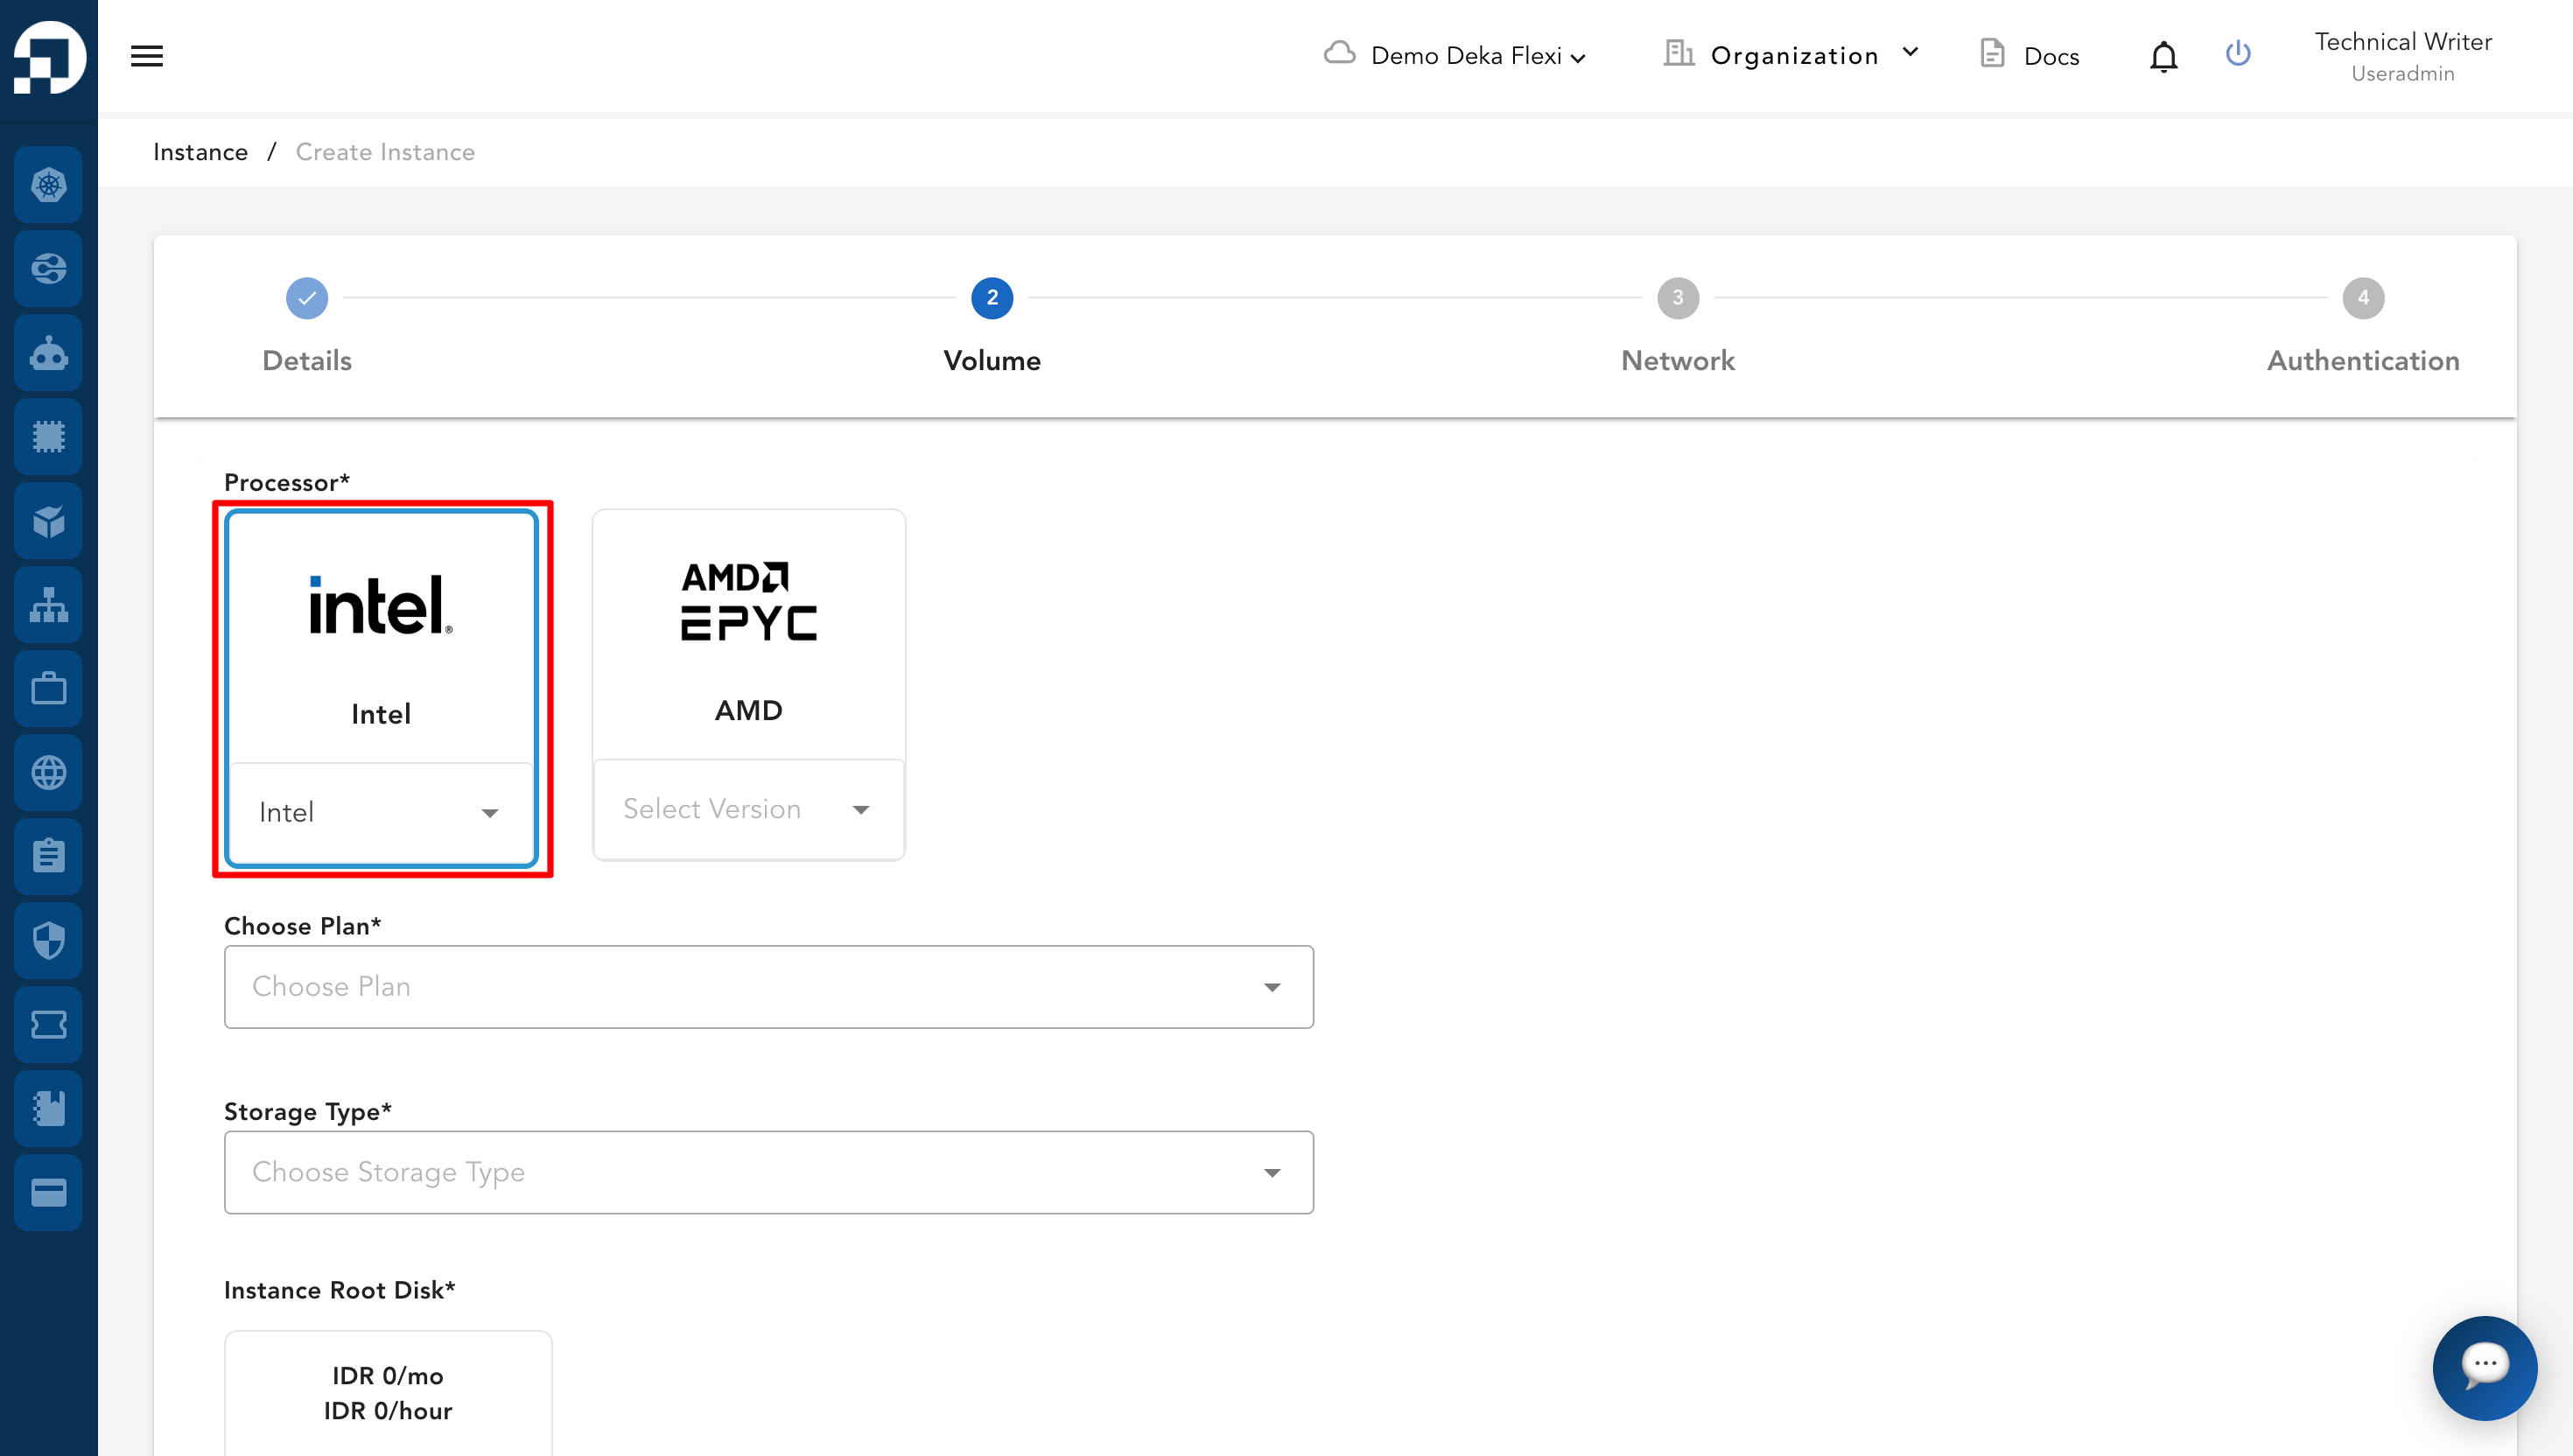
* Pada Processor tersedia prosesor Intel dan AMD. Panduan ini menggunakan prosesor Intel.

<figure><img src="https://putri.box.cloudeka.id/cloudeka-assets/docs.cloudeka.ai/6dekaflexi/createvminstance_28.png" alt=""><figcaption></figcaption></figure>

* Pilih Choose a plan untuk menentukan tipe mesin VM yang akan digunakan.

<figure><img src="https://putri.box.cloudeka.id/cloudeka-assets/docs.cloudeka.ai/6dekaflexi/createvminstance_29.png" alt=""><figcaption></figcaption></figure>

<table><thead><tr><th width="199"></th><th>Description</th></tr></thead><tbody><tr><td><strong>General</strong></td><td>The VM size provides a balanced CPU to memory ratio.</td></tr><tr><td><strong>Compute Optimized</strong></td><td>Delivers the highest performance CPU in Compute Engine and is optimized for compute-intensive workloads.</td></tr><tr><td><strong>Shared</strong></td><td>It provides a cost-effective method for running small applications that is not resource intensive.</td></tr><tr><td><strong>Memory Optimized</strong></td><td>Provides high memory to CPU ratio, optimized for memory-intensive workloads.</td></tr></tbody></table>

* Pilih Instance size untuk menentukan sumber daya CPU dan RAM pada VM yang akan dibuat.

<figure><img src="https://putri.box.cloudeka.id/cloudeka-assets/docs.cloudeka.ai/6dekaflexi/createvminstance_30.png" alt=""><figcaption></figcaption></figure>

<table><thead><tr><th width="200">Type</th><th width="112">Description</th><th>vCPU/RAM</th></tr></thead><tbody><tr><td><strong>General</strong></td><td>CPU:RAM eq 1:2,1:3</td><td><p>In General there are several Instance size options including:</p><ol><li>o1.medium.rc with the size 2vCPU and memory 6 GB,</li><li>e1.medium.rc with the size 2vCPU and memory 4 GB,</li><li>o1.large.rc with the size 4vCPU and memory 12 GB,</li><li>e1.large.rc with the size 4vCPU and memory 8 GB,</li><li>o1.xlarge.rc with the size 8vCPU and memory 24 GB,</li><li>e1.xlarge.rc with the size 8vCPU and memory 16 GB,</li><li>o1.cclarge.rc with the size 16vCPU and memory 48 GB,</li><li>e1.xxlarge.rc dengan 16vCPU and memory 32 G,</li><li>o1.qlarge.rc with the size 32vCPU and memory 96 GB,</li><li>e1.qlarge.rc with the size 32vCPU and memory 64 GB.</li></ol></td></tr><tr><td><strong>Compute Optimized</strong></td><td>CPU:RAM eq 1:1</td><td><p>In Compute Optimized there are several Instance size options including:</p><ol><li>c1.medium.rc with the size 2vCPU and memory 2GB,</li><li>c1.large.rc with the size 4vCPU and memory 4GB,</li><li>c1.xlarge.rc with the size 8vCPU and memory 8GB,</li><li>c1.xxlarge.rc with the size 16vCPU and memory 16GB,</li><li>c1.qlarge.rc with the size 32vCPU and memory 32GB</li></ol></td></tr><tr><td><strong>Shared</strong></td><td>Berdasarkan 1 vCPU</td><td><p>In Shared there are several Instance sizes that can be used:</p><ol><li>s1.small.rc with the size 1vCPU and memory 4 GB,</li><li>o1.small.rc with the size 1vCPU and memory 3 GB,</li><li>c1.qsmall.rs with the size 1vCPU and memory 2 GB,</li><li>c1.small.rc with the size 1vCPU and memory 1 GB.</li></ol></td></tr><tr><td><strong>Memory Optimized</strong></td><td>CPU:RAM eq 1:4</td><td><p>In Memory Optimized there are several Instance sizes that can be used:</p><ol><li>o1.xxxxlarge.rc with the size 2vCPU and memory 32 GB,</li><li>o1.xxxLarge.rc with the size 2vCPU dan ukuran memori 16 GB,</li><li>s1.medium.rc with the size 2vCPU and memory 8 GB,</li><li>c1.sxLarge.rc with the size 4vCPU and memory 64 GB,</li><li>c1.xxxLarge.rc with the size 4vCPU dan ukuran memori 32 GB,</li><li>s1.large.rc with the size 4vCPU and memory 16 GB,</li><li>q1.xlarge.rc with the size 8vCPU and memory 128 GB.</li><li>s1.sxlarge.rc with the size 8vCPU and memory 32 GB.</li><li>s1.xlarge.rc with the size 8vCPU and memory 32 GB.</li><li>s1.xxlarge.rc with the size 16vCPU and memory 64 GB,</li><li>s1.qlarge.rc with the size 32vCPU and memory 128 GB,</li><li>a1.xxxlarge.rc with the size 64vCPU and memory 512 GB.</li></ol></td></tr></tbody></table>

* Tersedia lima tingkatan penyimpanan: Basic, Standard, Premium, NVMe Standard, dan NVMe Premium. Setiap tingkatan menyediakan performa IOPS dan dukungan fitur yang berbeda. Pilih tipe penyimpanan yang akan digunakan.

<figure><img src="https://putri.box.cloudeka.id/cloudeka-assets/docs.cloudeka.ai/6dekaflexi/createvminstance_31.png" alt=""><figcaption></figcaption></figure>

Cloudeka menawarkan beberapa tingkatan penyimpanan dengan performa dan dukungan fitur yang berbeda. Lihat tabel berikut untuk membandingkan setiap tingkatan dan memilih opsi yang paling sesuai untuk beban kerja Anda.

<table><thead><tr><th>Tier</th><th width="245.5625">IOPS</th><th width="75.453125">TBS</th><th width="95.0677490234375">TKP</th><th width="76.5625">JAH</th></tr></thead><tbody><tr><td>Basic</td><td>No IOPS guarantee</td><td>Yes</td><td>Yes</td><td>No</td></tr><tr><td>Standard</td><td>750 - 2,500 IOPS</td><td>Yes</td><td>Yes</td><td>Yes</td></tr><tr><td>Premium</td><td>2,250 - 4,500 IOPS</td><td>Yes</td><td>Yes</td><td>Yes</td></tr><tr><td>NVMe Standard</td><td>4,500 - 10,000 IOPS</td><td>Yes</td><td>No</td><td>No</td></tr><tr><td>NVMe Premium</td><td>10,000 - 15,000 IOPS</td><td>Yes</td><td>No</td><td>No</td></tr></tbody></table>

* Pada kolom Instance Root disk, masukkan atau pilih ukuran disk OS yang akan digunakan. Ukuran minimum root disk yang dapat digunakan adalah 20 GB.

<figure><img src="https://putri.box.cloudeka.id/cloudeka-assets/docs.cloudeka.ai/6dekaflexi/createvminstance_32.png" alt=""><figcaption></figcaption></figure>

* Terdapat dua jenis Volume Type, yaitu Standard Volume SSD dengan 750–2500 IOPS dan Premium Volume SSD dengan 2250–4500 IOPS. Pilih tipe Volume yang akan digunakan untuk data disk. Data disk digunakan untuk menambahkan penyimpanan pada VM di luar root disk/disk OS, lalu tekan tombol Add.

<figure><img src="https://putri.box.cloudeka.id/cloudeka-assets/docs.cloudeka.ai/6dekaflexi/createvminstance_33.png" alt=""><figcaption></figcaption></figure>

* Setelah Instance Data Disk ditambahkan, disk akan muncul pada bagian Custom Instance Data Disk. Anda dapat menambahkan Data Disk dengan menekan tombol Add Custom Data Disk atau menghapus konfigurasi Data Disk yang telah ditambahkan dengan menekan tombol Delete. Jika Data Disk telah dikonfigurasi, tekan tombol Next untuk menuju tahap berikutnya.

<figure><img src="https://putri.box.cloudeka.id/cloudeka-assets/docs.cloudeka.ai/6dekaflexi/createvminstance_34.png" alt=""><figcaption></figcaption></figure>

* Pada tahap ketiga, yaitu Network, terdapat VPC Network. Pastikan Anda telah membuat VPC yang akan digunakan VM. Untuk penjelasan lebih lanjut tentang VPC yang digunakan, [klik di sini](/deka-gpu-documentations/panduan-untuk-enterprise/deka-flexi/deka-flexi-network/vpc-network/create-vpc-network.md).

<figure><img src="https://putri.box.cloudeka.id/cloudeka-assets/docs.cloudeka.ai/6dekaflexi/createvminstance_35.png" alt=""><figcaption></figcaption></figure>

* Tentukan VPC yang akan digunakan. Tekan tombol Next untuk menuju tahap berikutnya.

<figure><img src="https://putri.box.cloudeka.id/cloudeka-assets/docs.cloudeka.ai/6dekaflexi/createvminstance_36.png" alt=""><figcaption></figcaption></figure>

* Pada tahap keempat, yaitu Authentication, terdapat dua metode autentikasi untuk masuk ke VM, yaitu SSH Keys dan Passwords.

  * **Password**, masukkan password default untuk metode autentikasi.

  <figure><img src="https://putri.box.cloudeka.id/cloudeka-assets/docs.cloudeka.ai/6dekaflexi/createvminstance_37.png" alt=""><figcaption></figcaption></figure>

  * **SSH Keys** lebih aman daripada password standar. Untuk menggunakan autentikasi ini, Anda harus membuat SSH Key terlebih dahulu. Berikut langkah-langkah untuk menambahkan SSH key:

    * Pilih SSH Keys sebagai metode autentikasi, lalu klik New SSH Key.

    <figure><img src="https://putri.box.cloudeka.id/cloudeka-assets/docs.cloudeka.ai/6dekaflexi/createvminstance_38.png" alt=""><figcaption></figcaption></figure>

    * Tempelkan Public Key yang diperoleh sebelumnya, masukkan nama key, lalu klik Add SSH Key.

    <figure><img src="https://putri.box.cloudeka.id/cloudeka-assets/docs.cloudeka.ai/6dekaflexi/createvminstance_39.png" alt=""><figcaption></figcaption></figure>

    * Centang SSH Key yang baru ditambahkan.

    <figure><img src="https://putri.box.cloudeka.id/cloudeka-assets/docs.cloudeka.ai/6dekaflexi/createvminstance_40.png" alt=""><figcaption></figcaption></figure>
* Setelah menentukan autentikasi yang akan digunakan, tekan tombol Submit untuk proses pembuatan VM pada Instance.

<figure><img src="https://putri.box.cloudeka.id/cloudeka-assets/docs.cloudeka.ai/6dekaflexi/createvminstance_41.png" alt=""><figcaption></figcaption></figure>

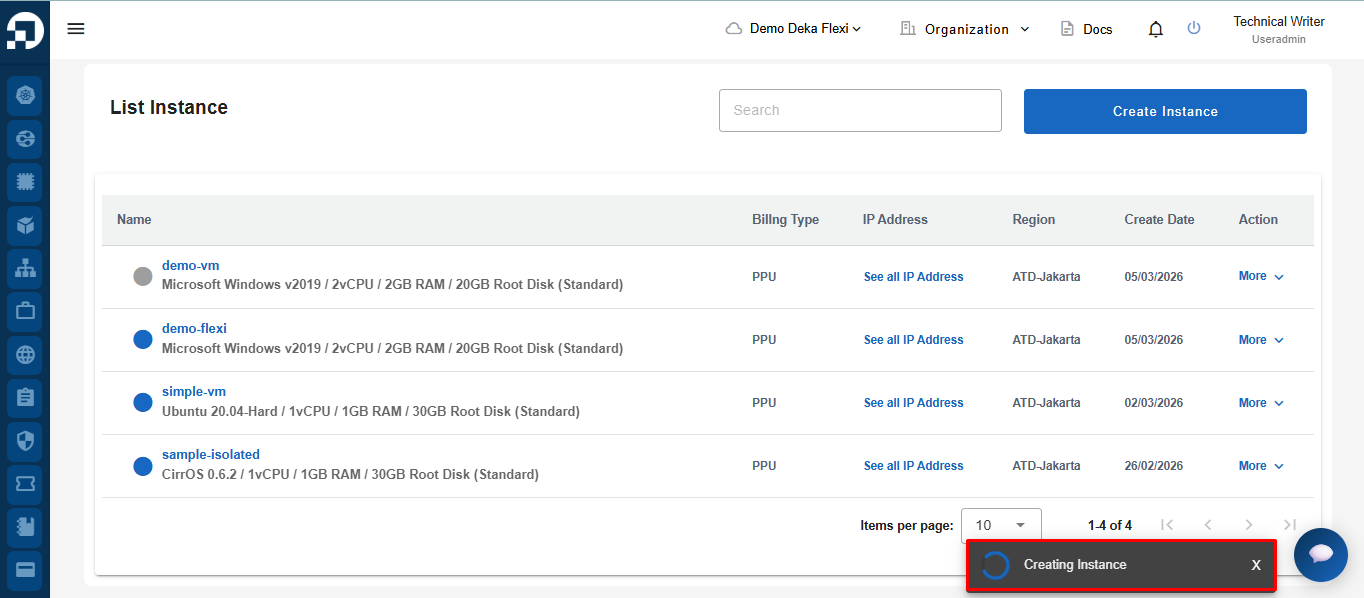
* Notifikasi akan muncul yang menunjukkan bahwa instance sedang dibuat.

<figure><img src="https://putri.box.cloudeka.id/cloudeka-assets/docs.cloudeka.ai/6dekaflexi/createvminstance_42.png" alt=""><figcaption></figcaption></figure>

* Setelah Instance berhasil dibuat, notifikasi **"Instance (instance name) has been successfully created"** akan muncul.

<figure><img src="https://putri.box.cloudeka.id/cloudeka-assets/docs.cloudeka.ai/6dekaflexi/createvminstance_43.png" alt=""><figcaption></figcaption></figure>