> For the complete documentation index, see [llms.txt](https://docs.cloudeka.ai/llms.txt). Markdown versions of documentation pages are available by appending `.md` to page URLs; this page is available as [Markdown](https://docs.cloudeka.ai/guideline-for-enterprise/deka-gpu-mlops/role-based-access-control-rbac/add-new-user-and-assign-roles-to-the-user.md).

# Add New User and Assign Roles To The User

This guide explains how to add a new user to a namespace and assign the appropriate role through the Cloudeka Deka MLOps Service Portal. The process consists of two stages: adding the user as a contributor and then assigning the required role.

## Adding a User as a Contributor

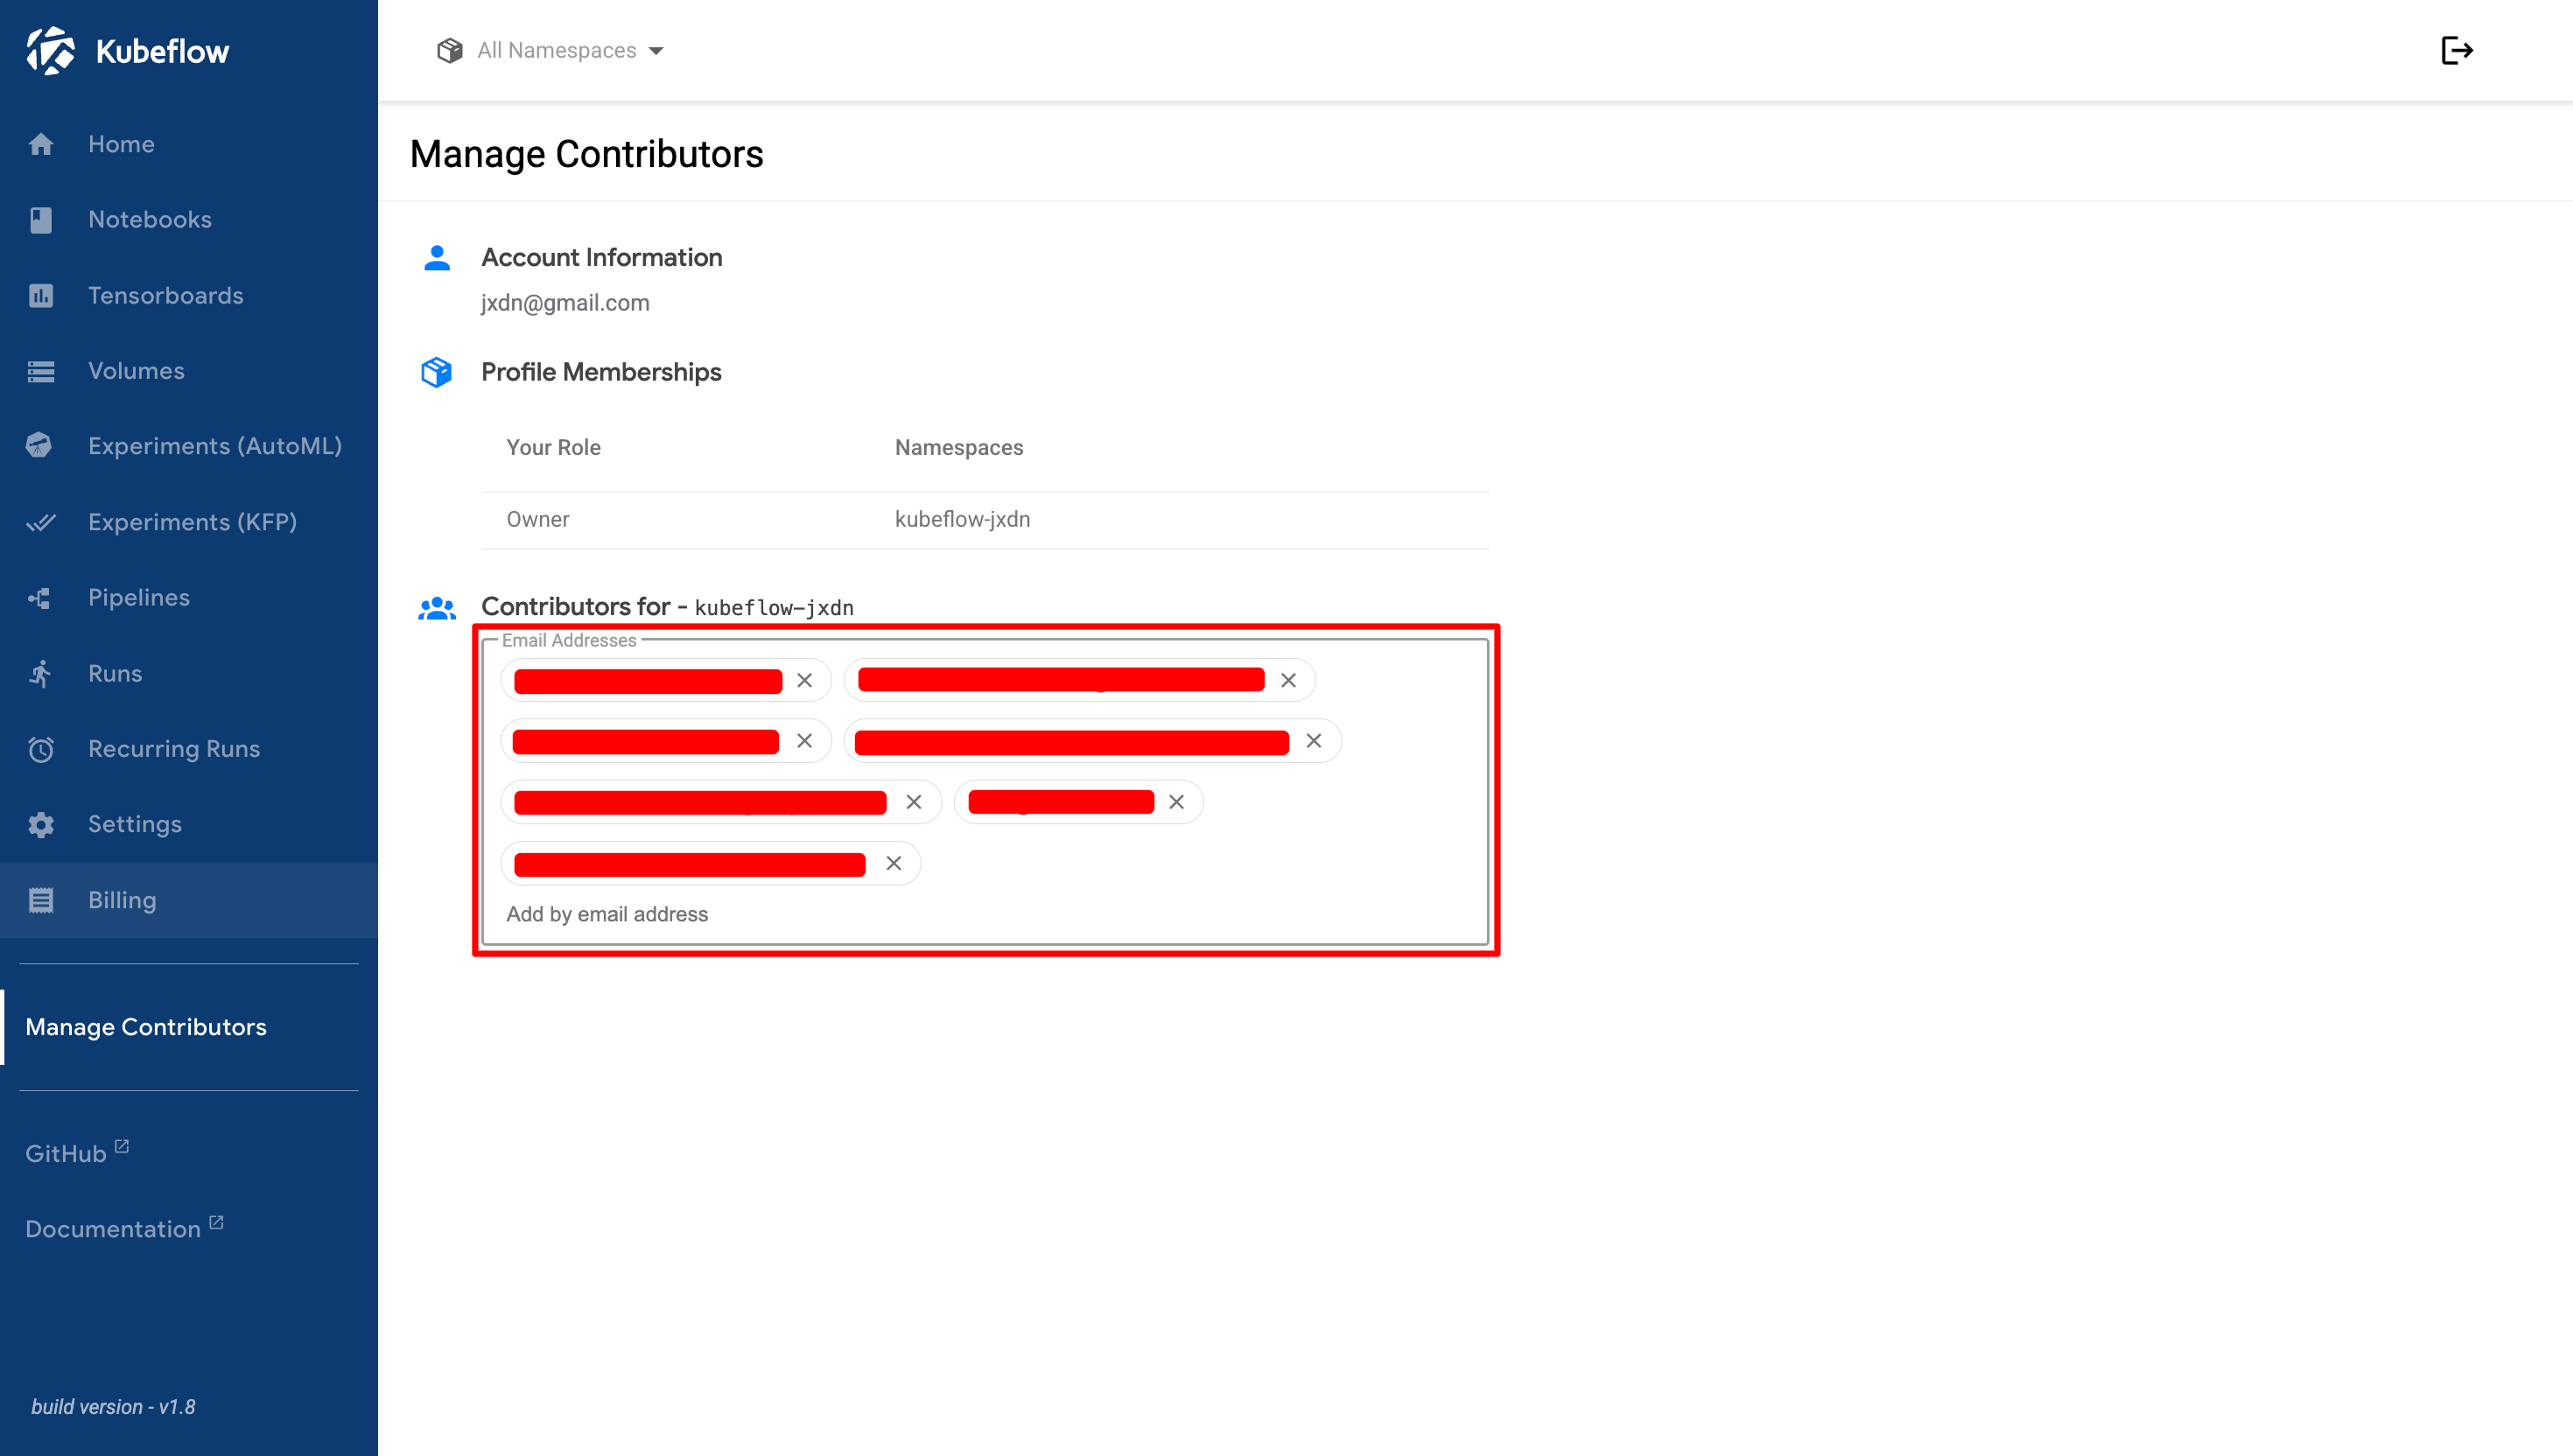
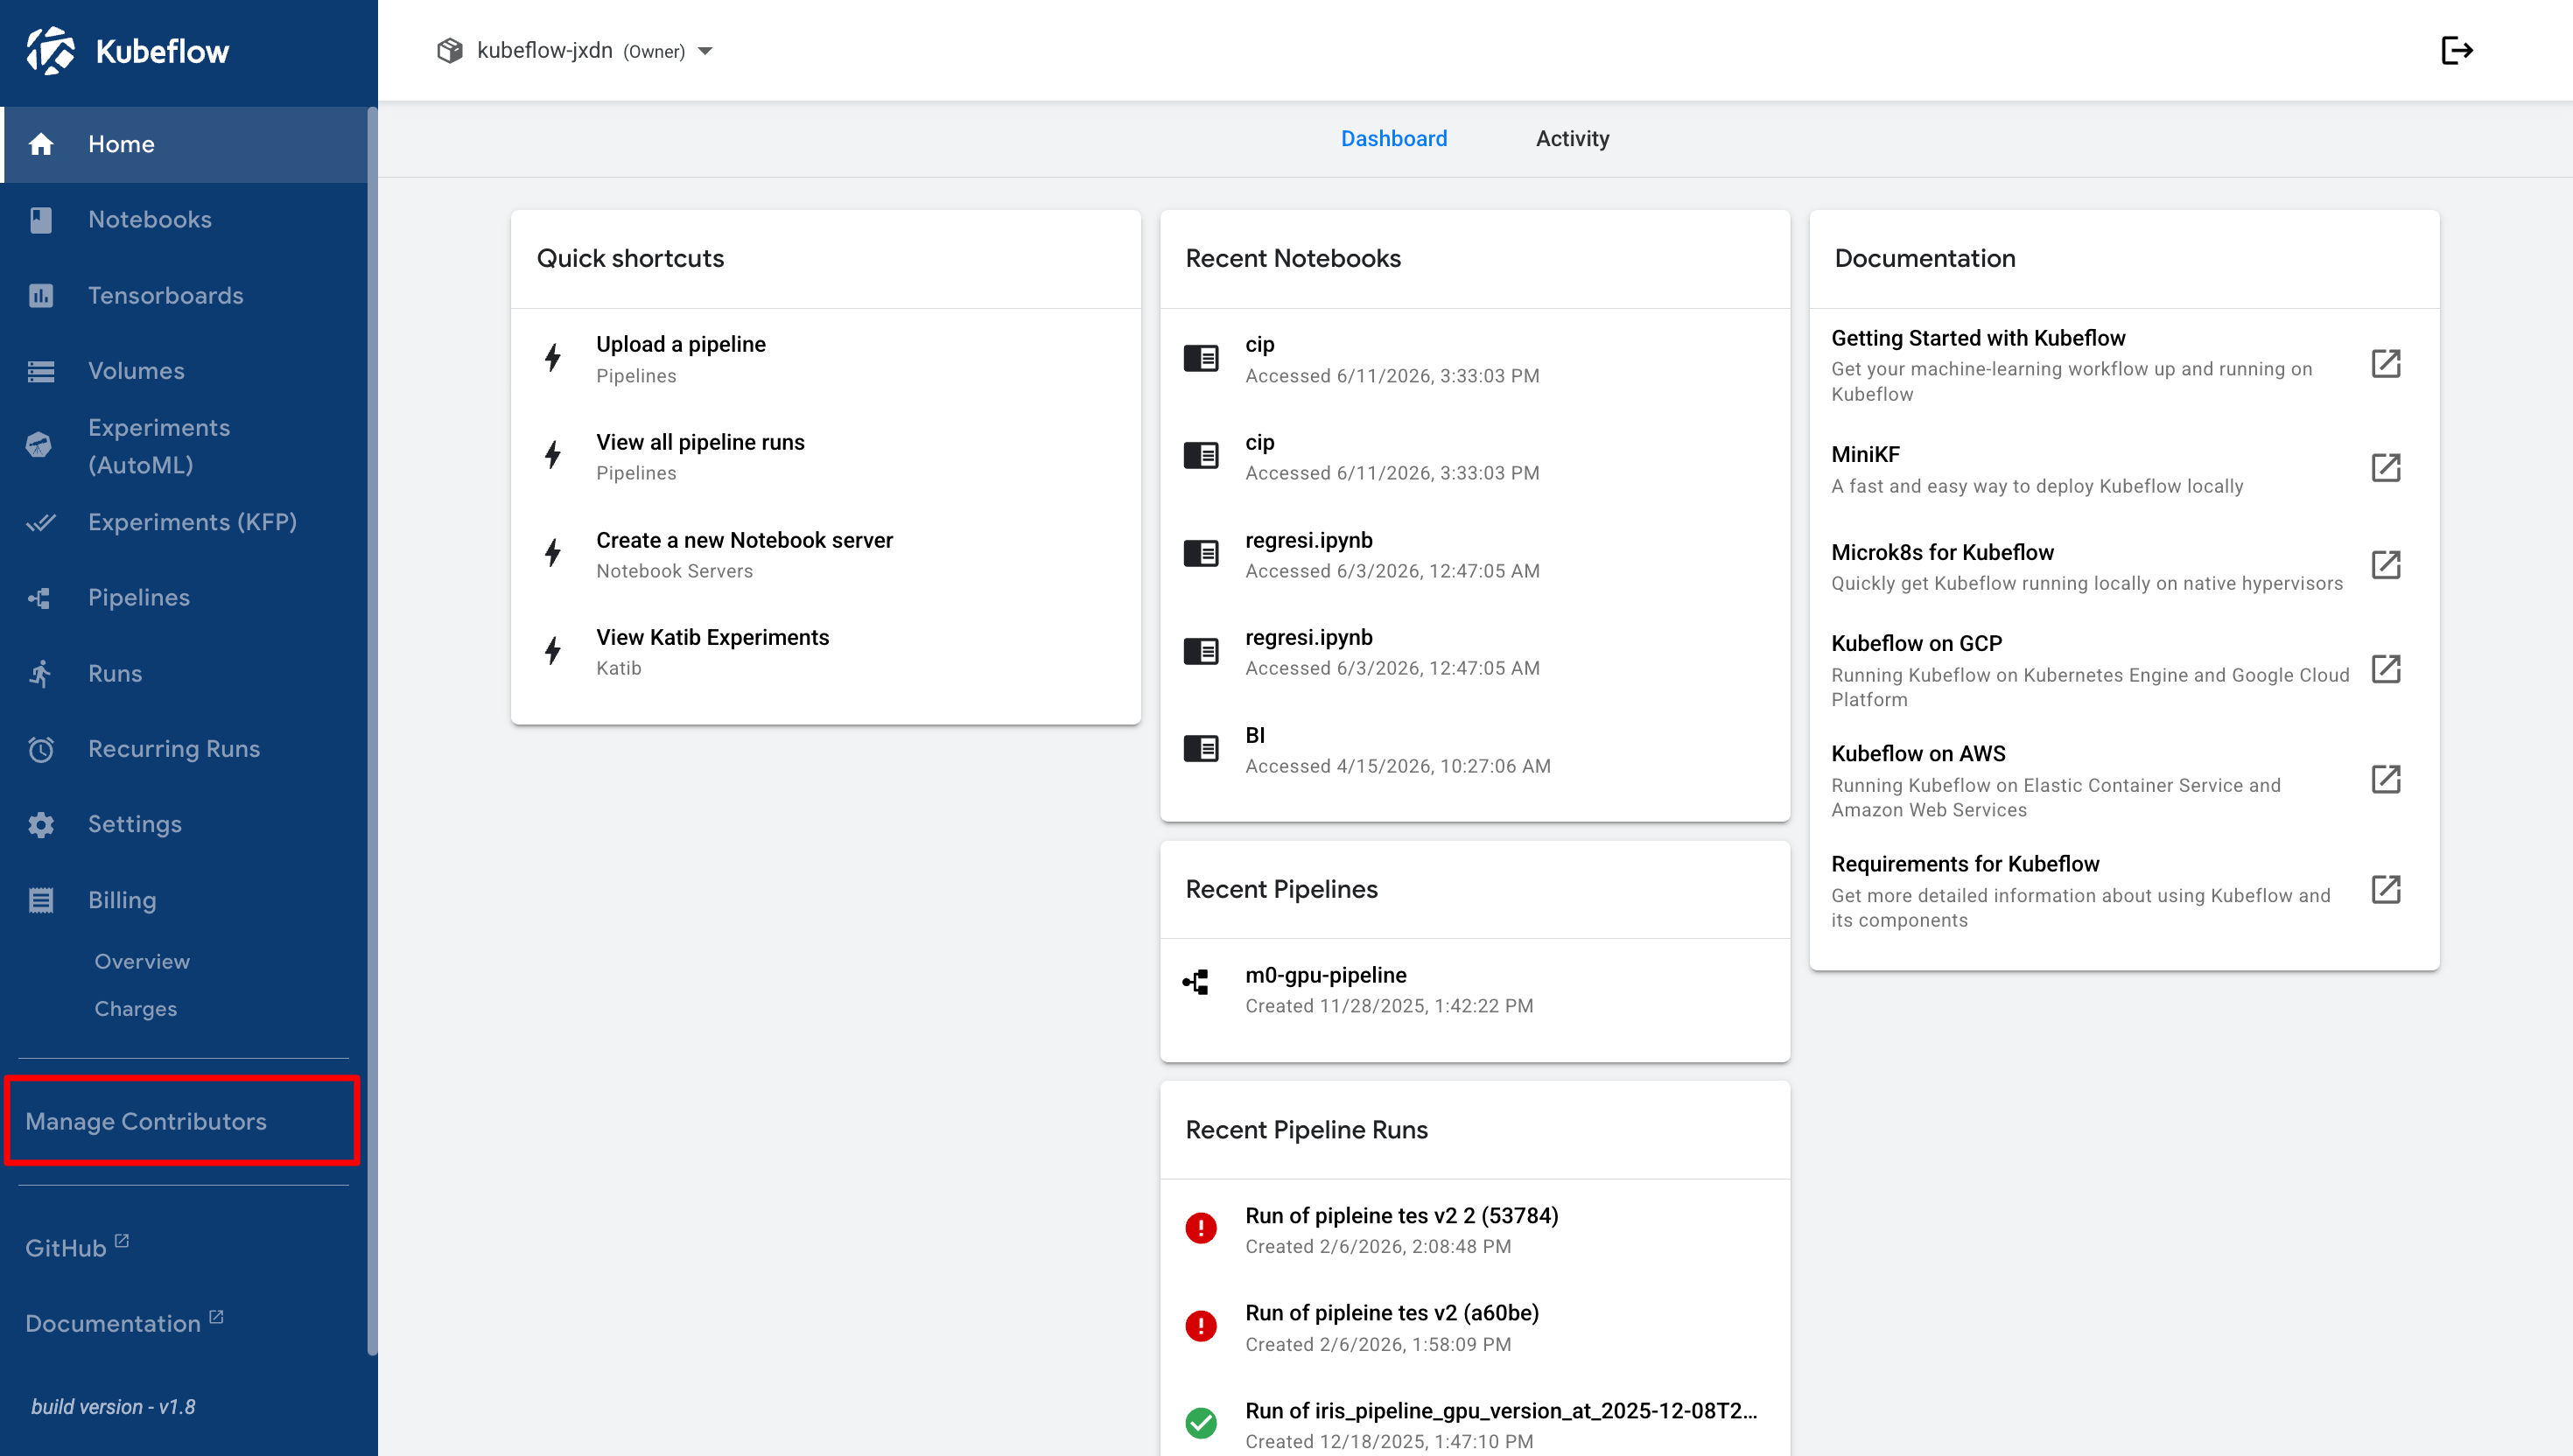
To add a user as a contributor, navigate to the **Manage Contributors** page.

<figure><img src="https://2882153758-files.gitbook.io/~/files/v0/b/gitbook-x-prod.appspot.com/o/spaces%2Fi9YWb69HFXLHYlXffReU%2Fuploads%2Fgit-blob-0526cddee3ae2de3bee899b07aaa96827c280188%2Fimage.png?alt=media" alt=""><figcaption></figcaption></figure>

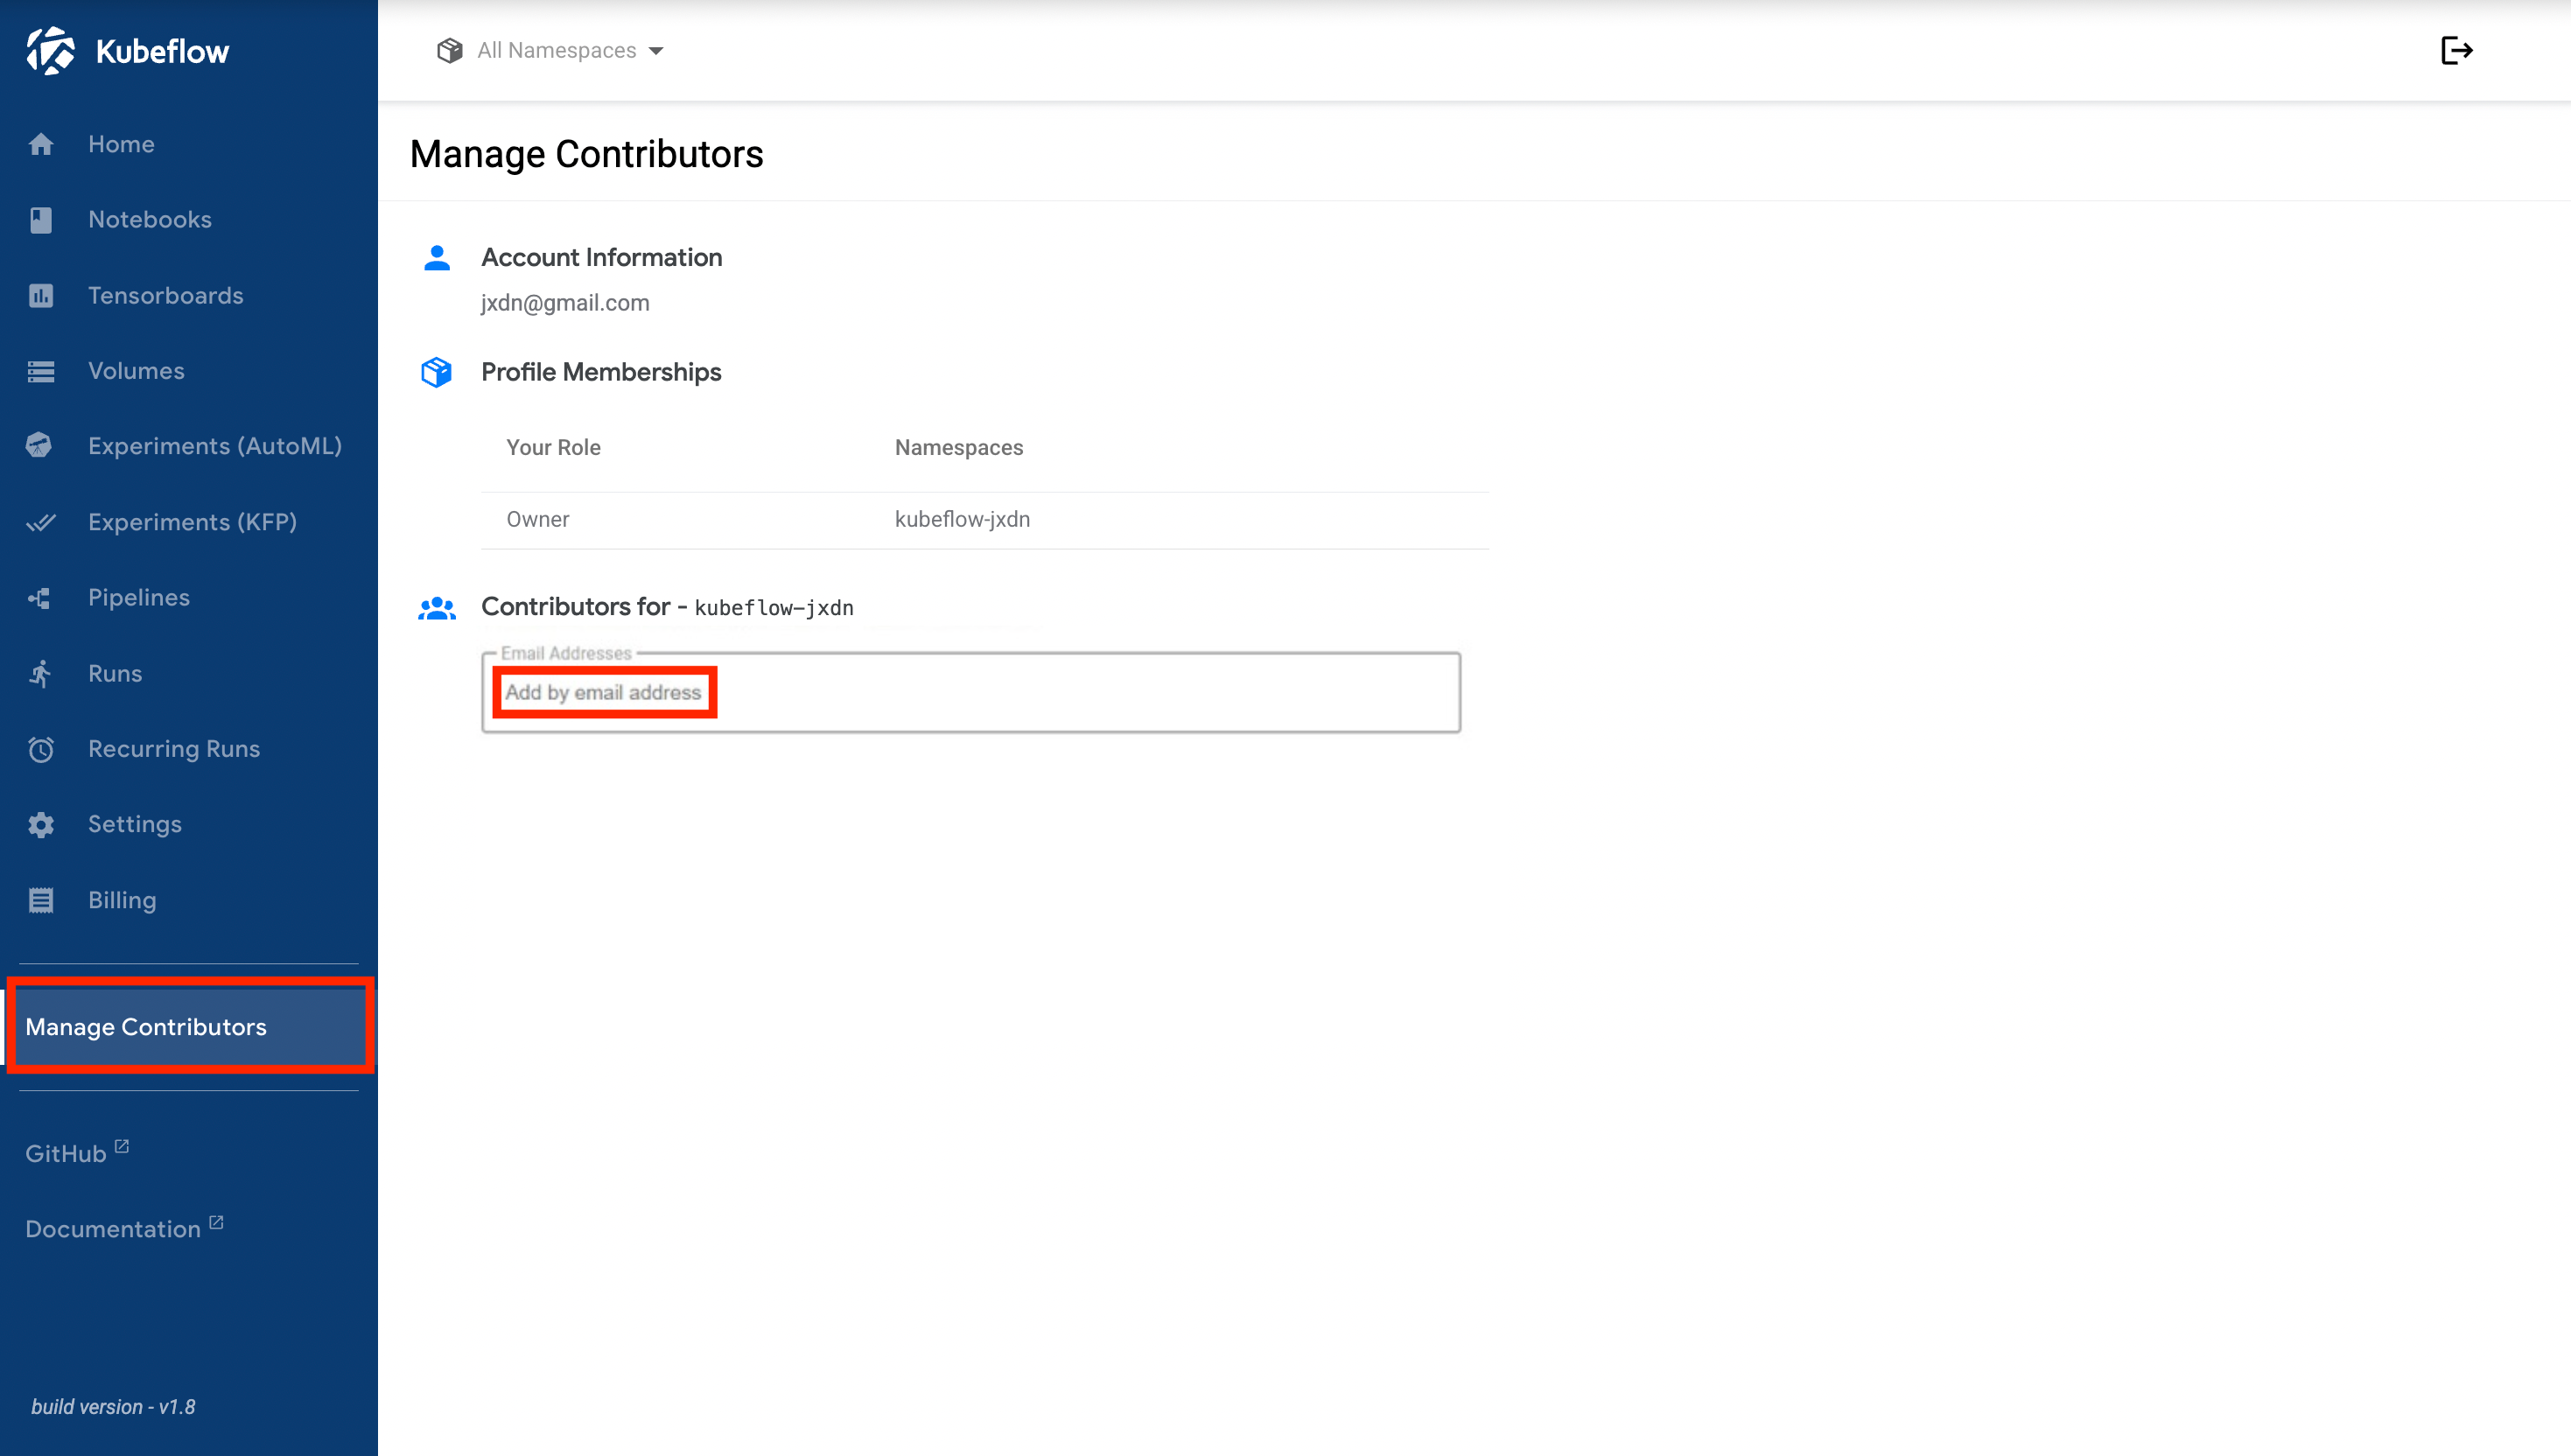
This page displays account information and a list of current contributors. In the **Contributors** section, an input field is available for adding new users.

<figure><img src="https://2882153758-files.gitbook.io/~/files/v0/b/gitbook-x-prod.appspot.com/o/spaces%2Fi9YWb69HFXLHYlXffReU%2Fuploads%2Fgit-blob-ab242428edb5a1e70e6a9f519b3def216b860a82%2Fimage.png?alt=media" alt=""><figcaption></figcaption></figure>

Click the **Add by email address** field and enter the email address of the user you want to grant access to. After entering the email address, press **Enter**. The user is then added as a contributor to the selected namespace.

<figure><img src="https://2882153758-files.gitbook.io/~/files/v0/b/gitbook-x-prod.appspot.com/o/spaces%2Fi9YWb69HFXLHYlXffReU%2Fuploads%2Fgit-blob-31168268acfc1342bfa4cd205f24b7c866981cbf%2Fimage.png?alt=media" alt=""><figcaption></figcaption></figure>

## Creating the User Account and Assigning a Base Role

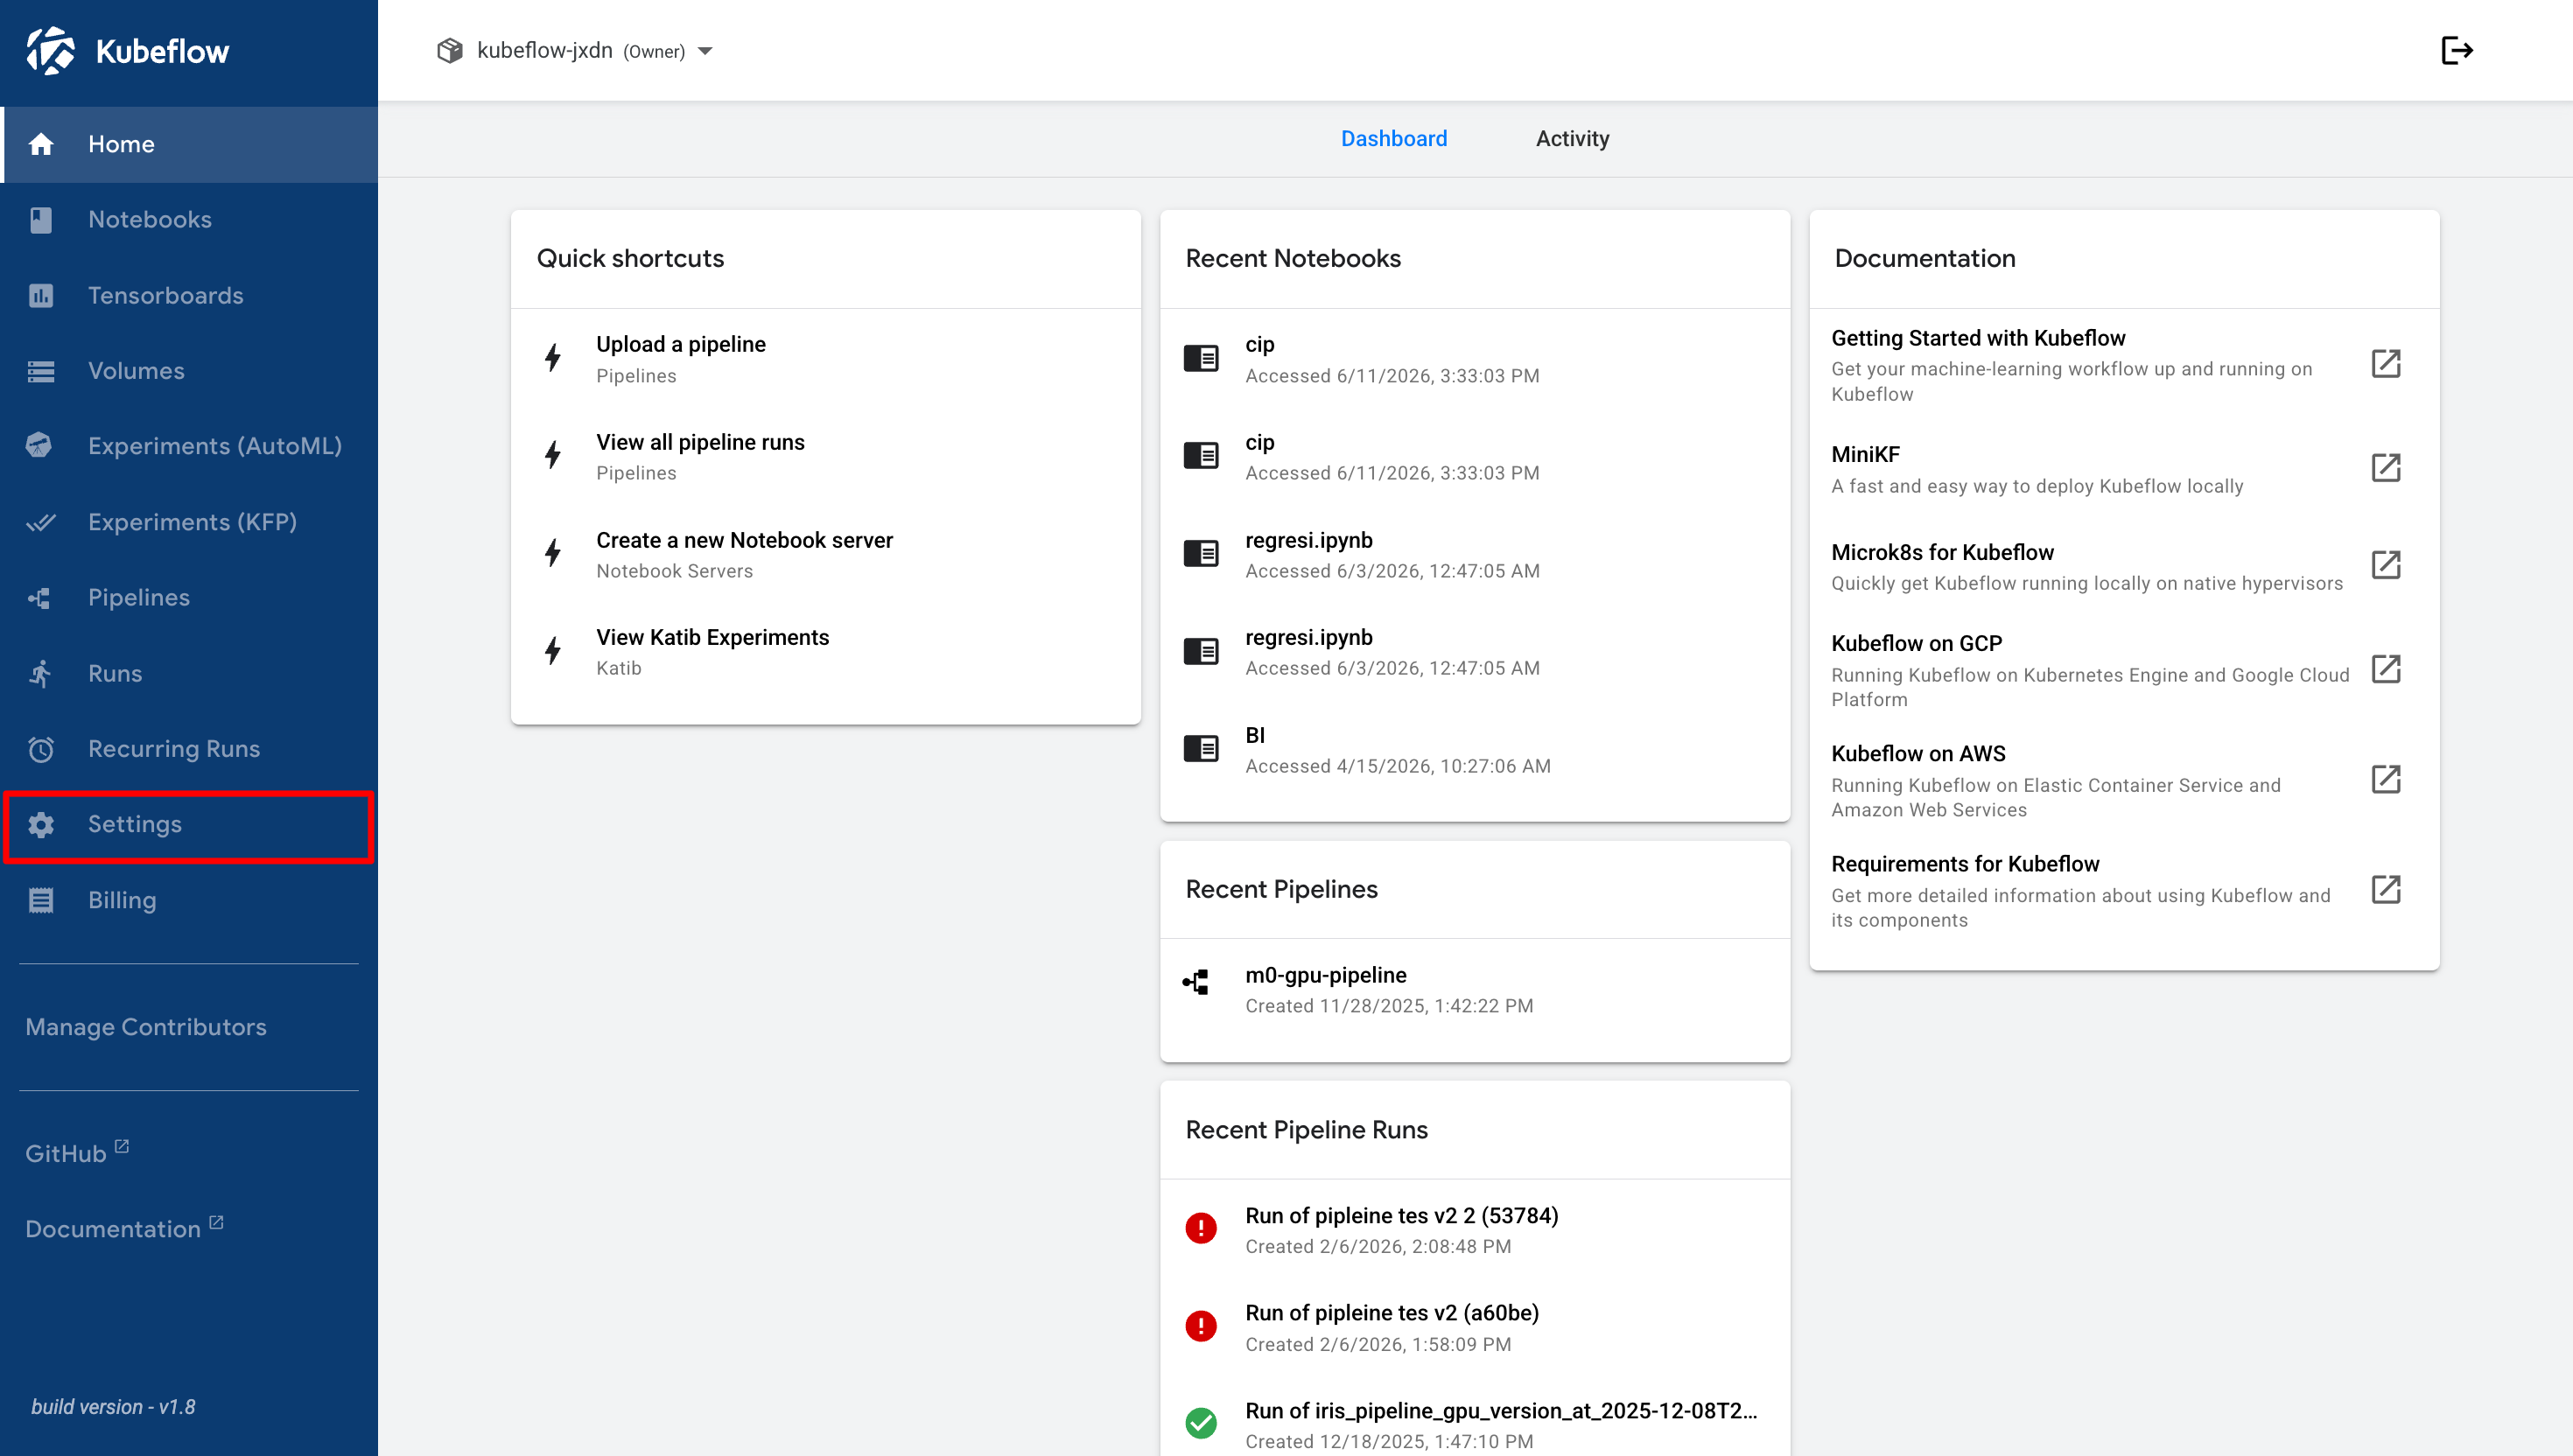
After adding the contributor, navigate to the **Settings** page.

<figure><img src="https://2882153758-files.gitbook.io/~/files/v0/b/gitbook-x-prod.appspot.com/o/spaces%2Fi9YWb69HFXLHYlXffReU%2Fuploads%2Fgit-blob-36238bee8aa59f94aa0544baf66ed27e0e842d38%2Fimage.png?alt=media" alt=""><figcaption></figcaption></figure>

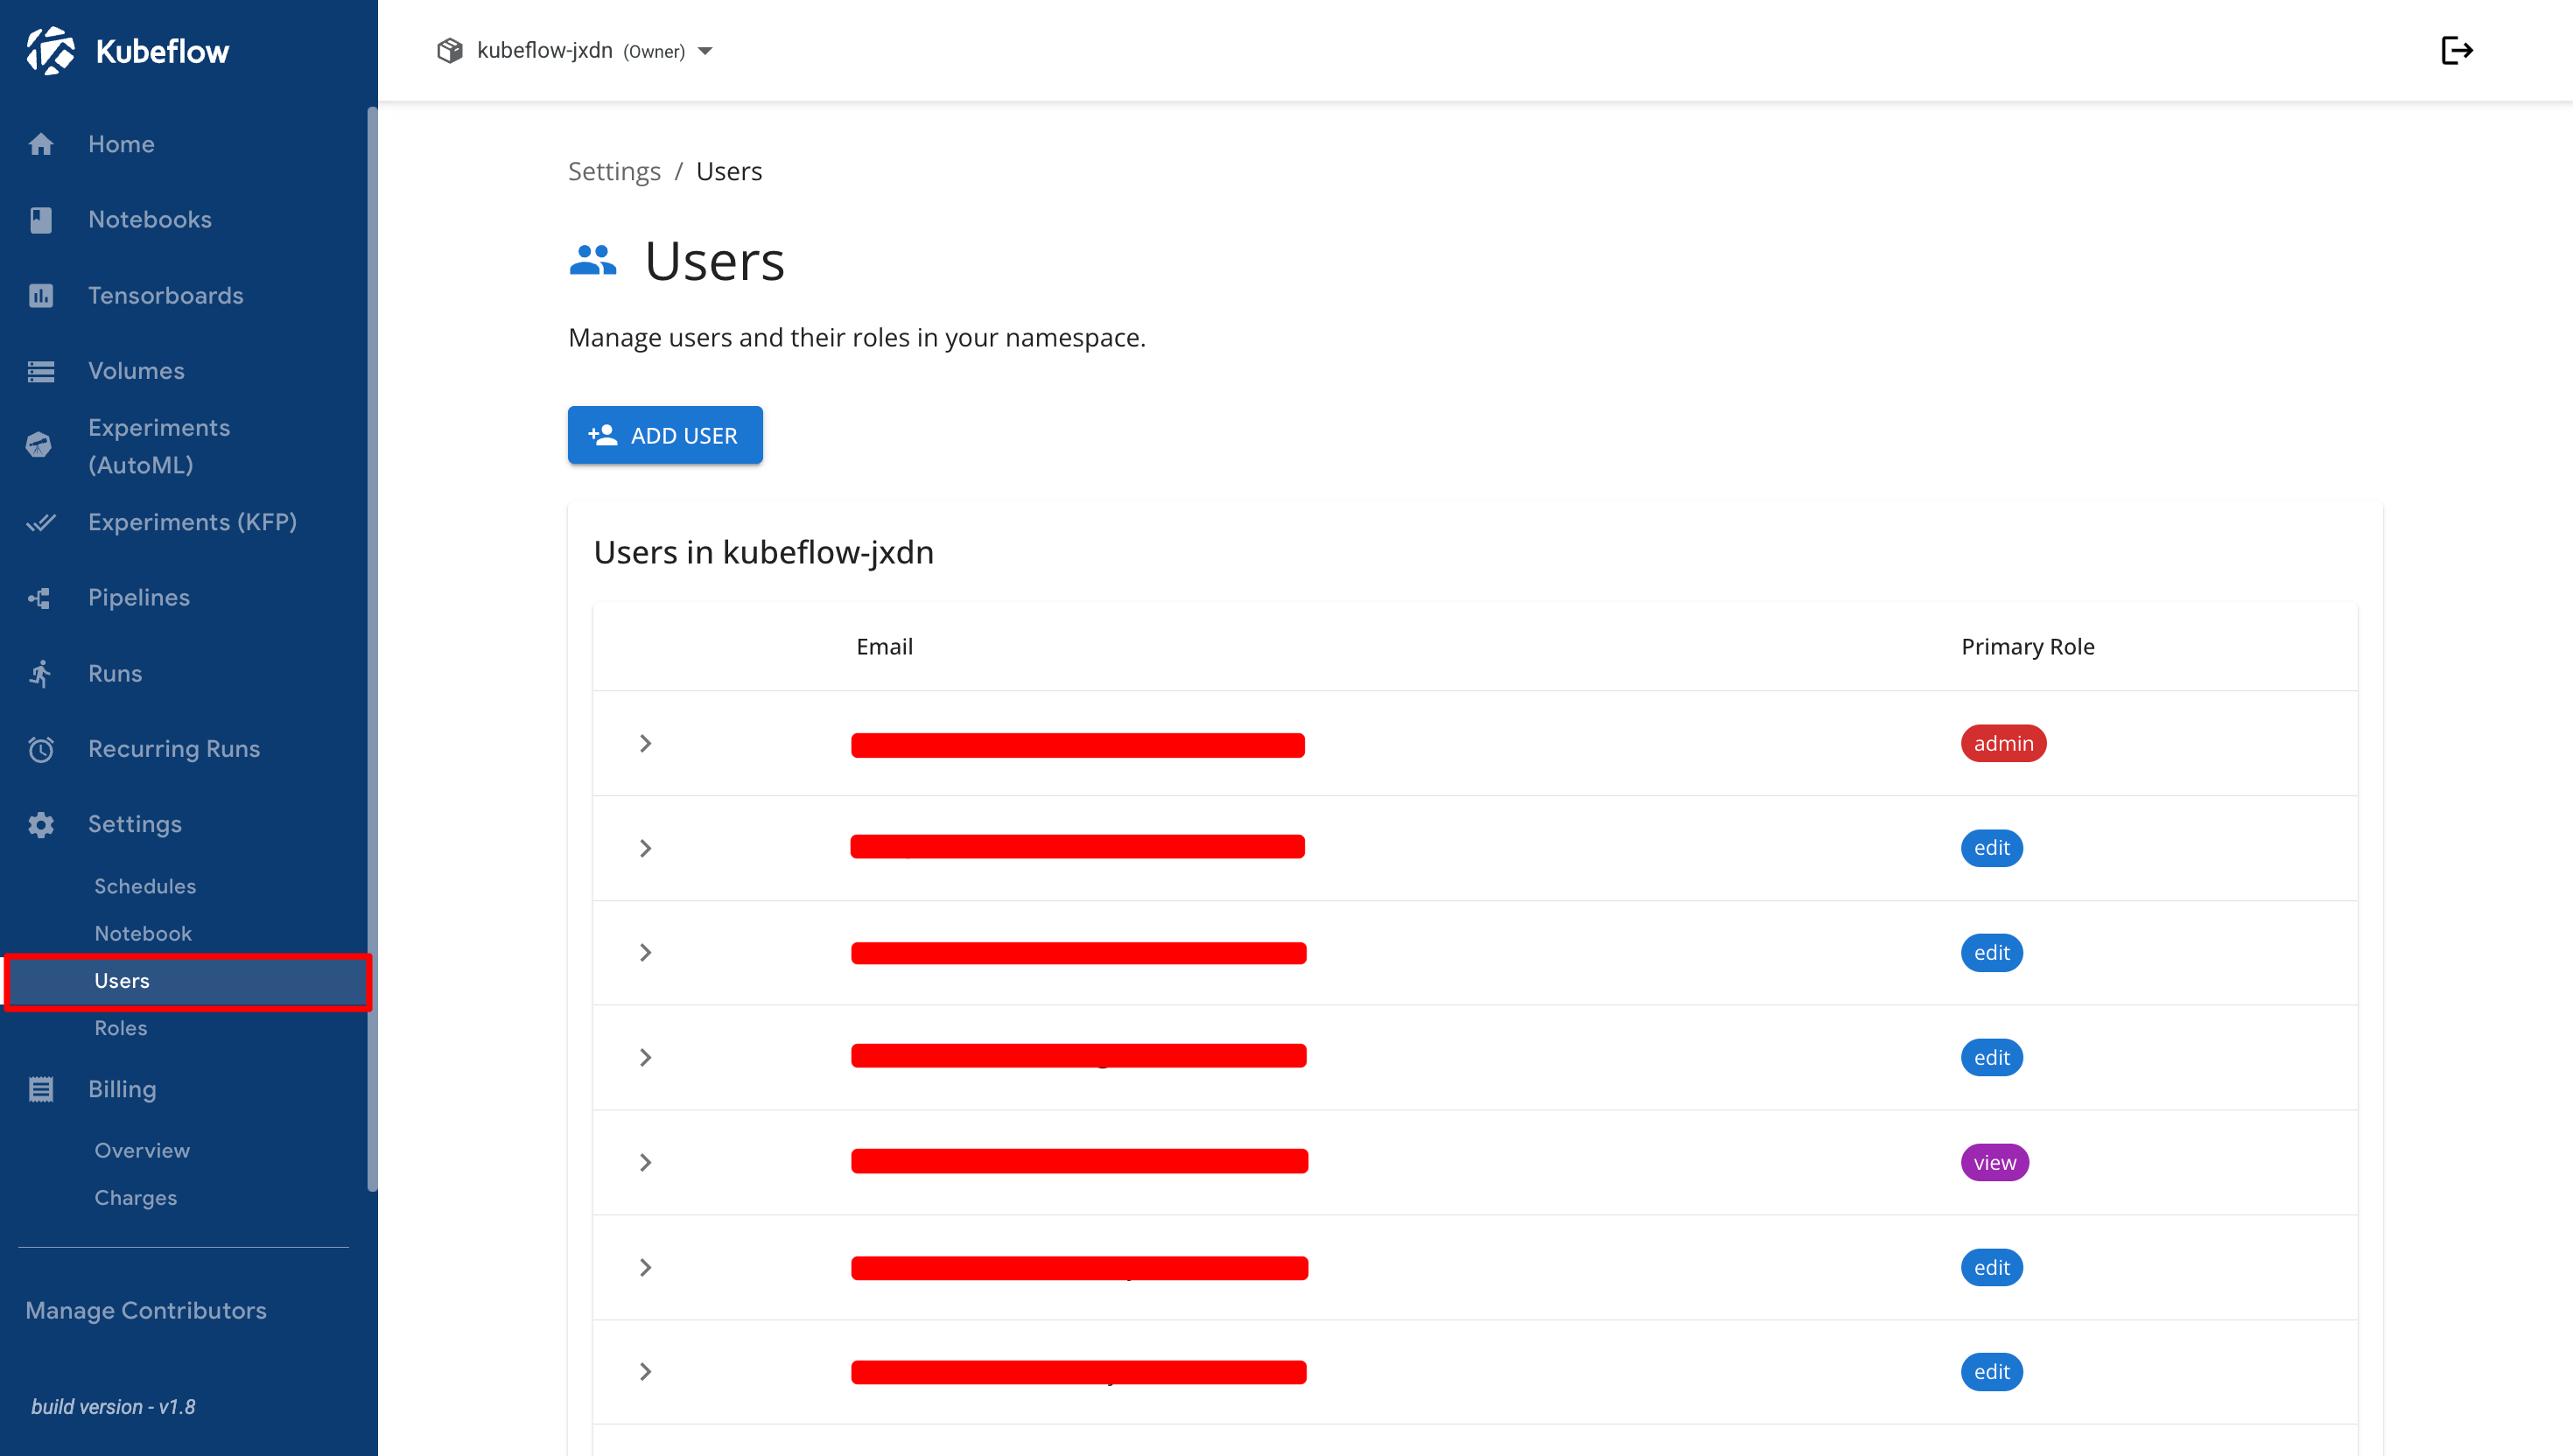
On the **Settings** page, select **Users** to open the user management page.

<figure><img src="https://2882153758-files.gitbook.io/~/files/v0/b/gitbook-x-prod.appspot.com/o/spaces%2Fi9YWb69HFXLHYlXffReU%2Fuploads%2Fgit-blob-8d414b8e12c41e6b4ab15f32cb331f6d58afe364%2Fimage.png?alt=media" alt=""><figcaption></figcaption></figure>

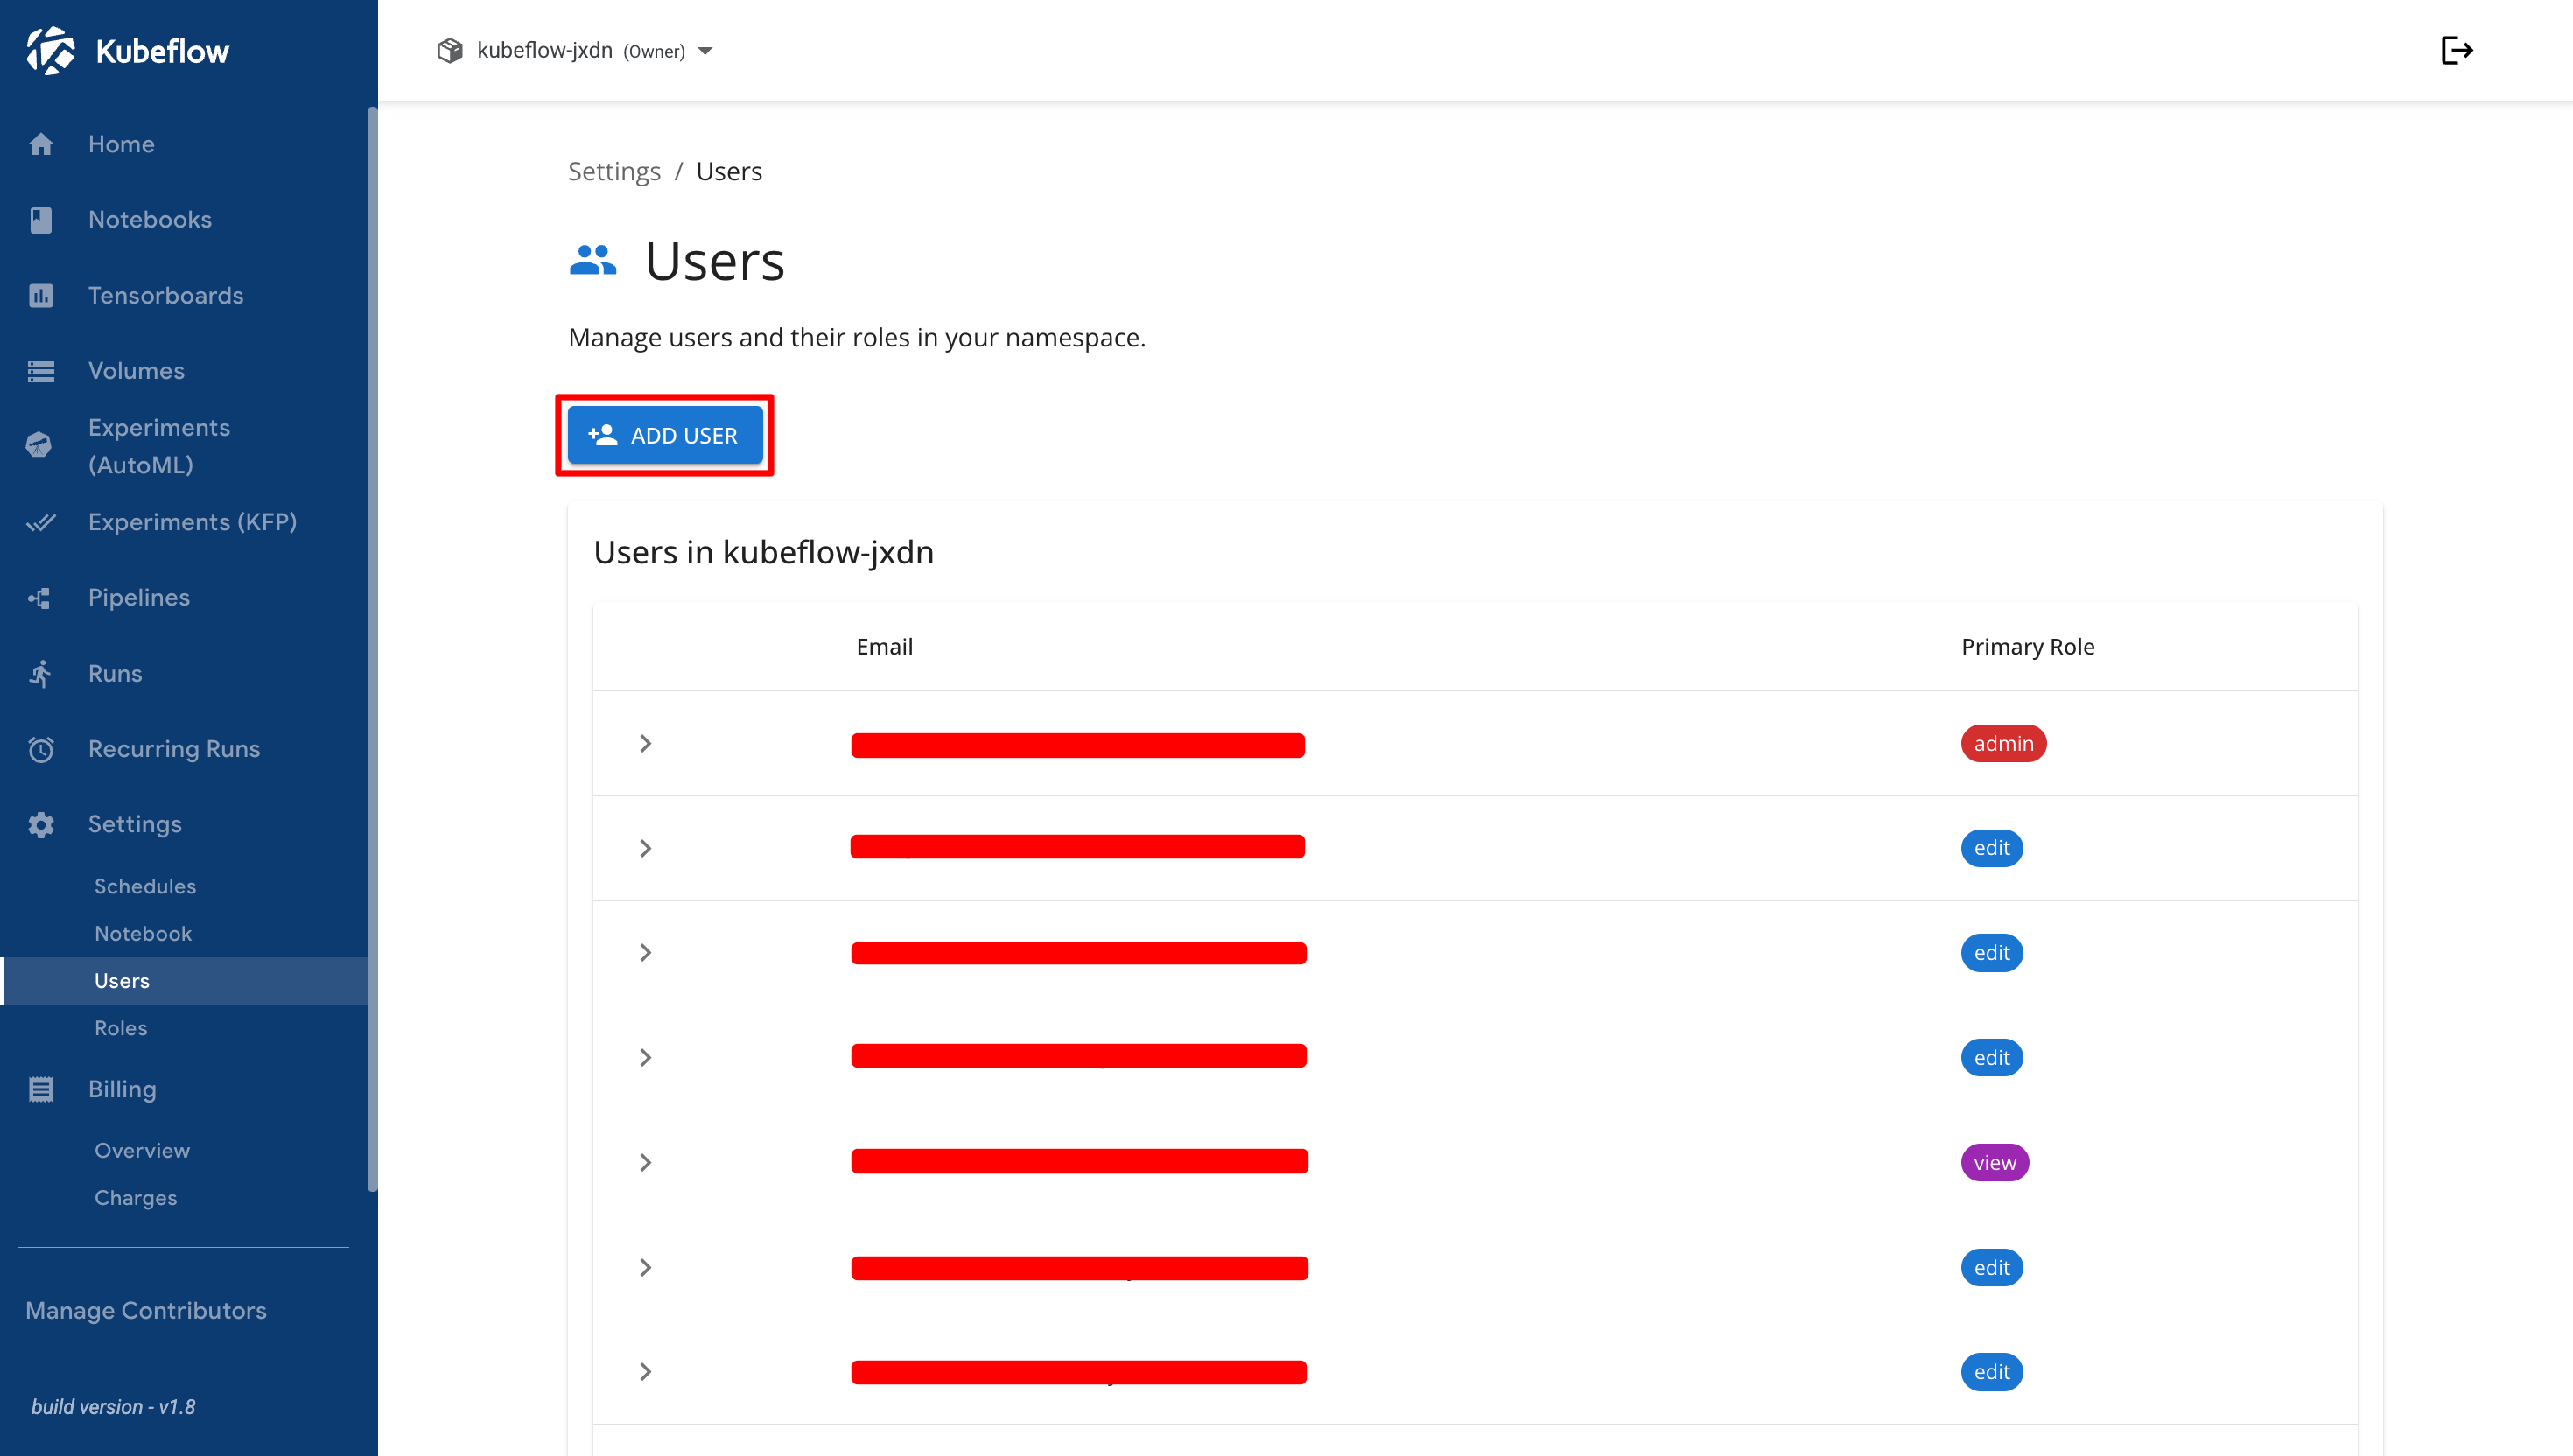
The **Users** page displays all users in the current namespace along with their assigned primary roles. From this page, administrators can add new users and manage existing user access. Click the **Add User** button.

<figure><img src="https://2882153758-files.gitbook.io/~/files/v0/b/gitbook-x-prod.appspot.com/o/spaces%2Fi9YWb69HFXLHYlXffReU%2Fuploads%2Fgit-blob-bdd3c78f5c76a5bd0c4eb3391262611a7f3a3d62%2Fimage.png?alt=media" alt=""><figcaption></figcaption></figure>

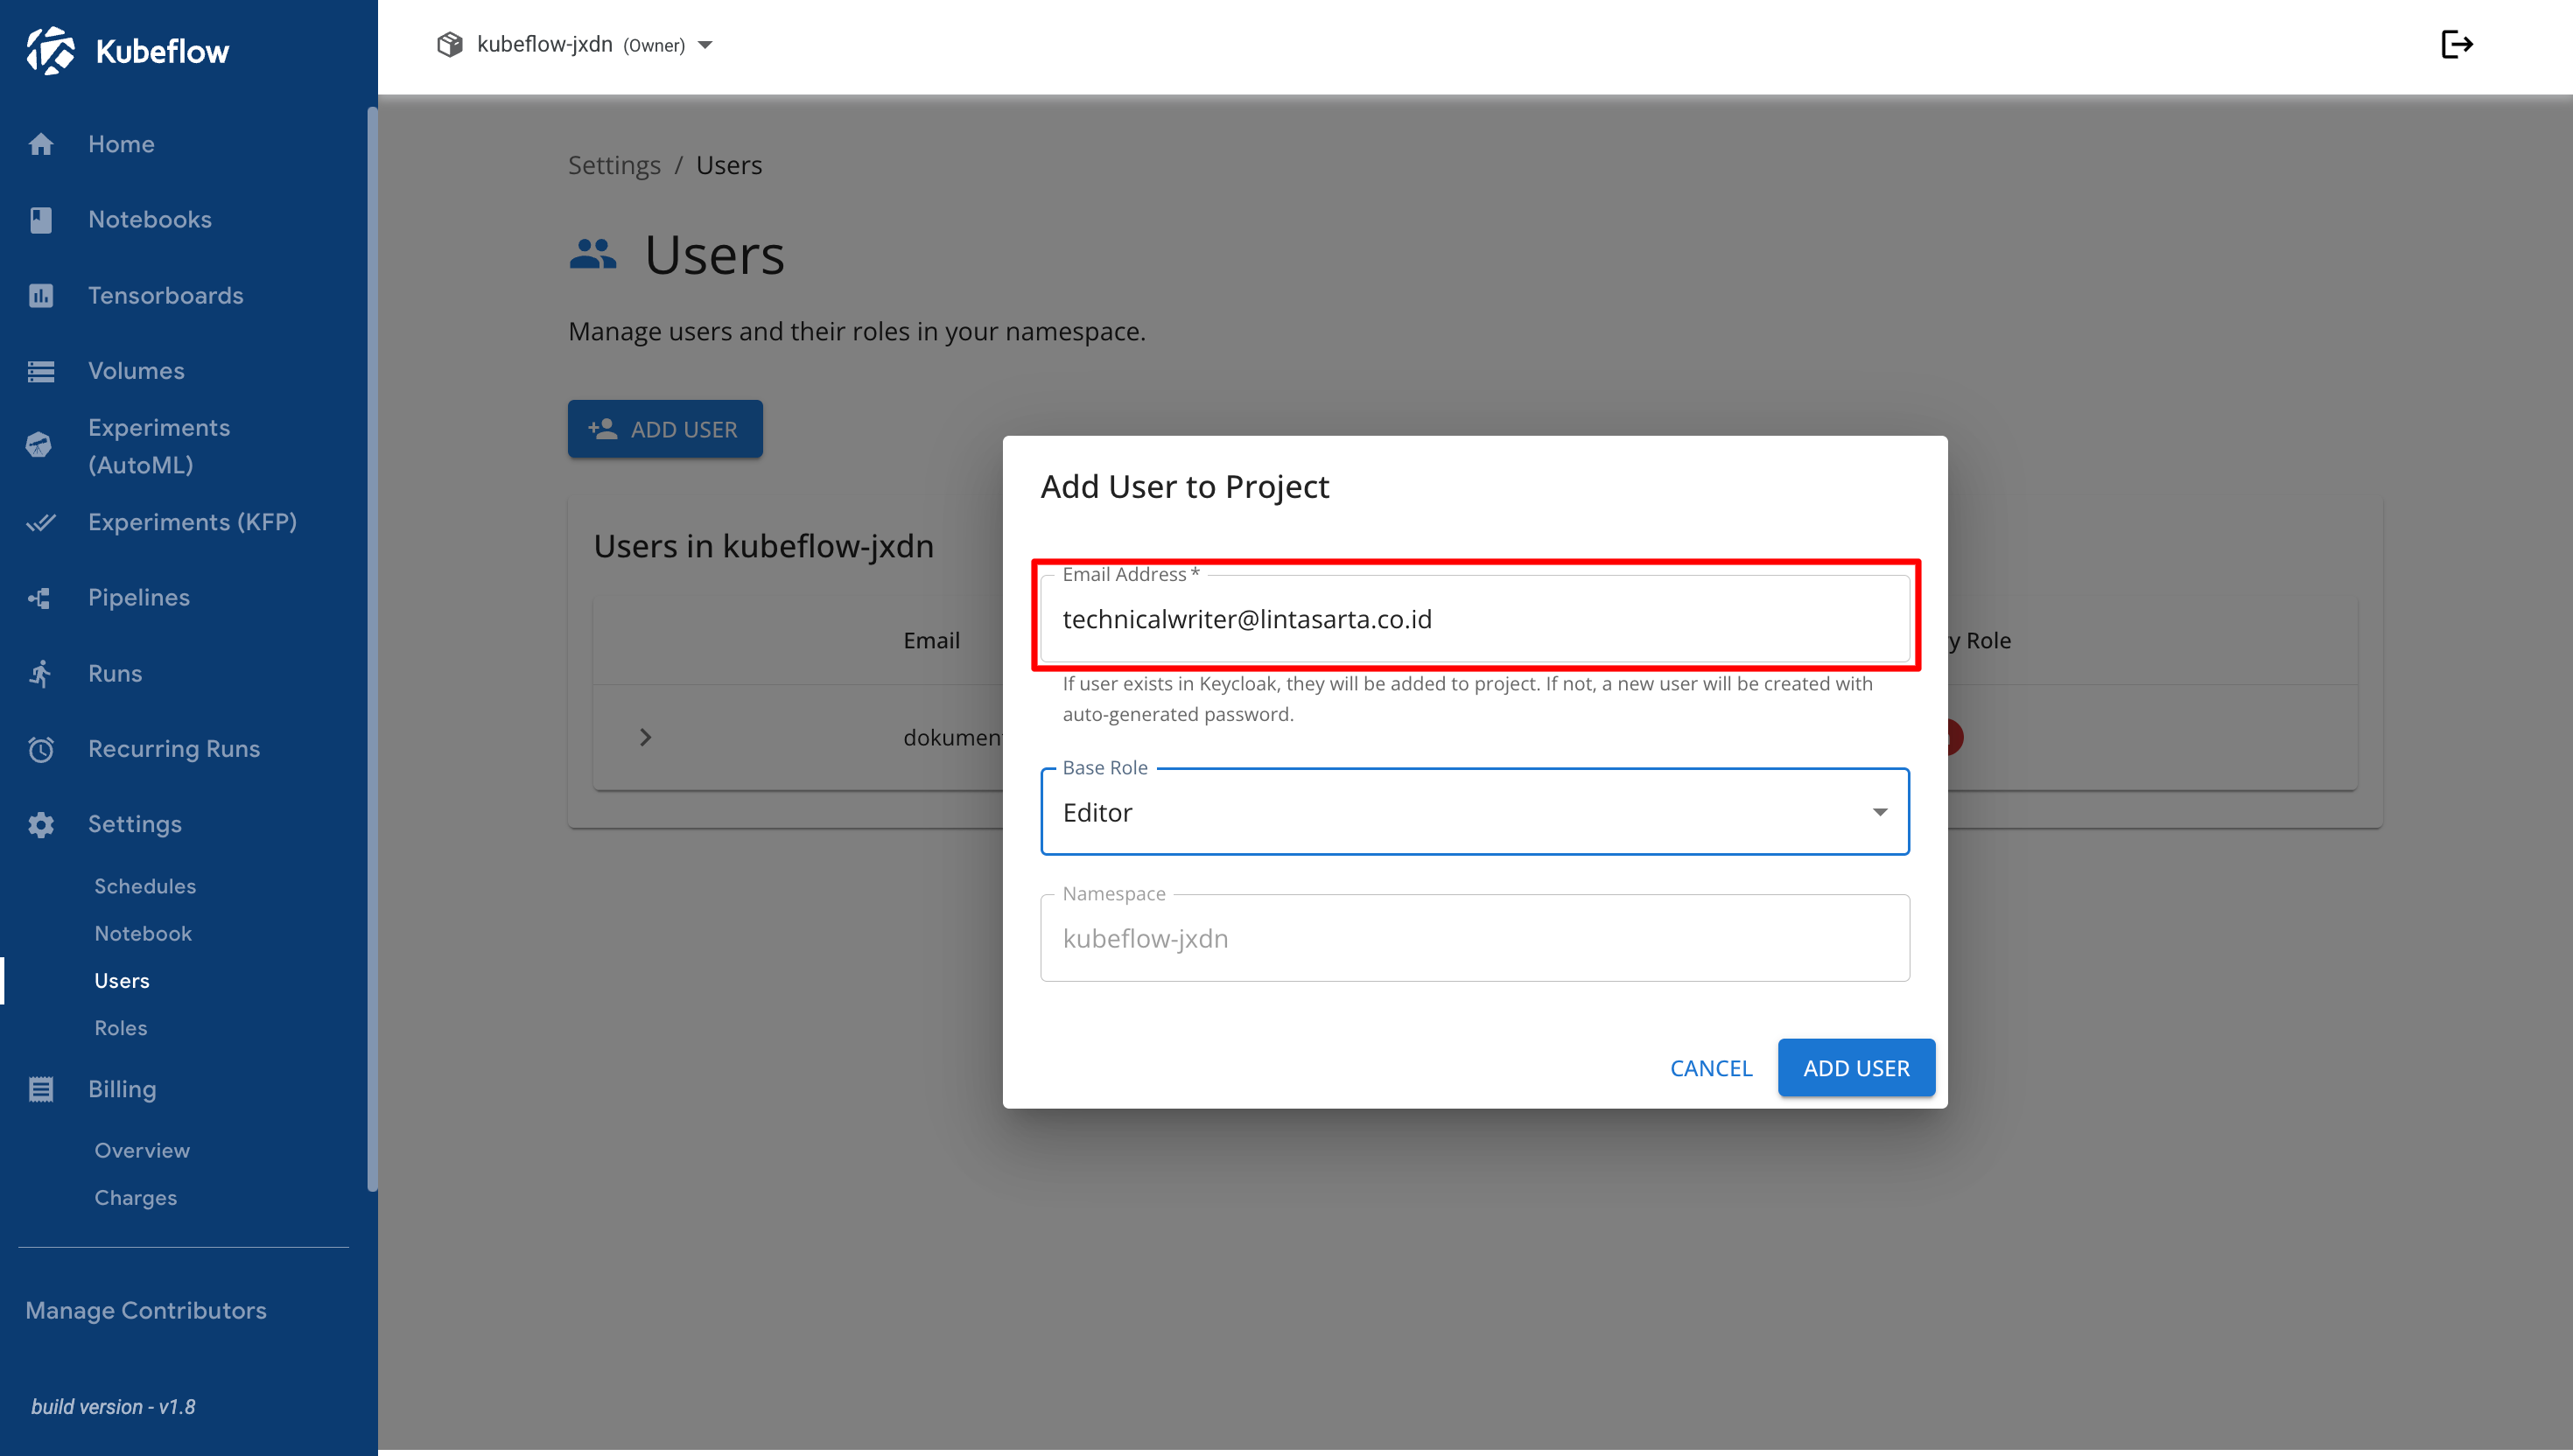
A dialog appears prompting you to enter several details. In the **Email Address** field, enter the same email address that was previously added as a contributor.

<figure><img src="https://2882153758-files.gitbook.io/~/files/v0/b/gitbook-x-prod.appspot.com/o/spaces%2Fi9YWb69HFXLHYlXffReU%2Fuploads%2Fgit-blob-896d9f5eab3b7161f2071d8a731b34feba1b2fdf%2Fimage.png?alt=media" alt=""><figcaption></figcaption></figure>

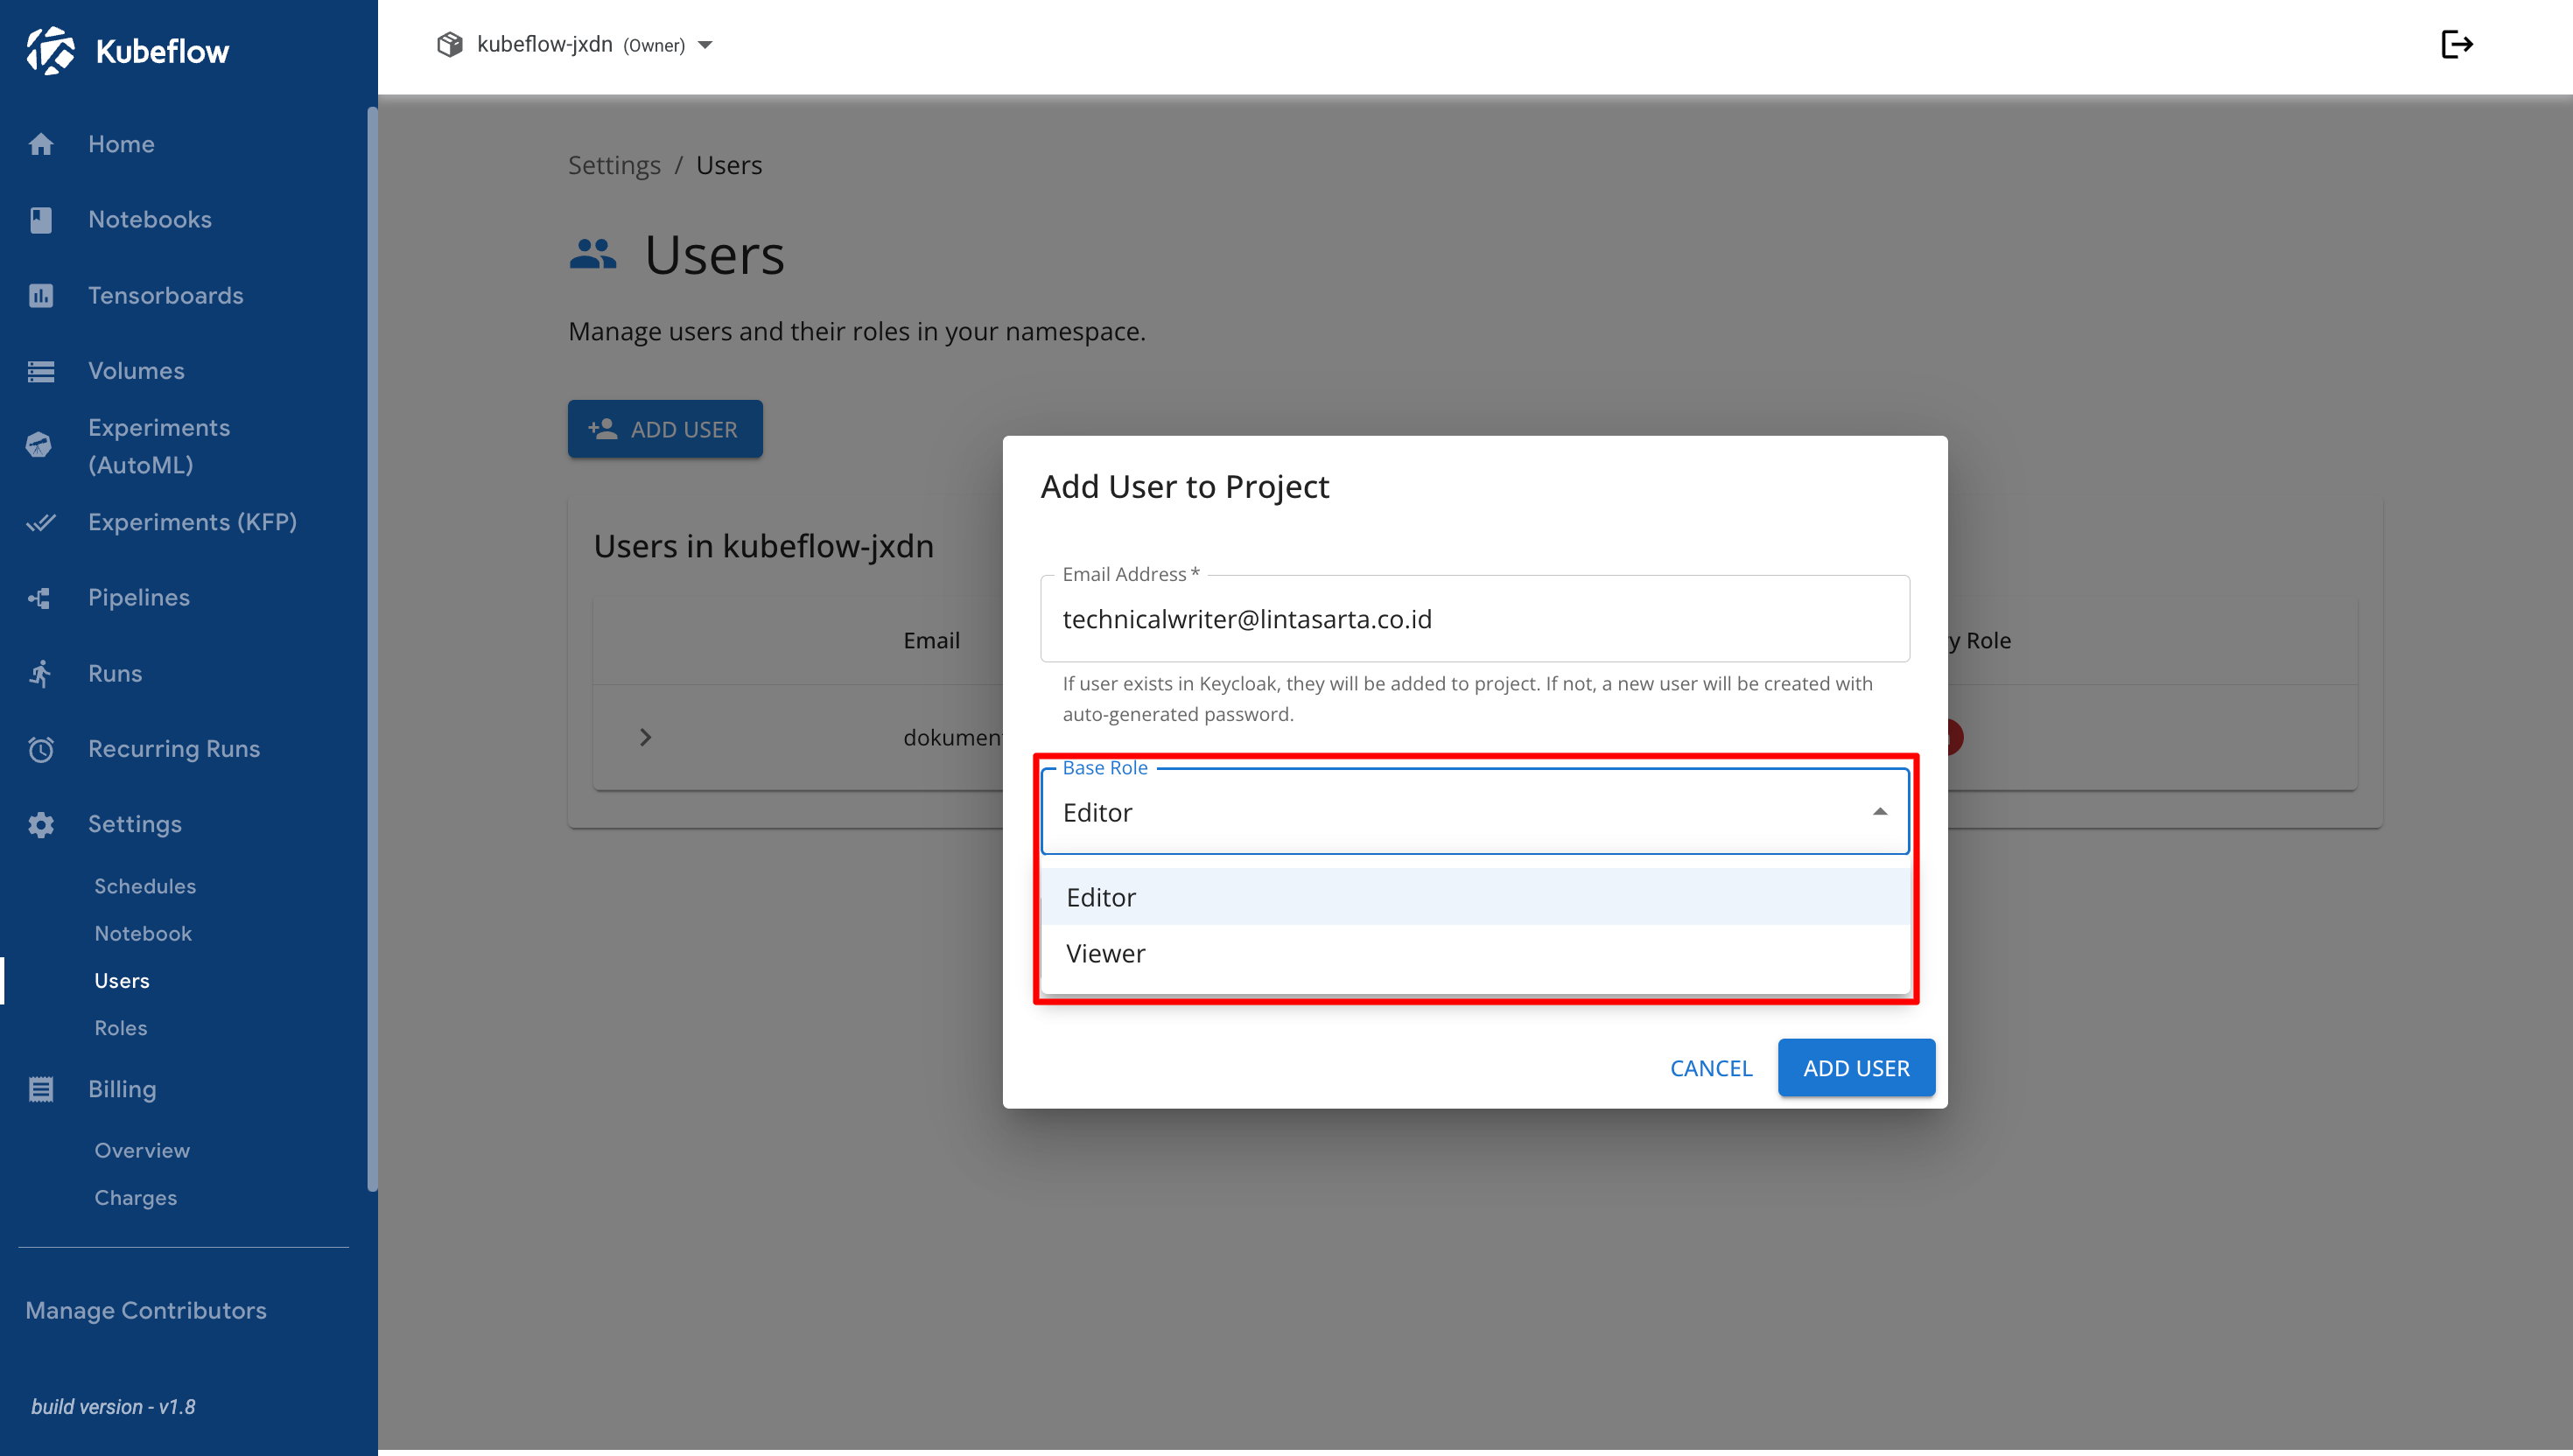
For the **Base Role**, select either **Editor** or **Viewer**. In this example, **Editor** is selected.

<figure><img src="https://2882153758-files.gitbook.io/~/files/v0/b/gitbook-x-prod.appspot.com/o/spaces%2Fi9YWb69HFXLHYlXffReU%2Fuploads%2Fgit-blob-04d366e71d4a481ba8e57adb7424ee2f5af91f34%2Fimage.png?alt=media" alt=""><figcaption></figcaption></figure>

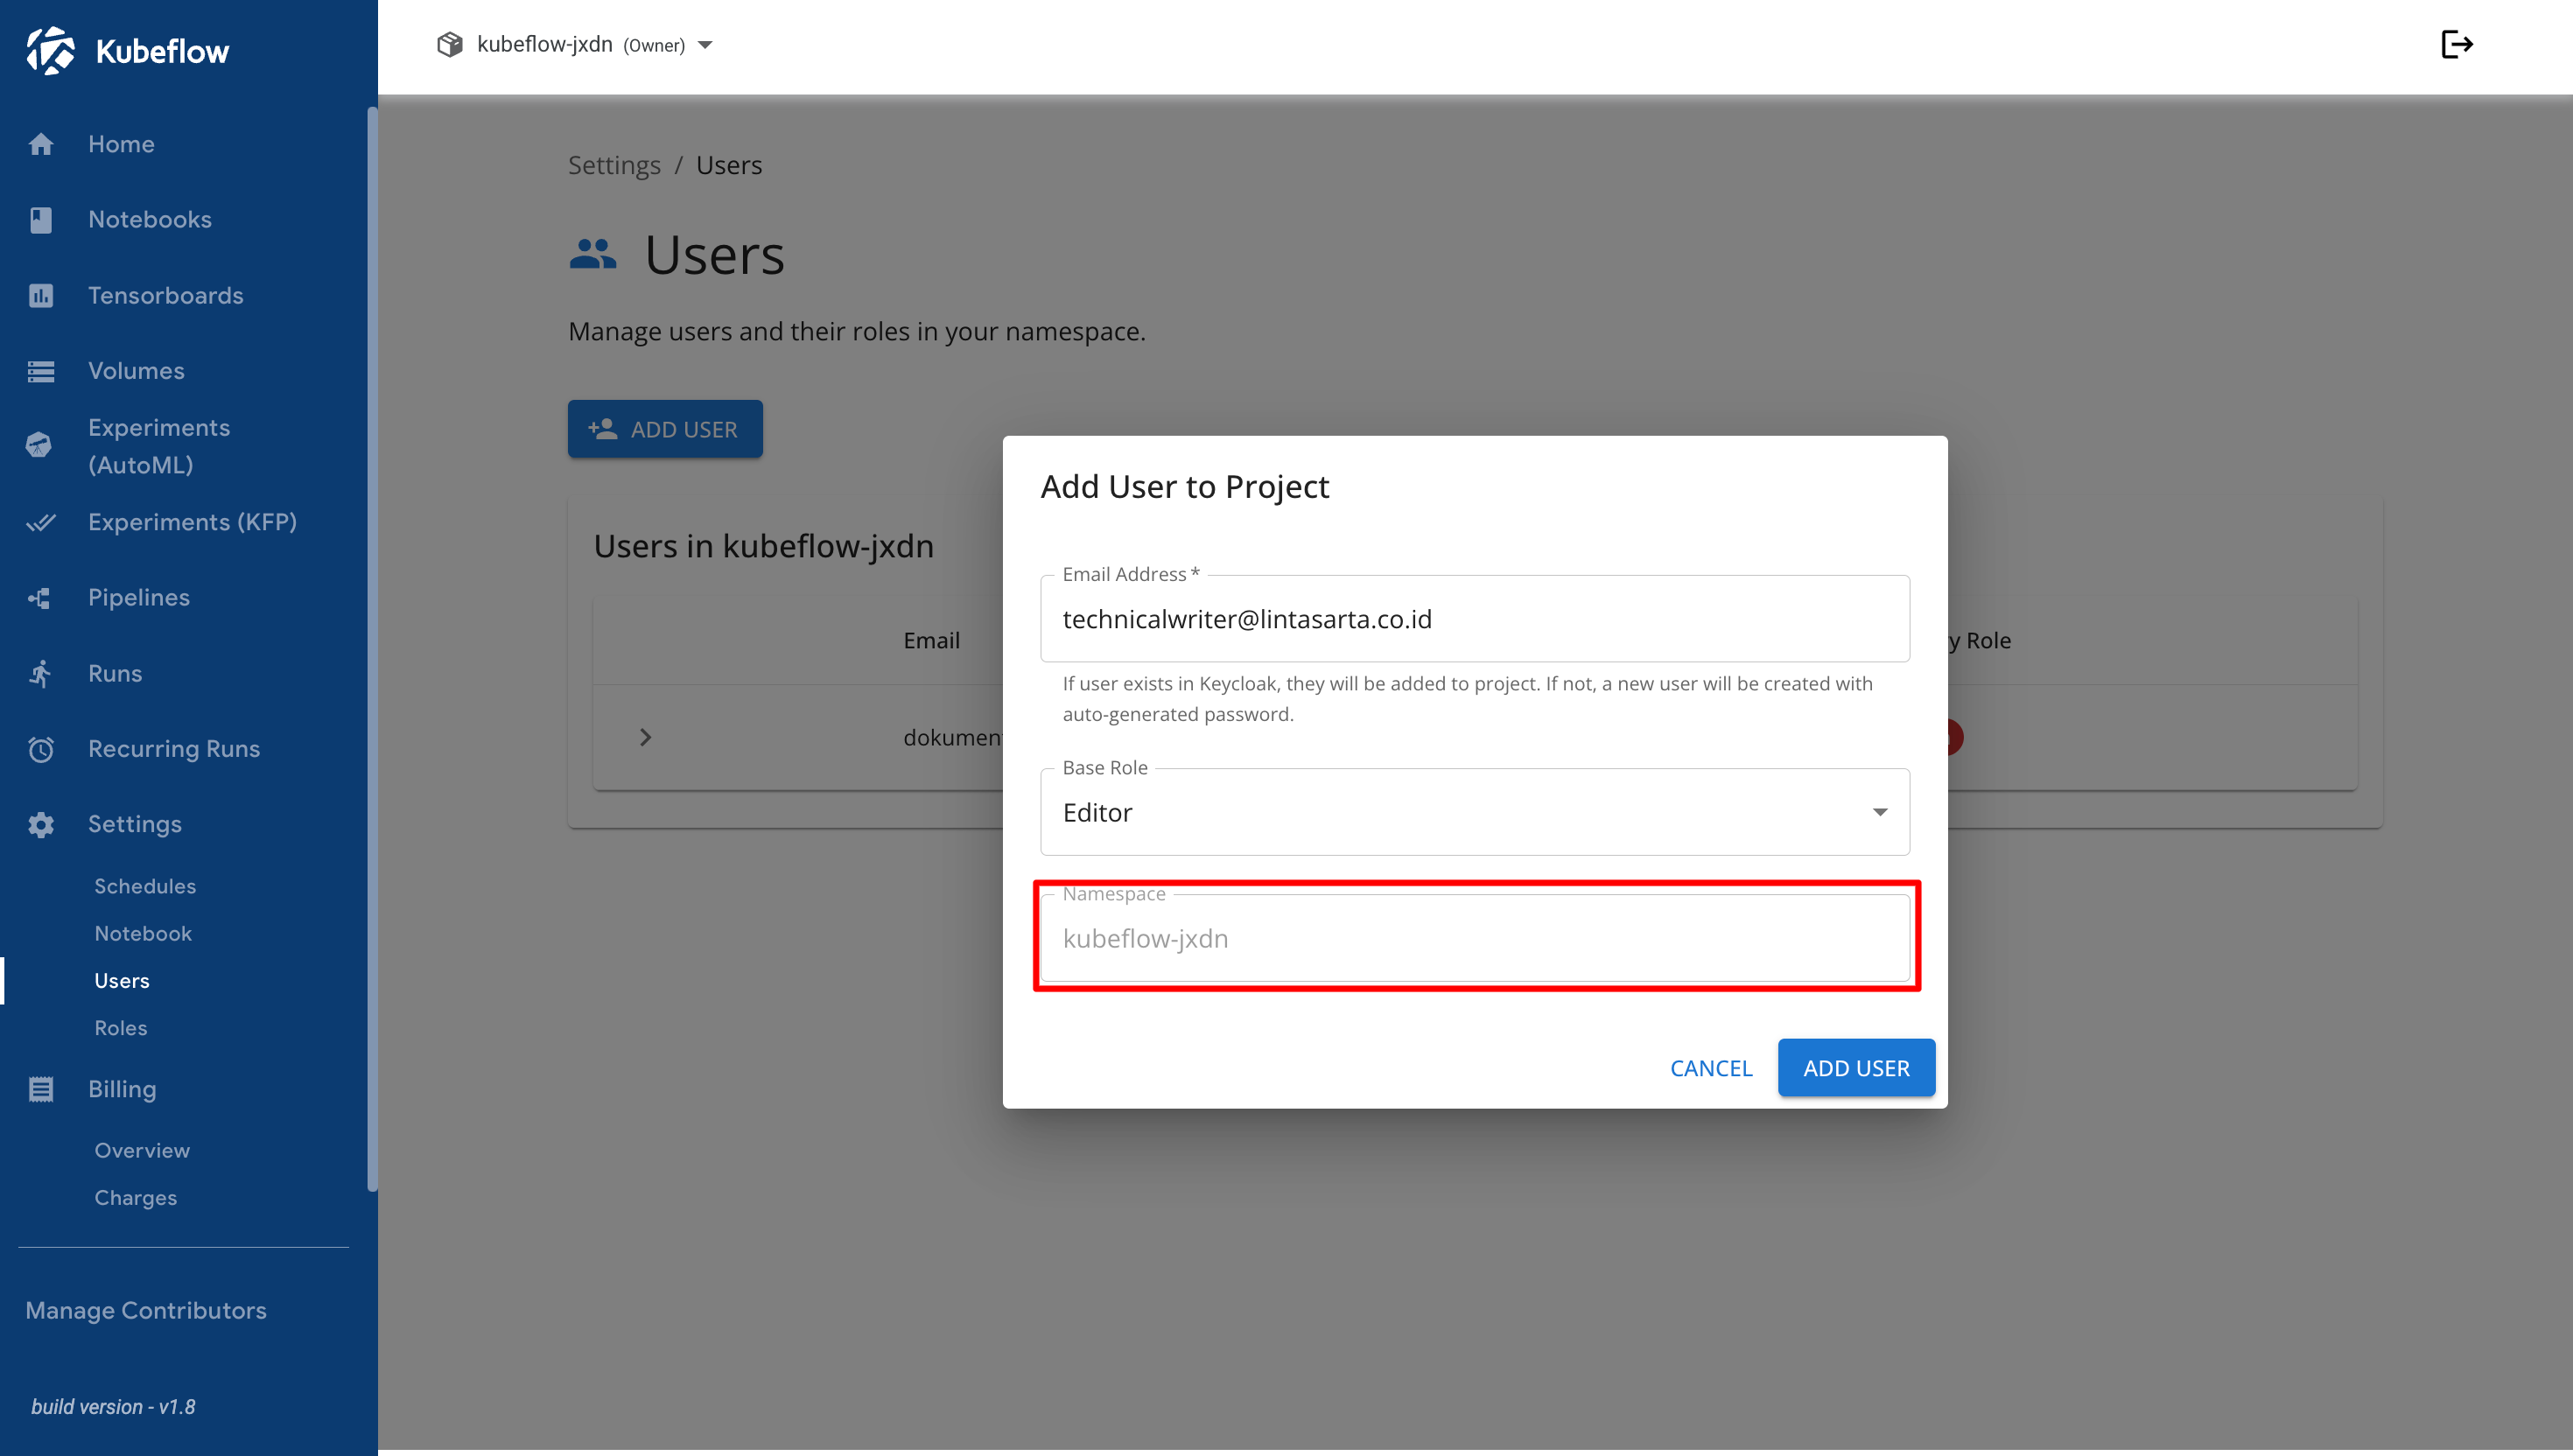
The **Namespace** field displays the namespace to which the user will be added. Ensure that the correct namespace is selected before proceeding.

<figure><img src="https://2882153758-files.gitbook.io/~/files/v0/b/gitbook-x-prod.appspot.com/o/spaces%2Fi9YWb69HFXLHYlXffReU%2Fuploads%2Fgit-blob-041b699aa30954d796bb356dca85156af13506ec%2Fimage.png?alt=media" alt=""><figcaption></figcaption></figure>

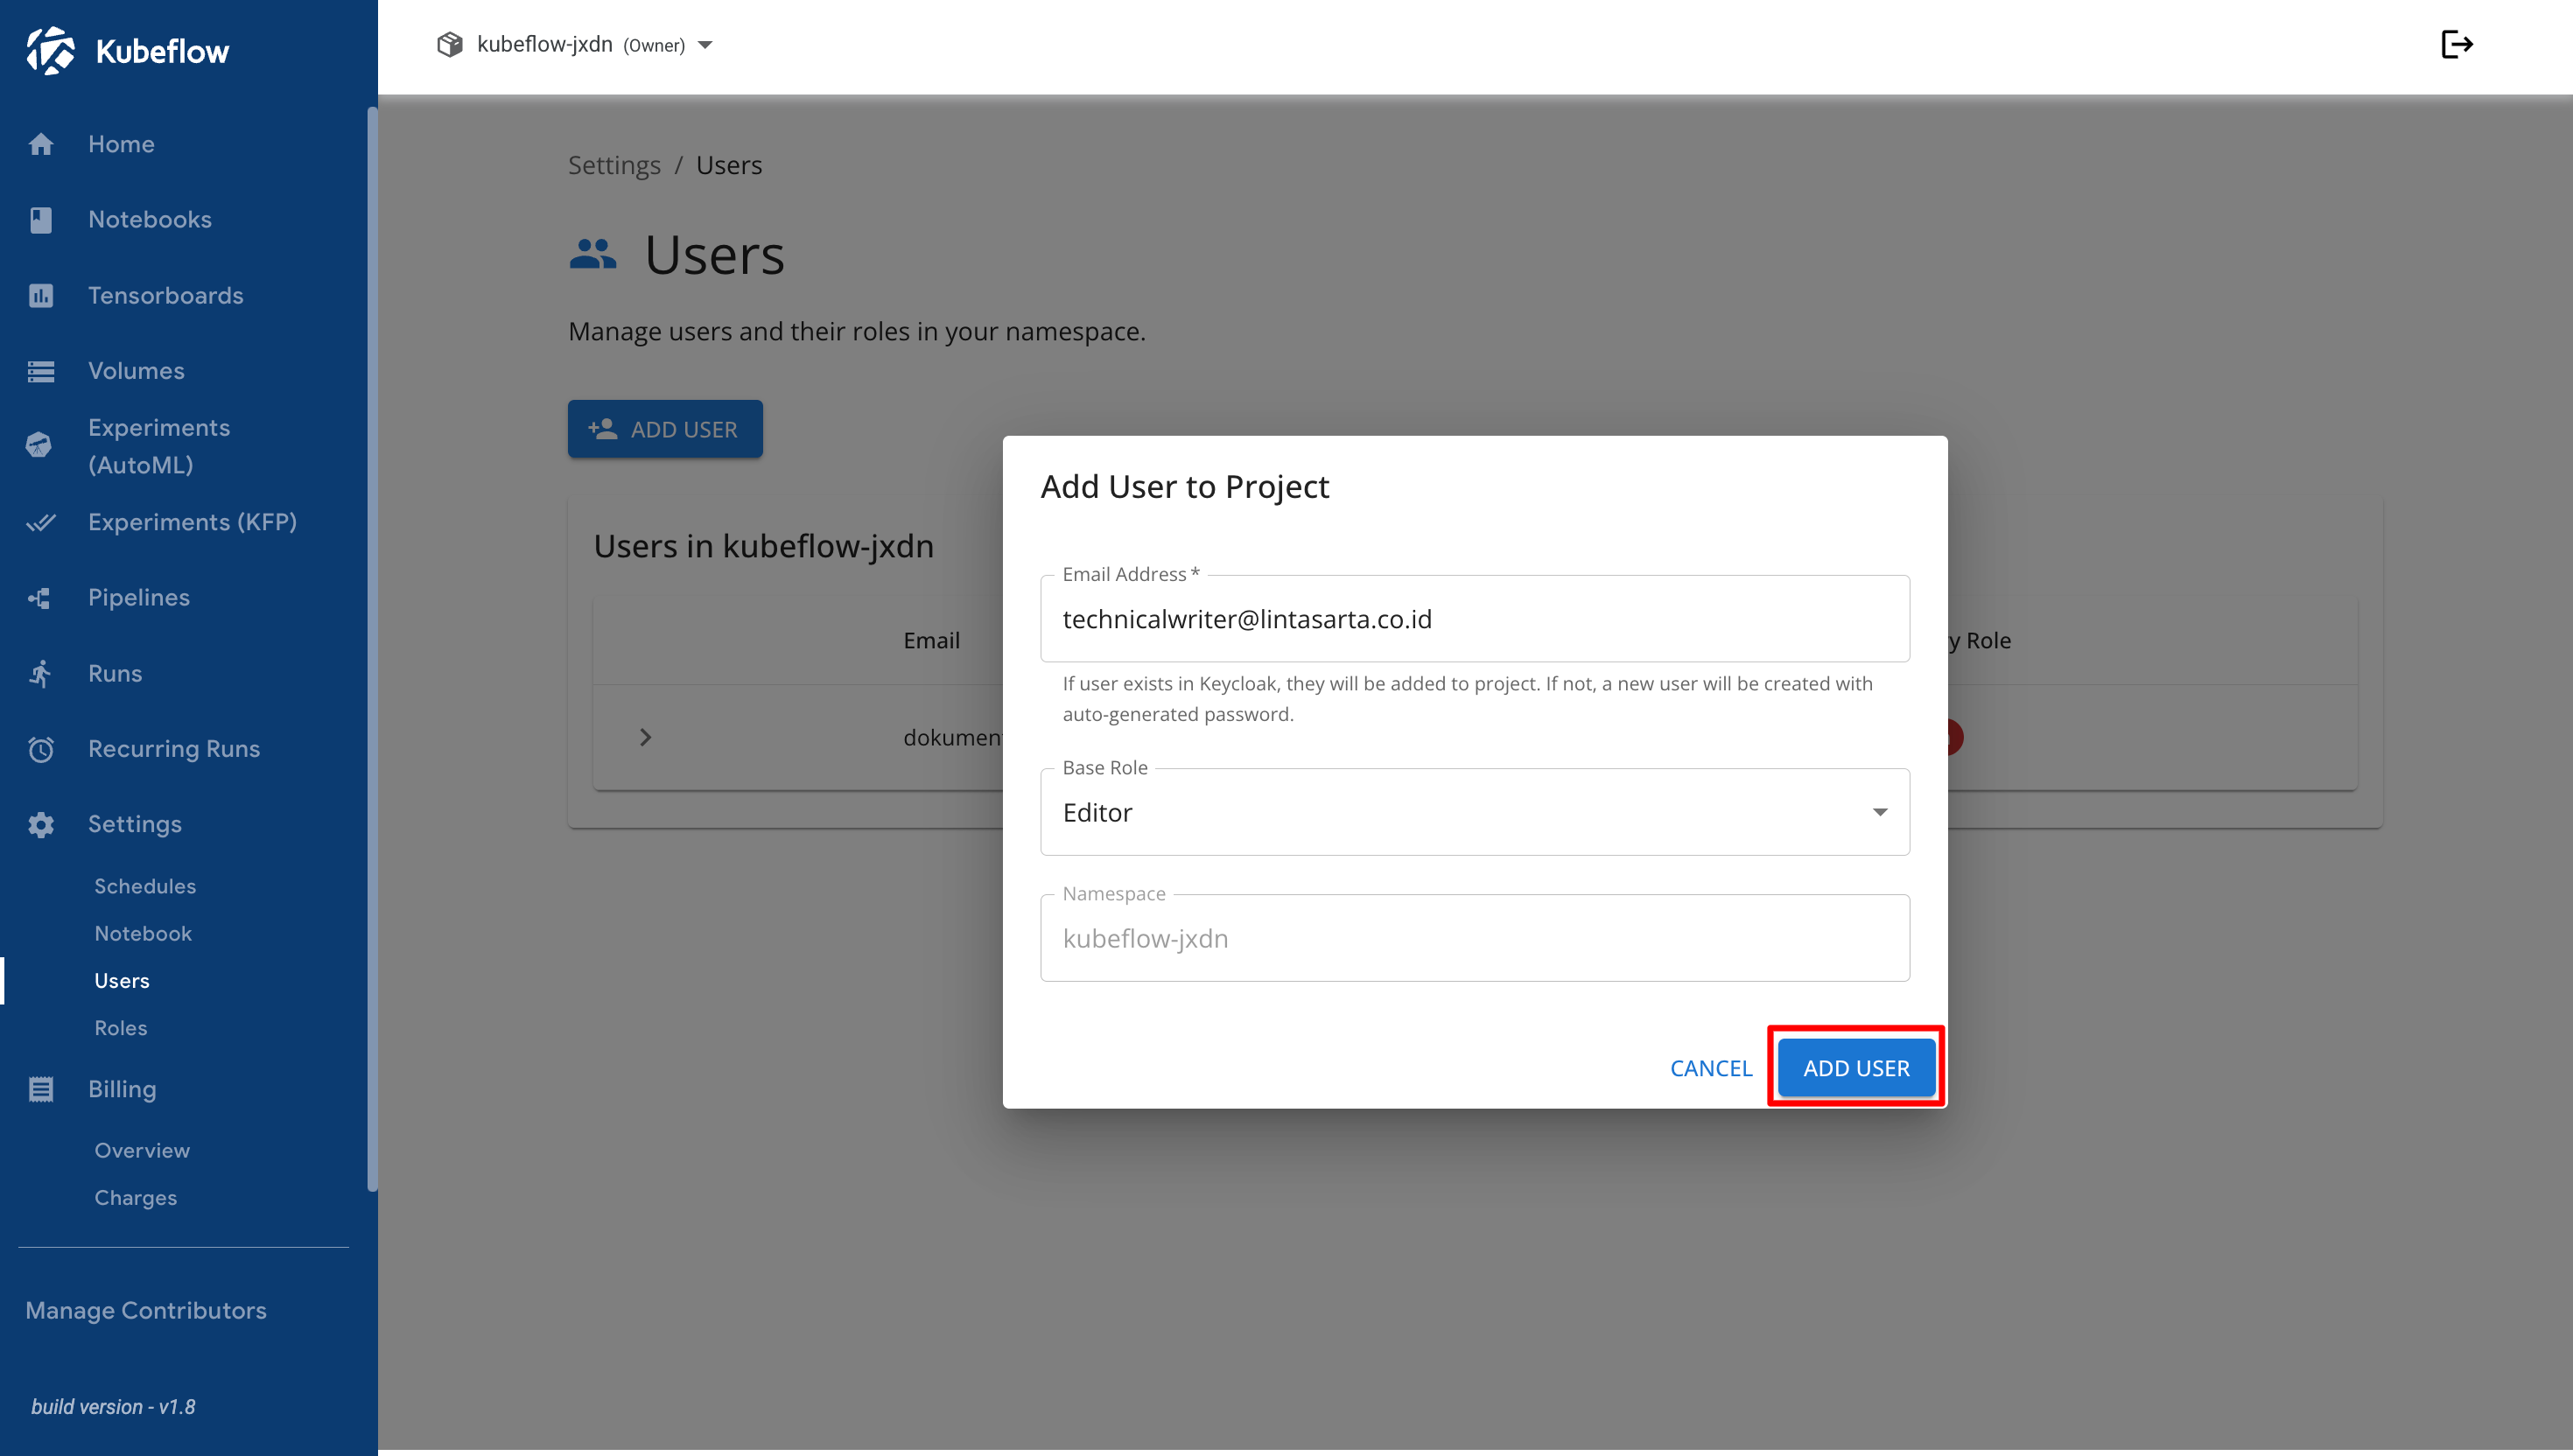
After confirming the namespace, click the **Add User** button.

<figure><img src="https://2882153758-files.gitbook.io/~/files/v0/b/gitbook-x-prod.appspot.com/o/spaces%2Fi9YWb69HFXLHYlXffReU%2Fuploads%2Fgit-blob-bf08d114ee1c8121d75c9725e99dc22255ce9b49%2Fimage.png?alt=media" alt=""><figcaption></figcaption></figure>

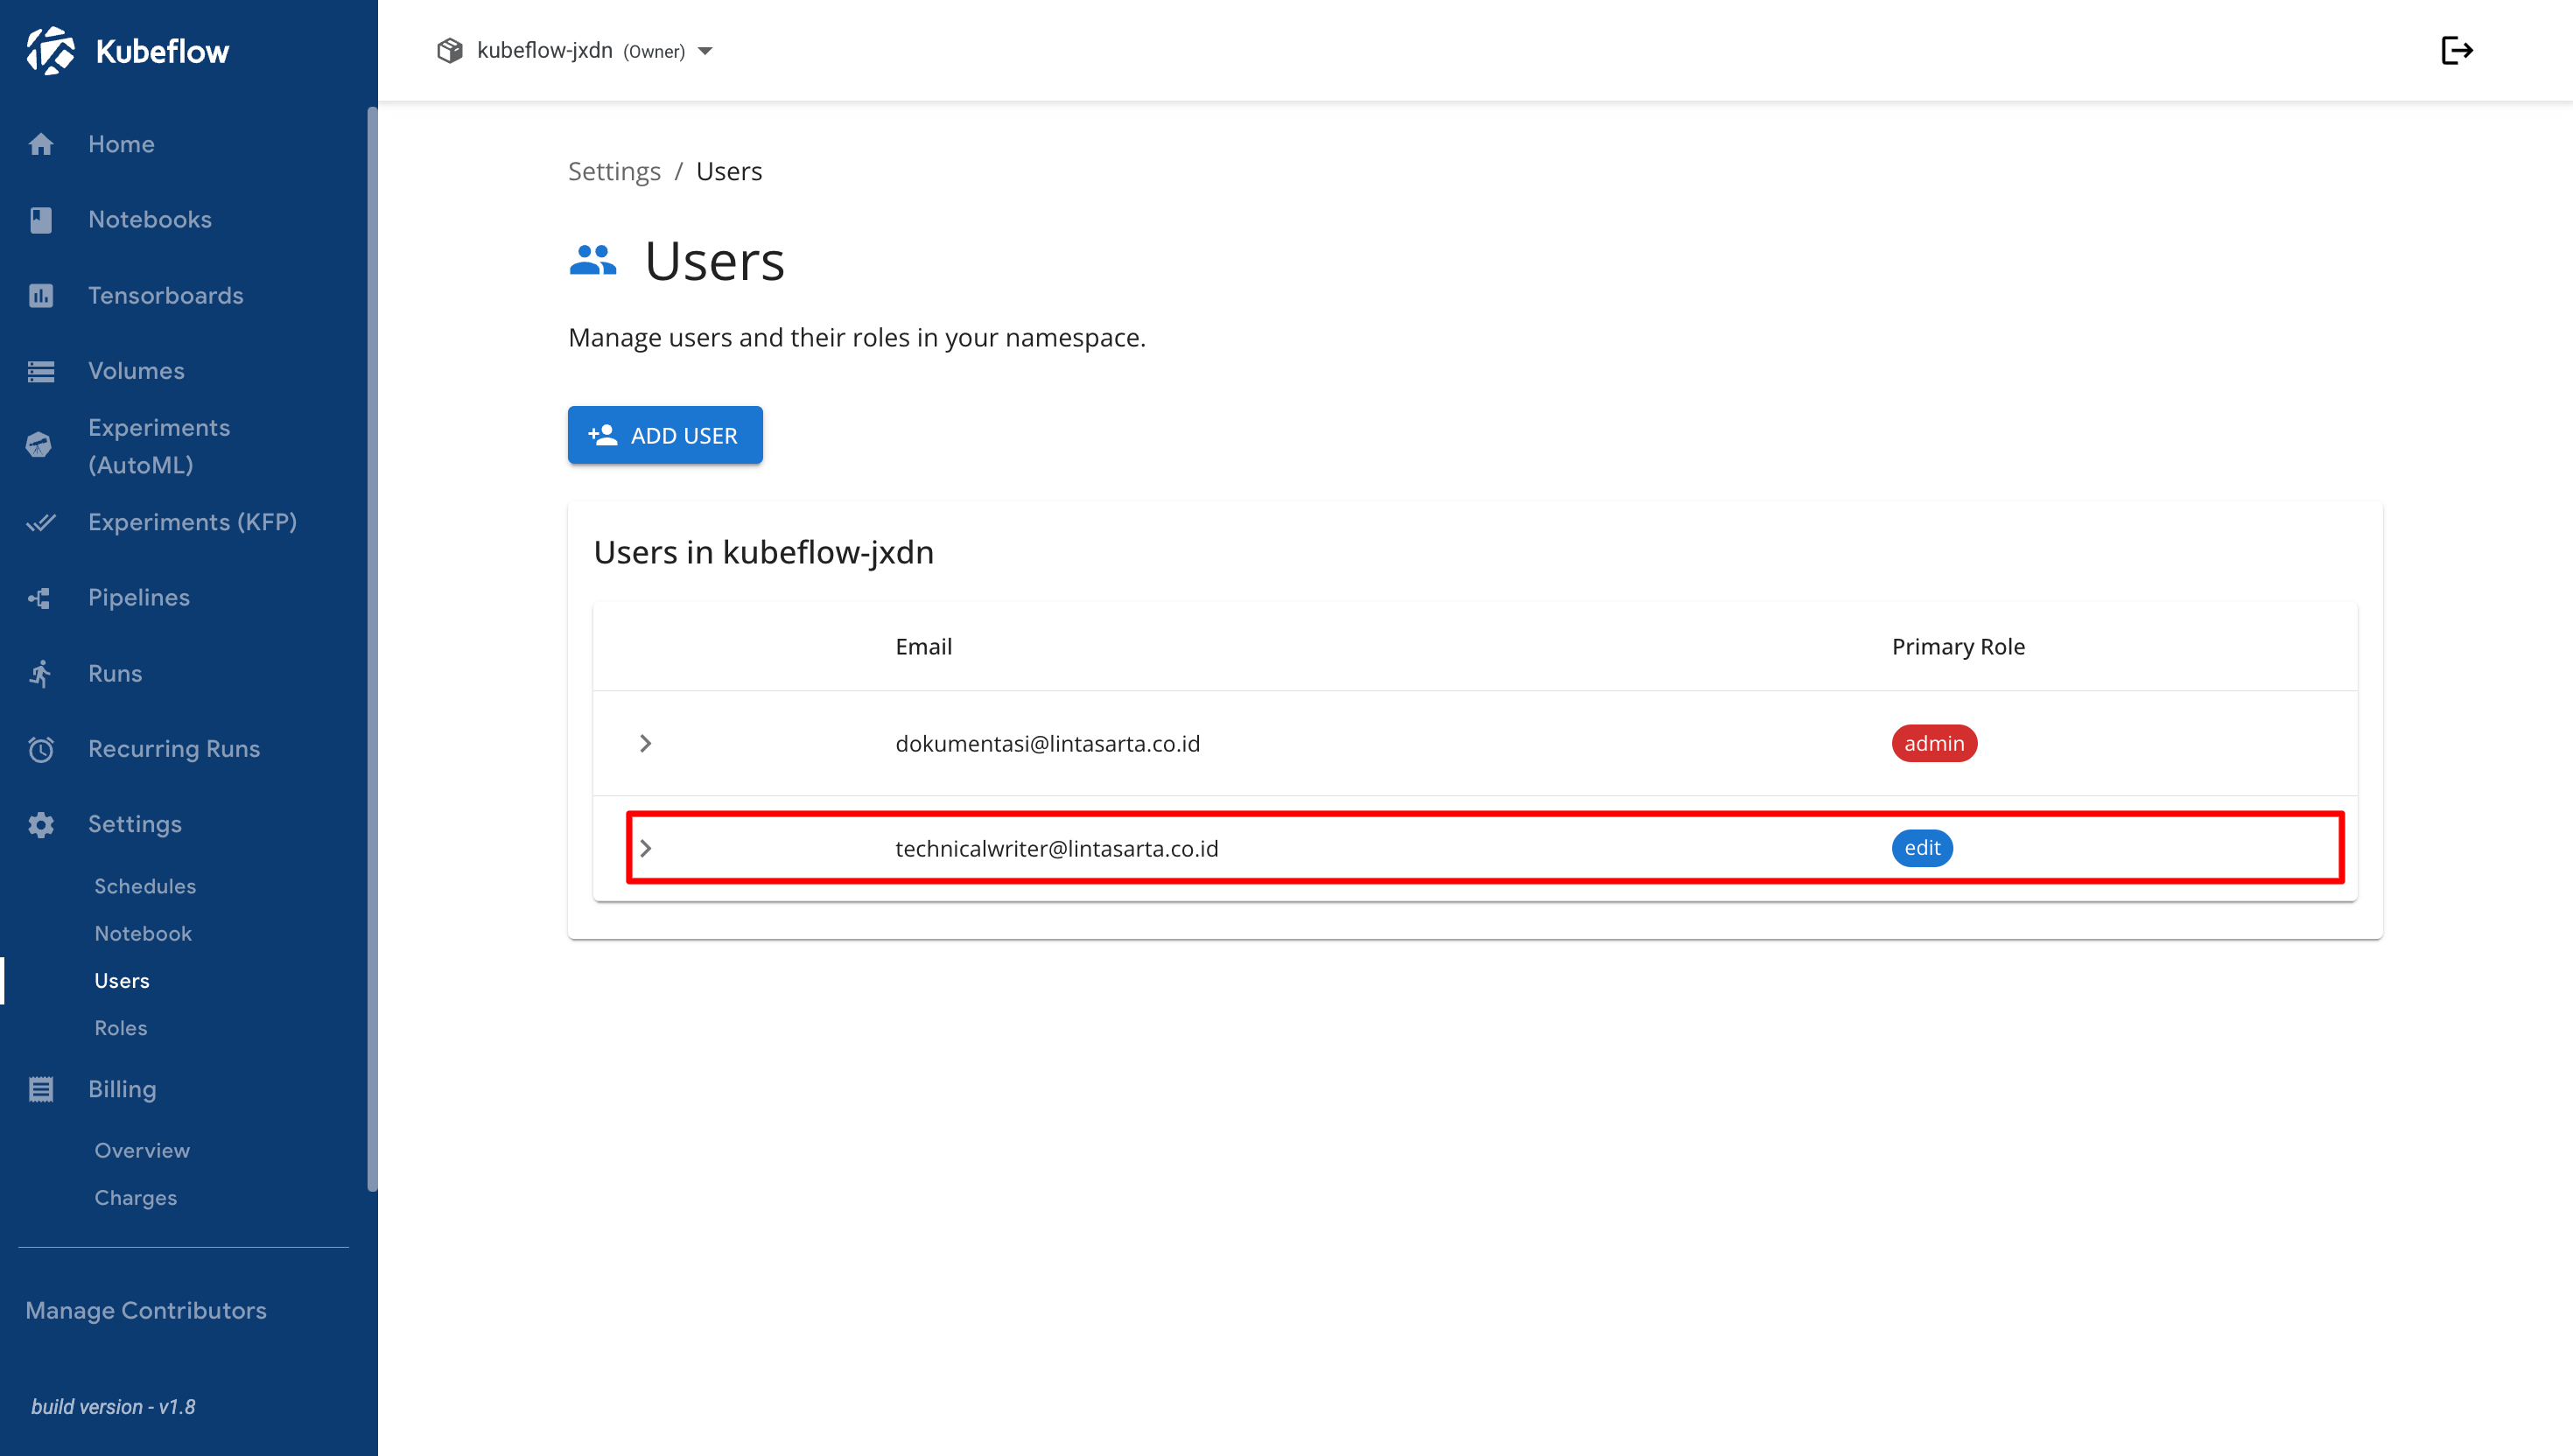
If the user is added successfully, the new user appears in the list and the **Primary Role** is displayed as **edit**, reflecting the **Edit** role that was selected.

<figure><img src="https://2882153758-files.gitbook.io/~/files/v0/b/gitbook-x-prod.appspot.com/o/spaces%2Fi9YWb69HFXLHYlXffReU%2Fuploads%2Fgit-blob-a7c5e09c4f6f93bf129147e2be1817913b99d363%2Fimage.png?alt=media" alt=""><figcaption></figcaption></figure>

## Binding Specific Roles

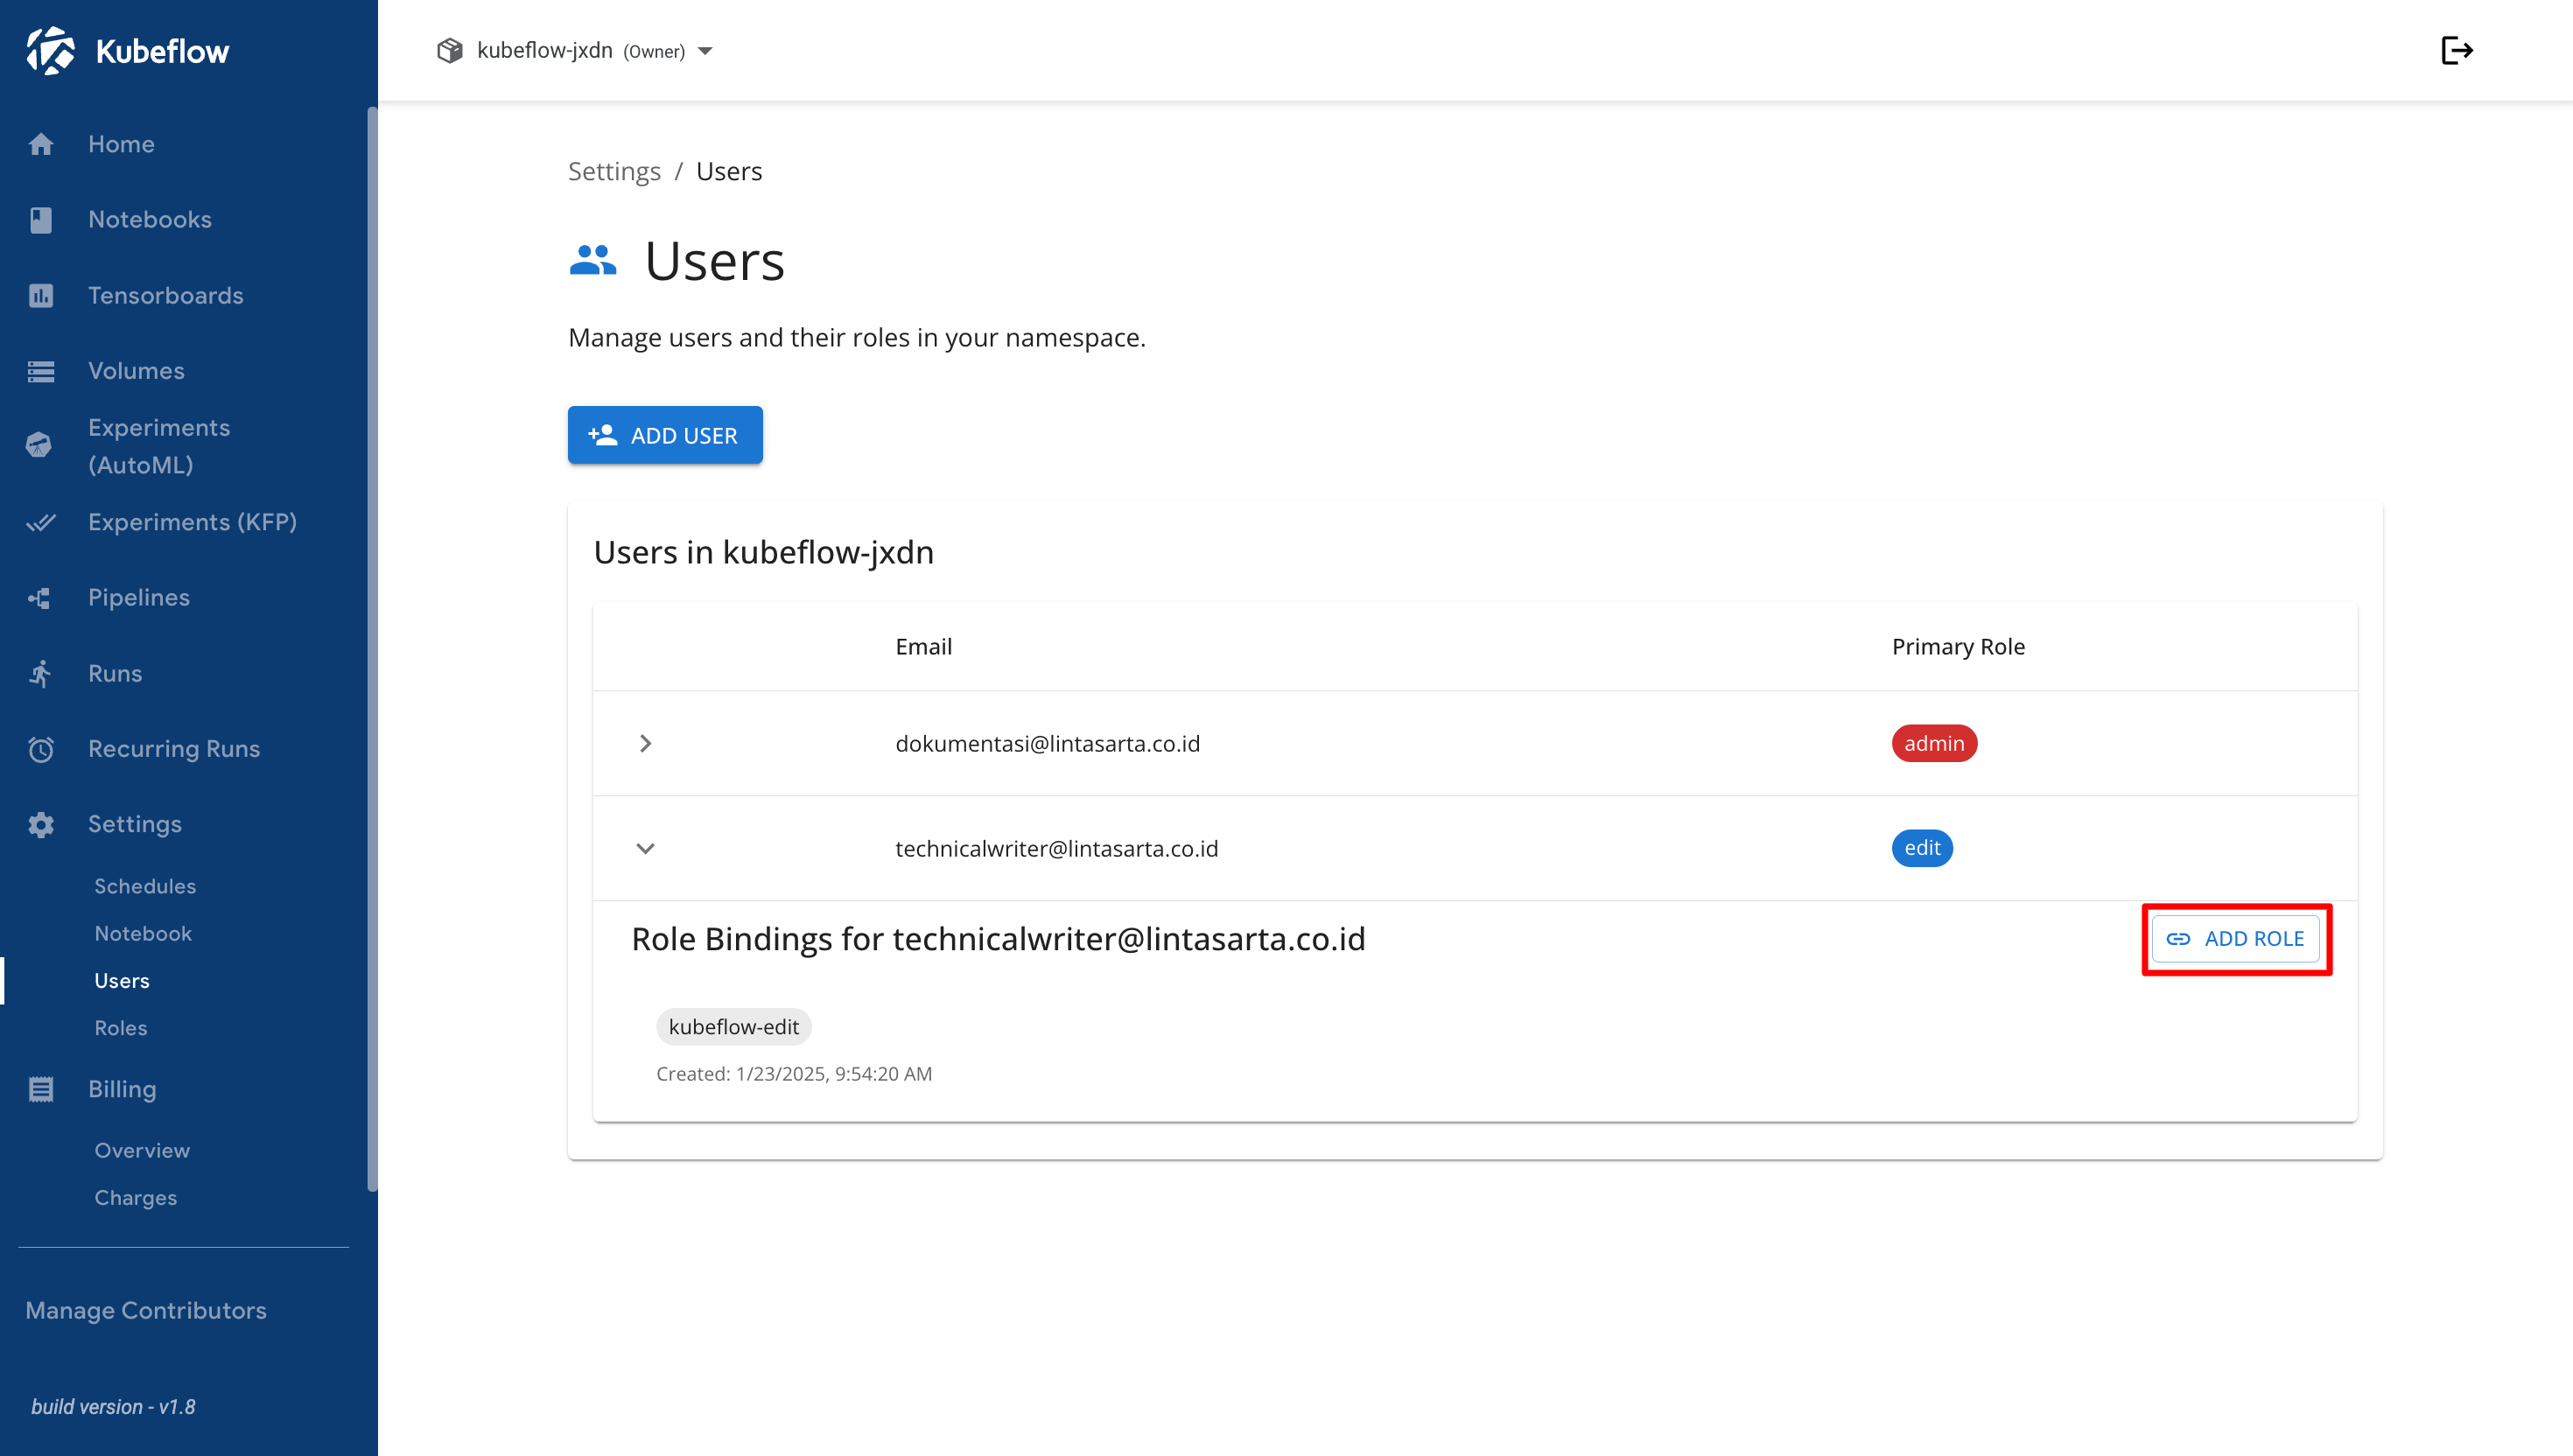
After the user account has been created, you can assign more specific roles to the user. On the **Users** page, locate the newly created user and click the dropdown arrow next to the user name to display additional details. Then, click the **Add Role** button.

<figure><img src="https://2882153758-files.gitbook.io/~/files/v0/b/gitbook-x-prod.appspot.com/o/spaces%2Fi9YWb69HFXLHYlXffReU%2Fuploads%2Fgit-blob-cedd46486e51369fdd90b85fe39a7839ccb72a18%2Fimage.png?alt=media" alt=""><figcaption></figcaption></figure>

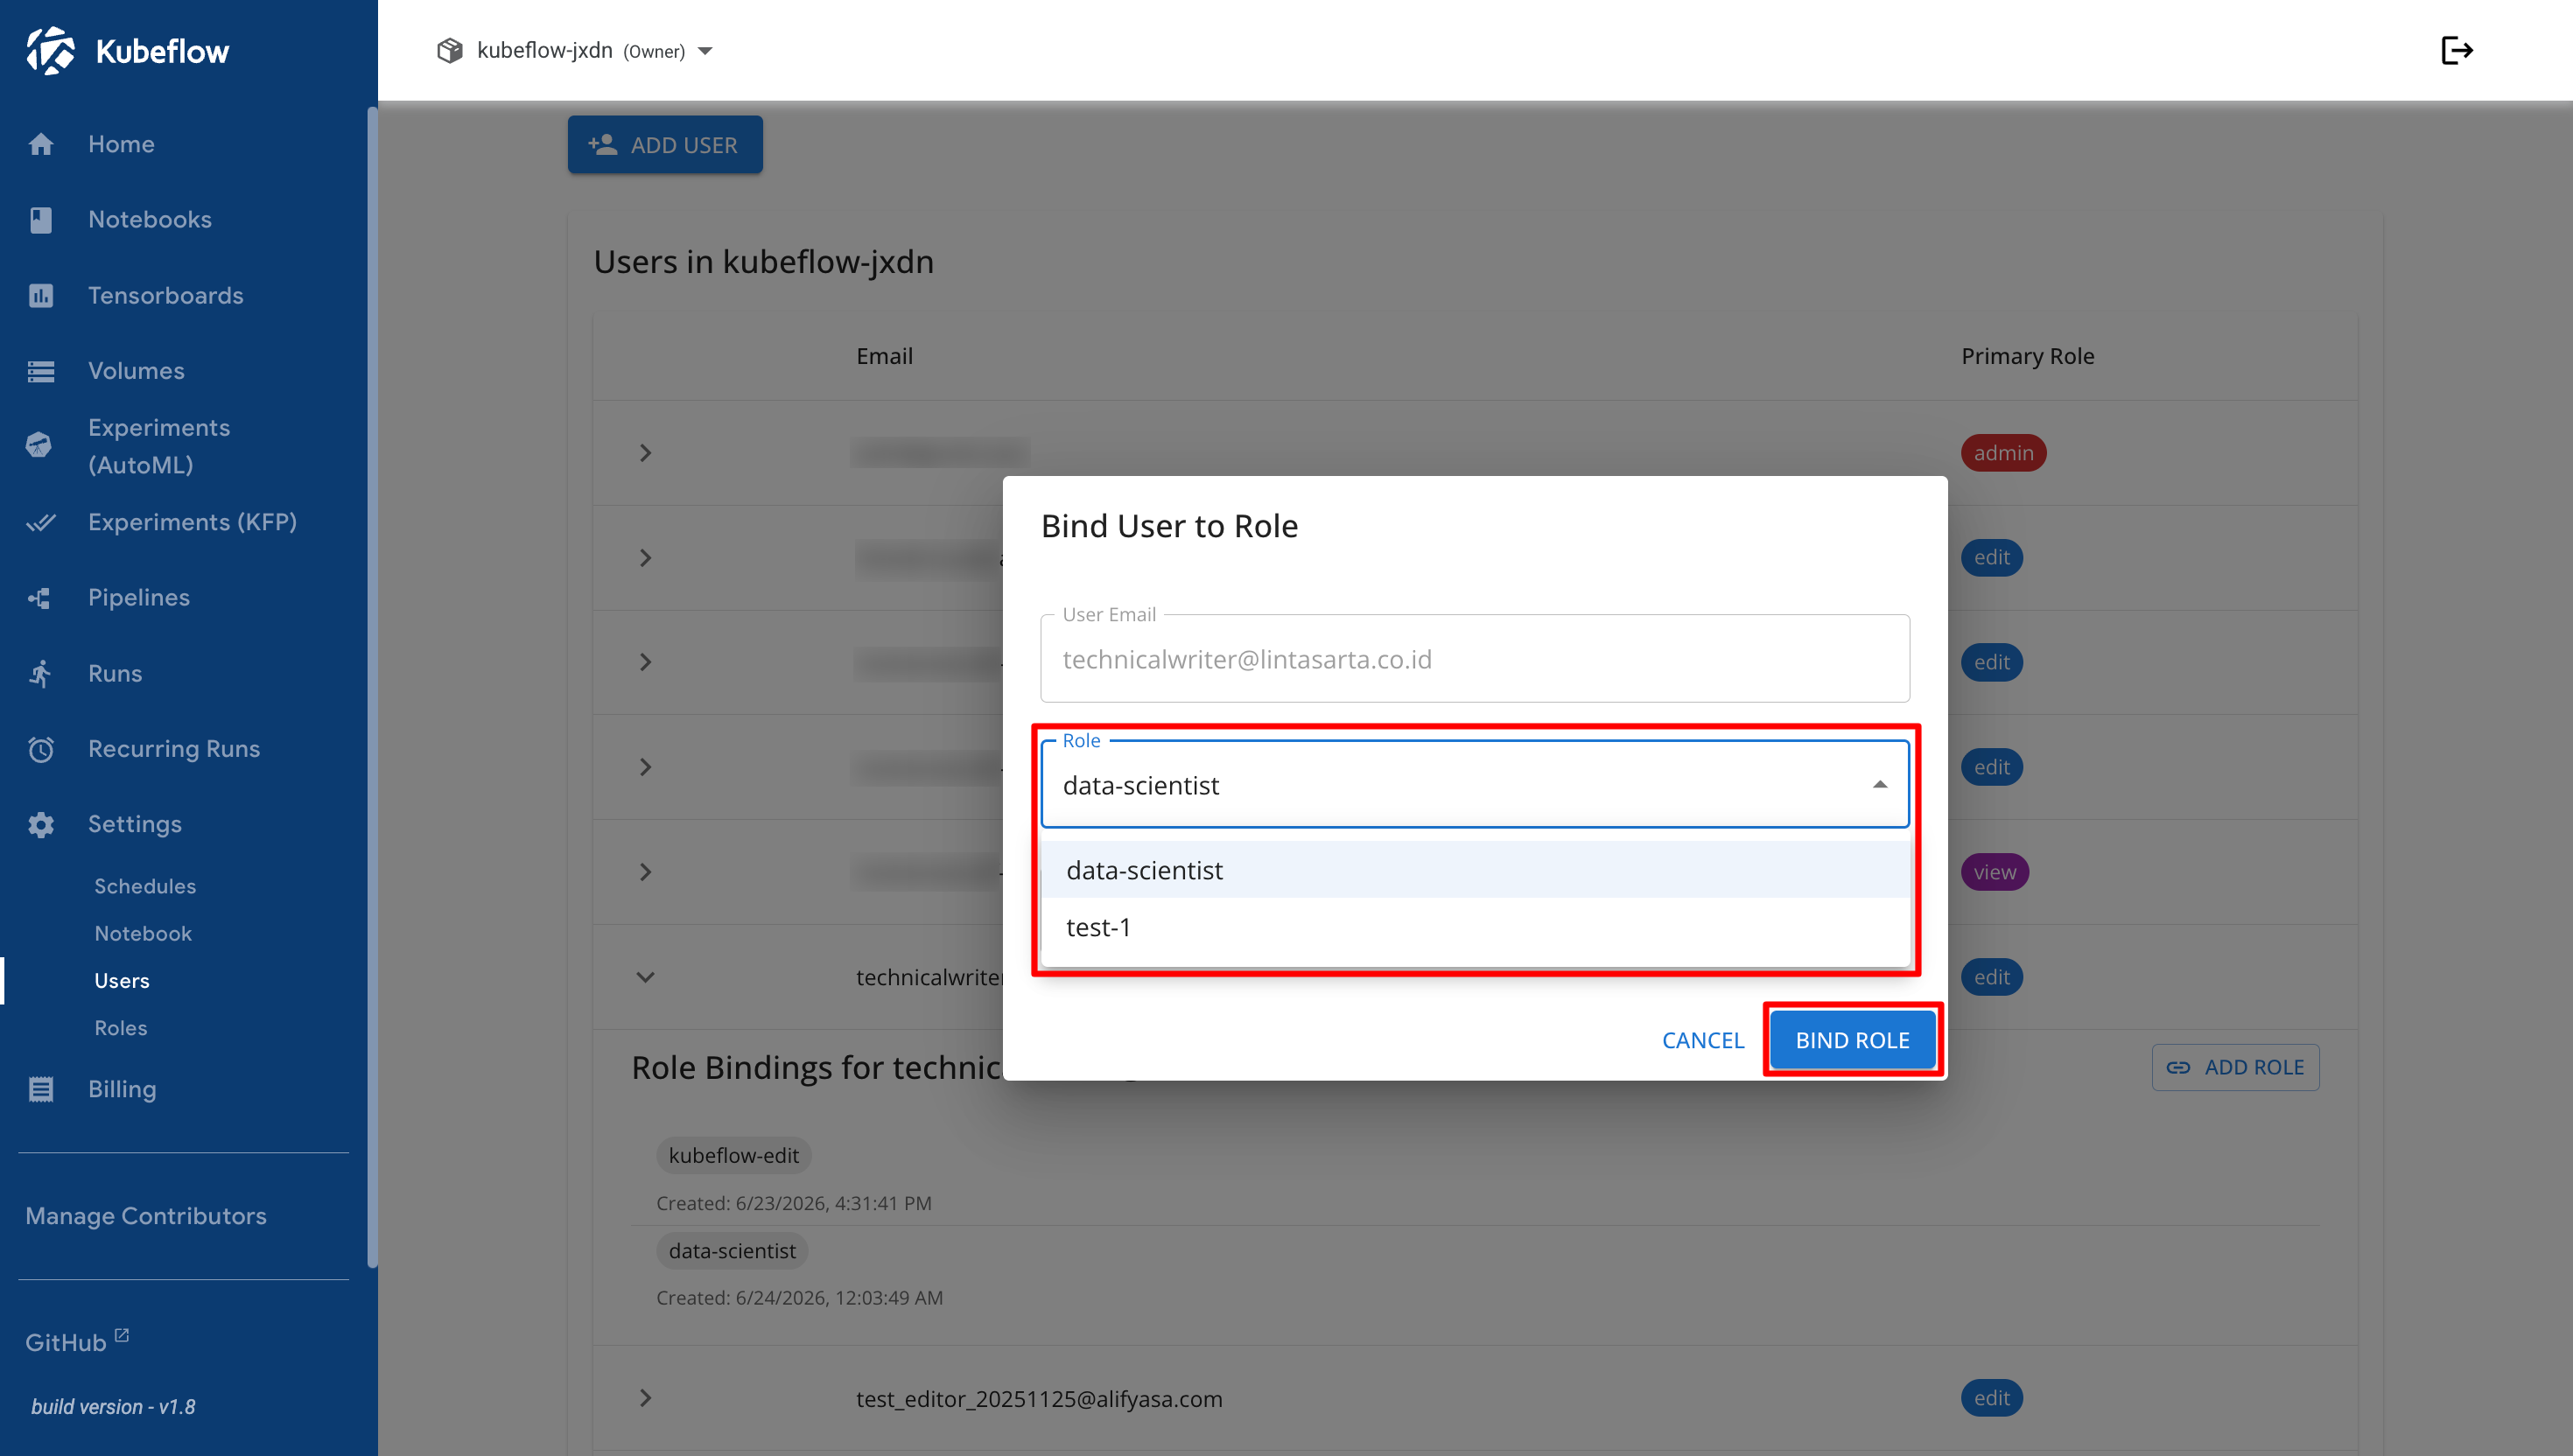
A dialog appears with the **User Email** and **Namespace** fields already populated. Select the desired role from the **Role** dropdown list, such as **Data Scientist**, and then click the **Bind Role** button. Additional roles can be created separately through the role creation process described in the [**Creating Roles**](/guideline-for-enterprise/cloudeka-service-portal/list-roles/create-roles.md) documentation.

<figure><img src="https://2882153758-files.gitbook.io/~/files/v0/b/gitbook-x-prod.appspot.com/o/spaces%2Fi9YWb69HFXLHYlXffReU%2Fuploads%2Fgit-blob-14dfb799c59d428c239bb1635b3ce32770057556%2Fimage.png?alt=media" alt=""><figcaption></figcaption></figure>

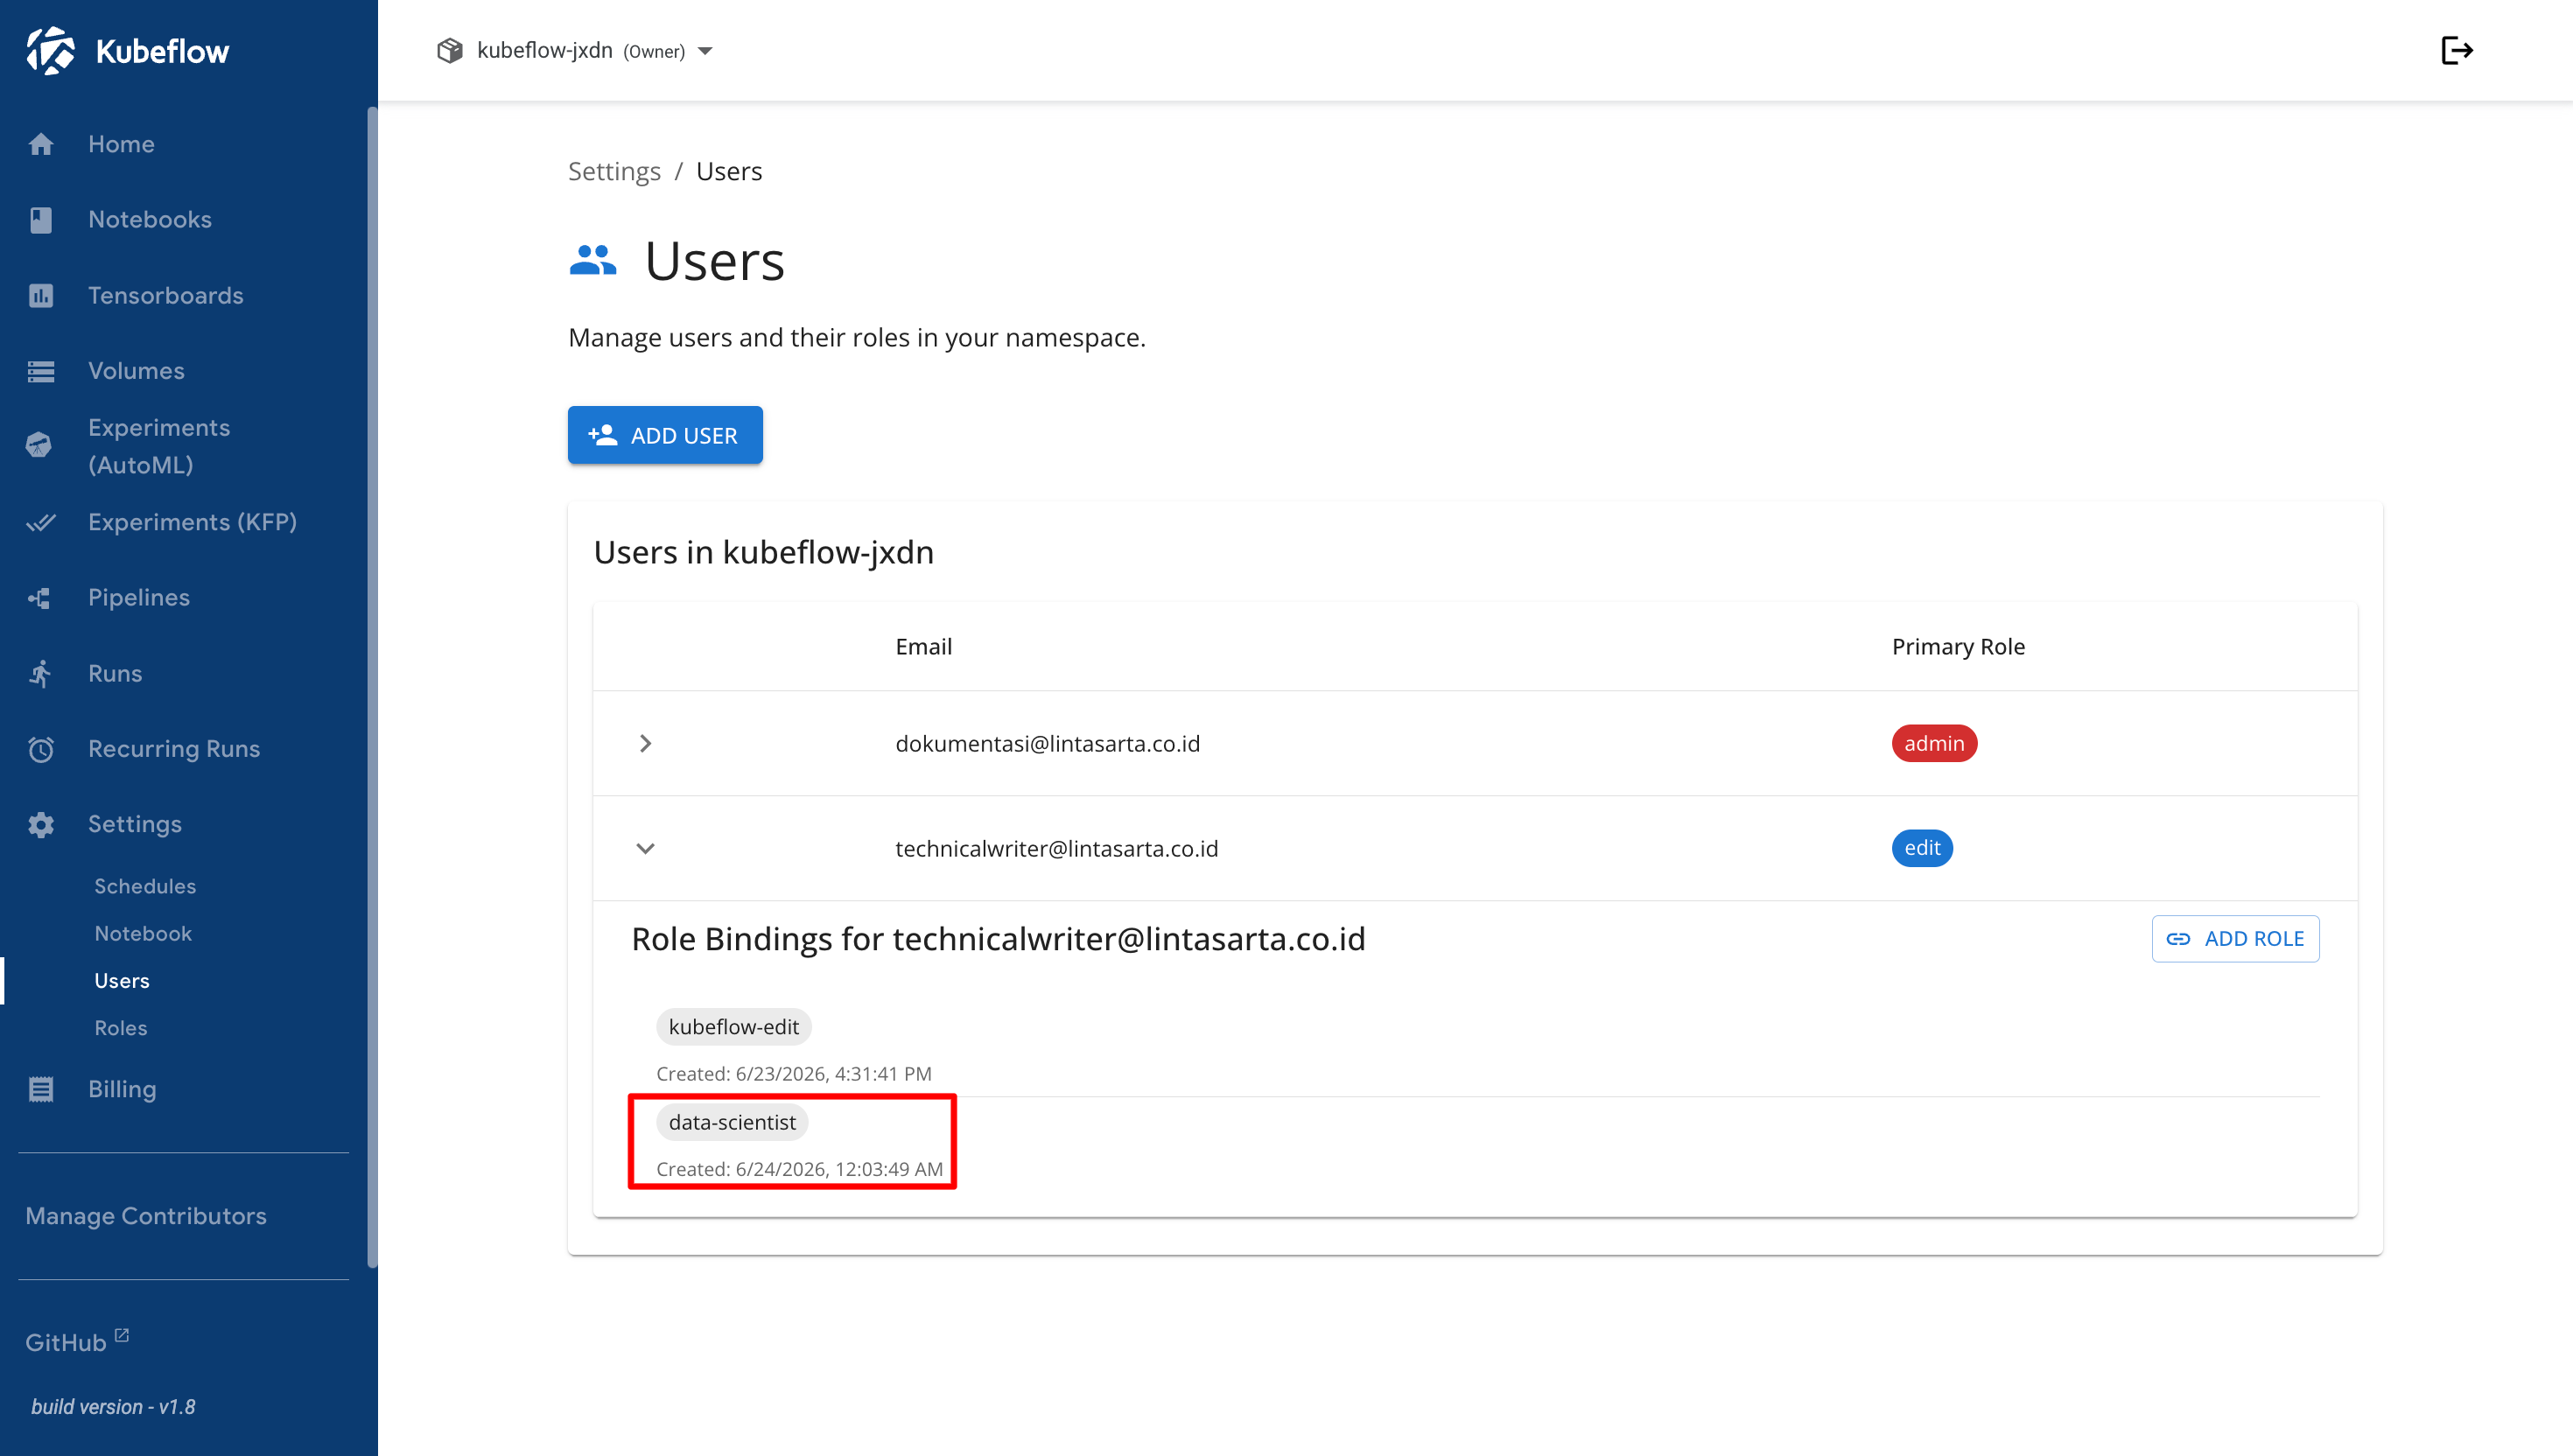
After the role is assigned successfully, the **Role Bindings for User** section is updated to display the newly assigned role along with the date and time when it was added, completing the user setup process.
<figure><img src="https://2882153758-files.gitbook.io/~/files/v0/b/gitbook-x-prod.appspot.com/o/spaces%2Fi9YWb69HFXLHYlXffReU%2Fuploads%2Fgit-blob-61b111cc7fb80889299e88e3436149f0a4435e83%2Fimage.png?alt=media" alt=""><figcaption></figcaption></figure>